
To Add a Border in Google Docs
- Click “Insert” > “Table” > 1×1 table.
- Resize the table to match the page dimensions.
- Customize the border’s details from “Table properties“.
- Add text within the table to create a colored border.
OR
- Click “Insert” > “Drawing” > “New“.
- Choose “Shape” and select “Rectangle“.
- Draw a rectangular border with custom properties.
- Add a text box within the border for text.
- Save and close the drawing to insert the border and text.
OR
- Click “Insert” > “Drawing” > “New“.
- Choose “Image” and search for a border image online.
- Select a border image and customize its size.
- Add a text box inside the image for text.
- Save and close the drawing to insert the border image and text.
OR
- Click within a paragraph where you want to add a border.
- Go to “Format” > “Paragraph styles” > “Borders and shading”.
- Select border positions (top, bottom, left, right) and customize width, style, color, background color, and text padding.
- Click “Apply” to add the border to the selected paragraph.
OR
- Create a new Google Docs document.
- Click “Insert” and add an image.
- Customize border colour, width, and style for the image.
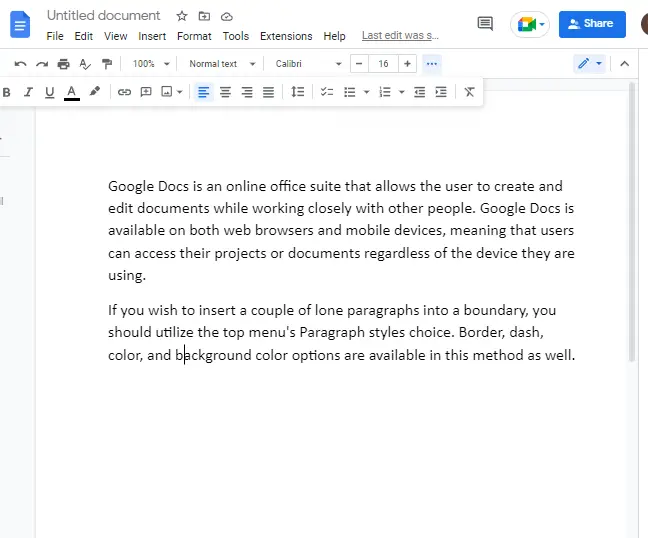
Google Docs is an online office suite that allows the user to create and edit documents while working closely with other people. Google Docs is available on both web browsers and mobile devices, meaning that users can access their projects or documents regardless of the device they are using. The application’s key features include real-time collaboration, a word processor, spreadsheets, presentations and forms that can be filled out by users in real time. Google Docs has received positive reviews from several industry experts. While it is similar to Microsoft Word in terms of features, it has proven to be more efficient than its rival tool in terms of pricing and ease of use.
Google Docs has been around for a while now and it has come a long way since its inception. It is currently Google’s flagship product as far as office applications are concerned, having come in place of its discontinued products, Google Spreadsheets and Google Presentations. While most users of Microsoft Office find Docs to be a handy alternative to MS Office, there are some features which are missing in the former compared to the latter. One such feature is adding borders to the page of your document within Google Docs – something which is quite prevalent in Word documents (at least until recently).
What are Borders in Google Docs?
Borders are lines that encompass the entire text of your document or sections, making the design of your book stand out from the rest.
When you create a document in Google Docs, you can set borders around a text box, paragraph, or the entire document. You can choose from different colors and styles of borders to make your documents easier to read.
Borders render information more structured or add emphasis toward a part of the document. Borders may also add a tiny bit of visual interest to upgrade a plain text box.
They are a great way to add some extra flair to your work and make it look more professional and polished. They can be used to separate sections of text and add a sense of order and structure to your work, but they’re also handy for adding emphasis.
No matter what you’re going to press into the paper, having all the information organized will make it much easier to work with. Borders adapt the document’s information to look more lively or serious based on your preference.
How to Add a Border in Google Docs
Google Docs does not have a built-in function to add a page border, but there are a few workarounds to this dilemma. You can create borders in documents in a variety of ways. You can create a table with one row and one column, draw the border manually, or import an image from the internet. These methods are very simple and only take a couple of minutes to complete. It can be simpler to just enclose a single paragraph in borders if you are going to go with a single sentence.
Be sure to look over the Template gallery before choosing a new blank document, so that you can be sure to find something suitable if you need it.
How to Create a Border in Google Docs using 1×1 Table
Google Docs, which does not consider page borders, gives you the ability to include tables and incorporate them into your document any way that you like. We can use this to our benefit for adding page borders. This is, in general, the most used way to create page borders in documents on Google Docs. All it takes is a couple of minutes, and it doesn’t take longer.
The easiest way to produce a border in Google Docs is to add one table to the worksheet and then copy the data into the cell. After the table is prepared, the users can easily change its dimensions and spacing to fit their associated formatting requirements. Options for table borders such as the color, dash, and so on can be edited further.
When attempting to place a border design as a table page, select a row and a single column, so that there is not something that interrupts the design.
Follow these steps to add a border in google docs using 1×1 table method,
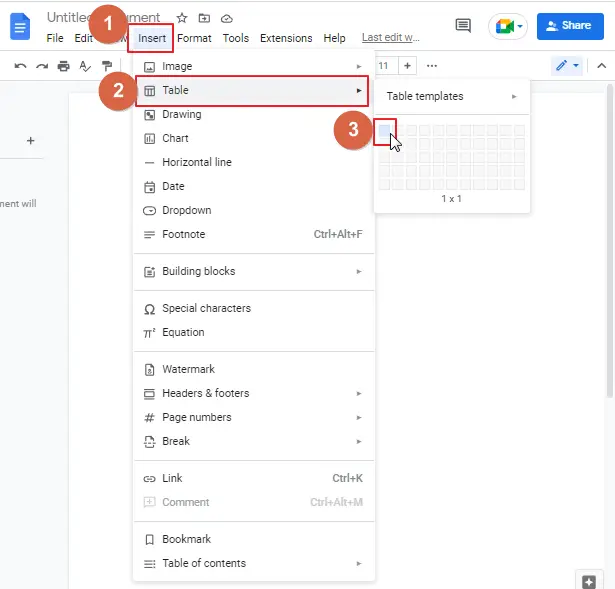
Step 1: open a blank document/ new document in google docs.
Step 2: click on the inset in the men bar. A dropdown menu will appear. click on the table from the list. Select 1×1 table size to create the table in the docs.
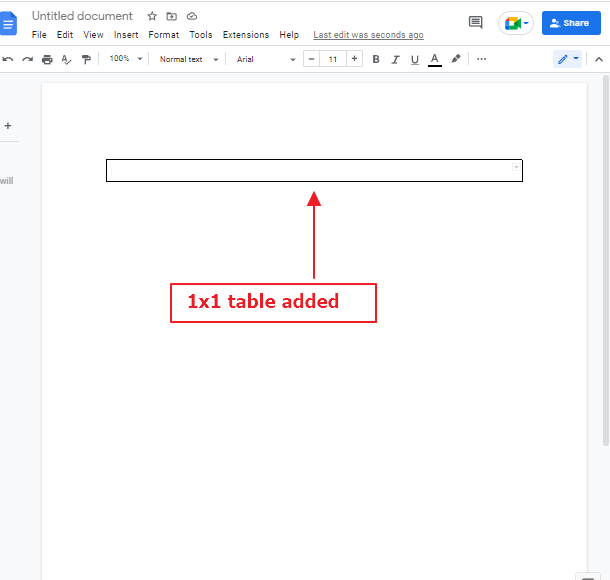
Step 3: as soon as you select 1×1 table, the table will be added to your google docs.
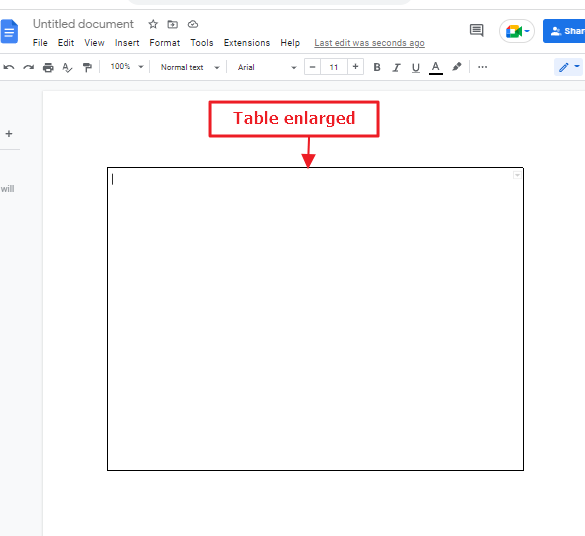
Step 4: All you have to do is resize it to match the page dimensions. To scale or resize the table, hover your mouse cursor over any of the table edges that are accessible. At this point, the mouse cursor will tun its shape. It will look like a pointer with arrows in both sides and two horizontal lines in the middle.
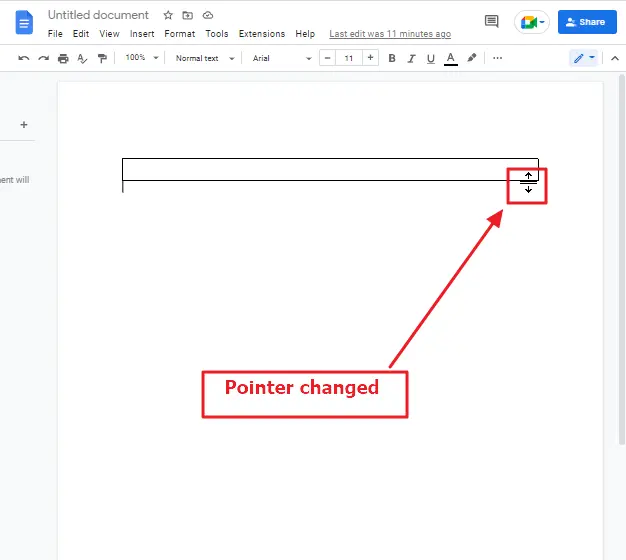
Press left click and drag the table to a size that matches your needs.
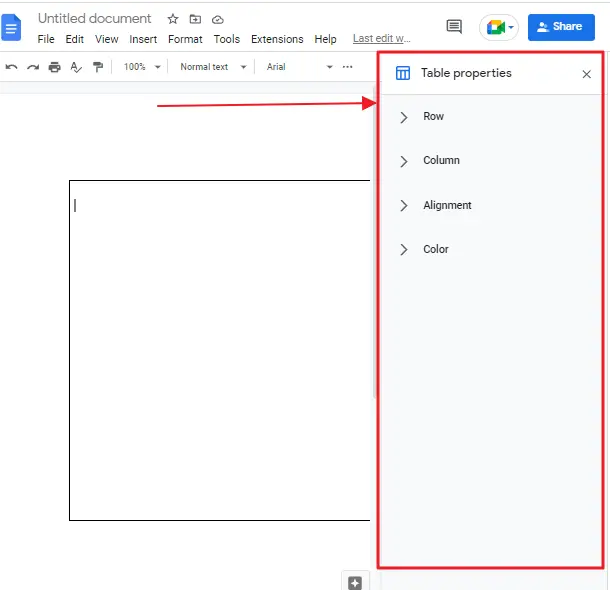
Step 5: At this point, you can customize your border. You can customize border color, bored dash, border width. To customize your border, click on insert in the menu bar. A dropdown menu will appear. click on the table. Click on Table properties.
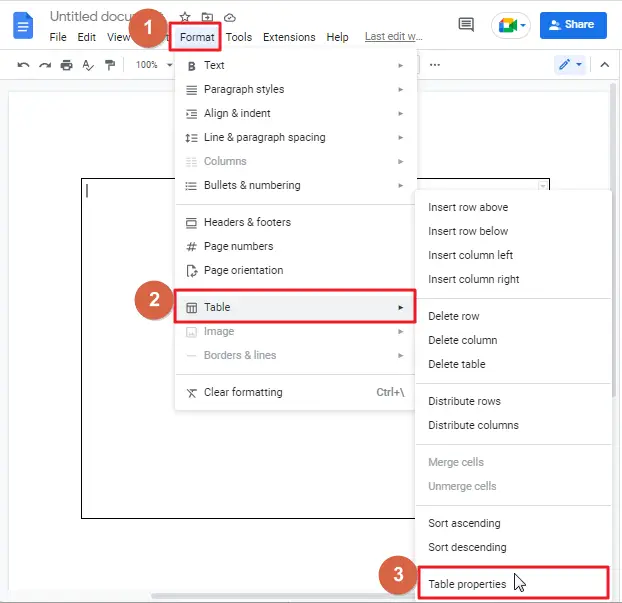
This will enable a pane on the right side of your screen. here you can modify the border using different modification options.
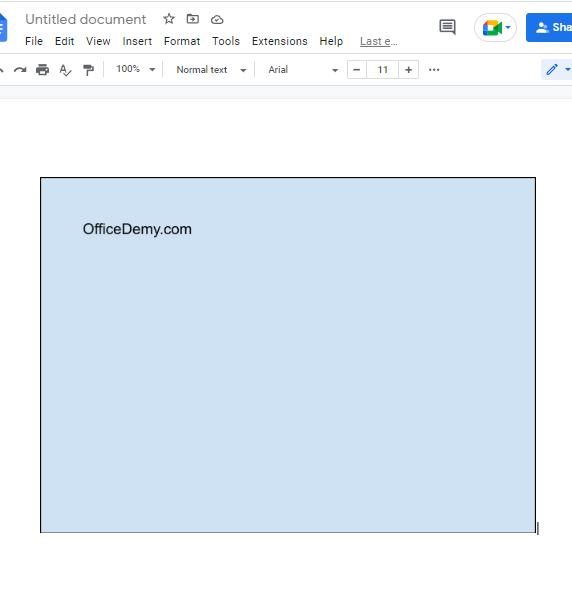
You can add text to the table and type as usual. Thus, you may add a color border to this web-based program’s text even though it lacks such capabilities.
That’s it. You are done.
BONUS TIP
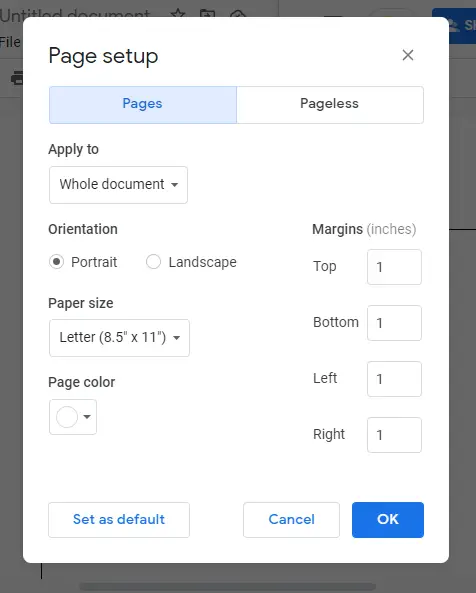
As an option, you can decrease the page margins so that the borders of each page are closer to the edge of the page. Click “File” at the top of the screen, then click “Page setup.”
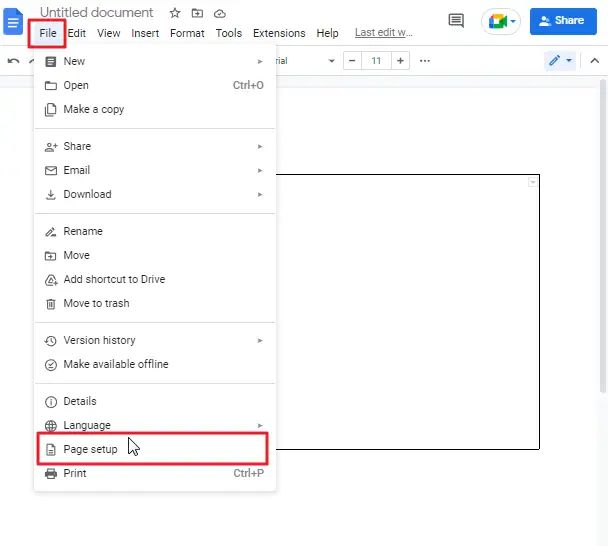
A new will opens on your screen. Next, decrease the top, bottom, left, and right margins to the desired level.
How to Make a Border in Google Docs using Drawing Tool
The drawing tool is an alternative for creating page borders in Google Docs. This enables us to utilize this tool to draw clear line boundaries that we can easily render as page borders. We generally suggest using this method, especially if you have attachments like images and photographs that you want to have on the page. Otherwise, a text box will get the job done.
To make use of drawing tools for designing page borders, you will have to proceed with the following steps.
Step 1: Go to the page in Google Docs where you want to insert your page border.
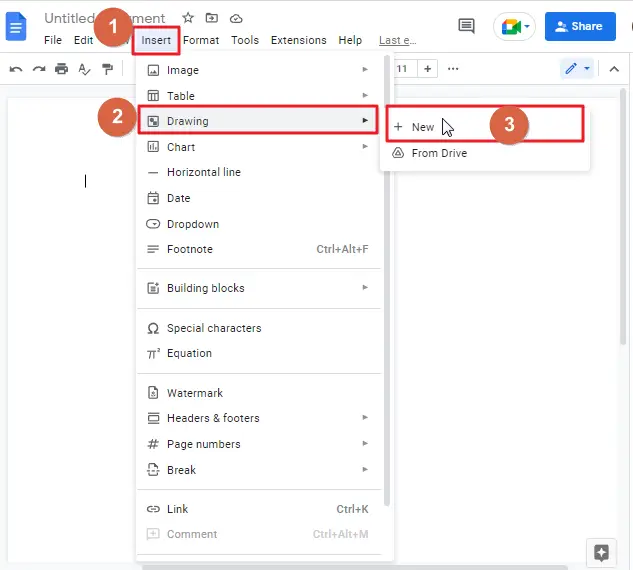
Step 2: Click on insert in the menu bar at the top of your screen. a dropdown menu will appear. click on Drawing. Click on New.
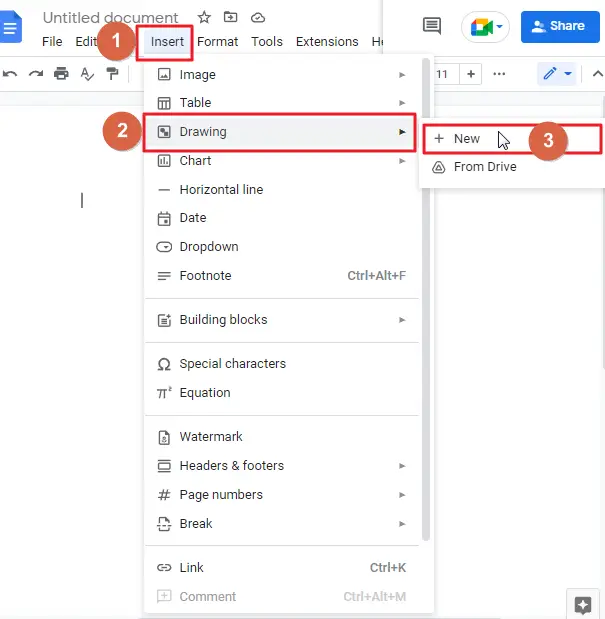
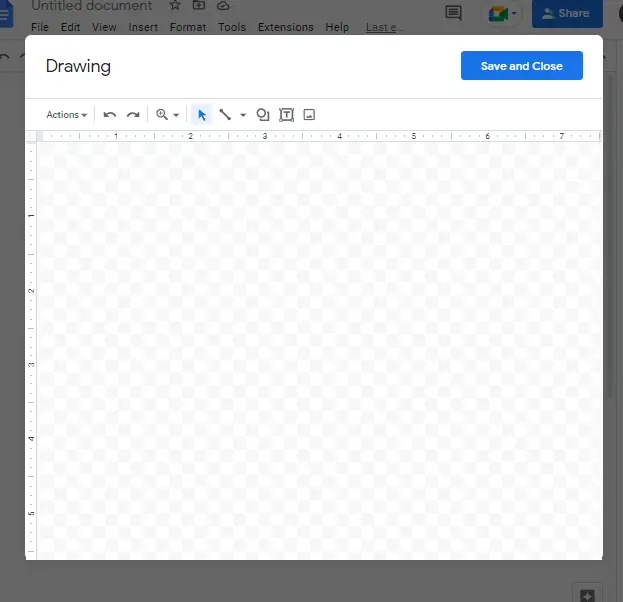
This will open up a new window on your screen where you can draw. This feature will be used to generate a new page border.
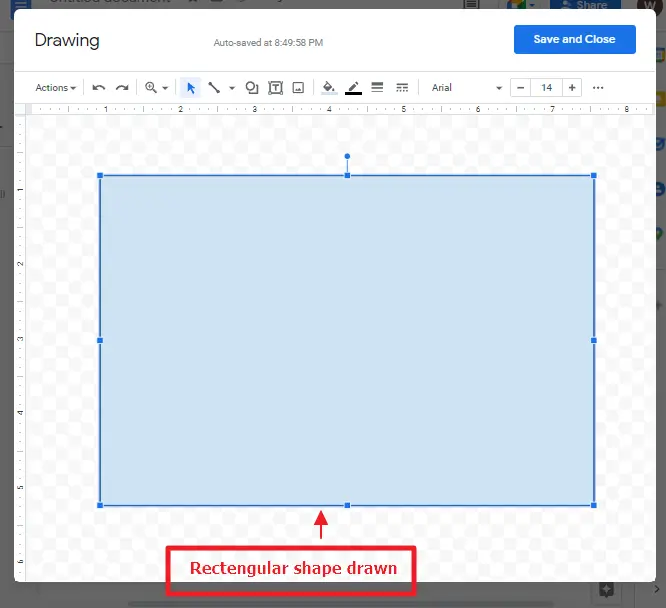
Step 3: click on the Shape in the menu bar at the top of your screen. a dropdown menu will appear. click on shape. Here another dropdown menu will appear where from you can choose a shape. select rectangular shape from the list.
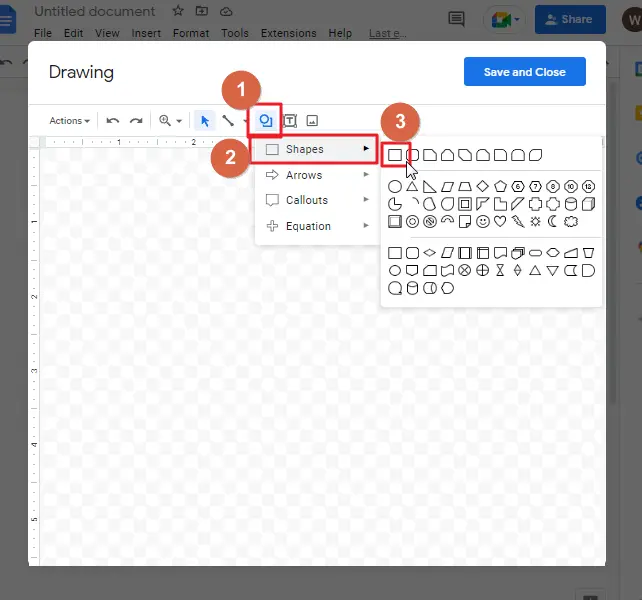
Step 4: Now draw on the drawing window. Draw the rectangular shape on the drawing page. Don’t think about the dimension. You can alter it later on.
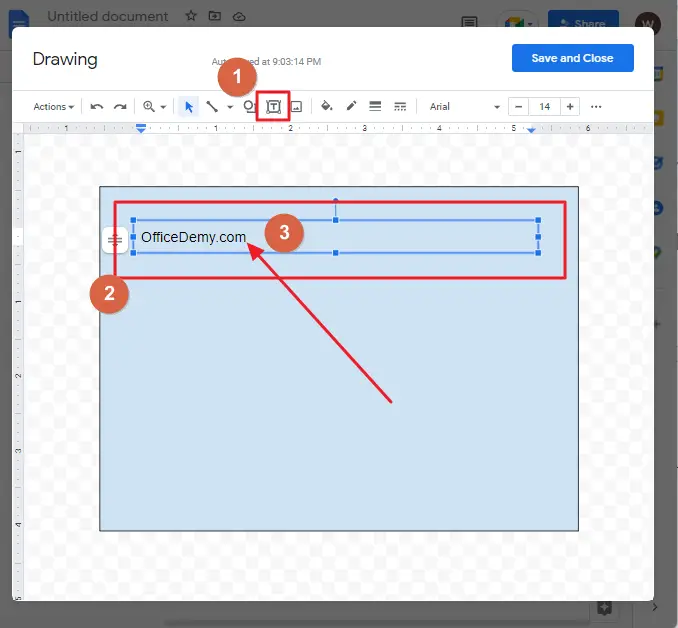
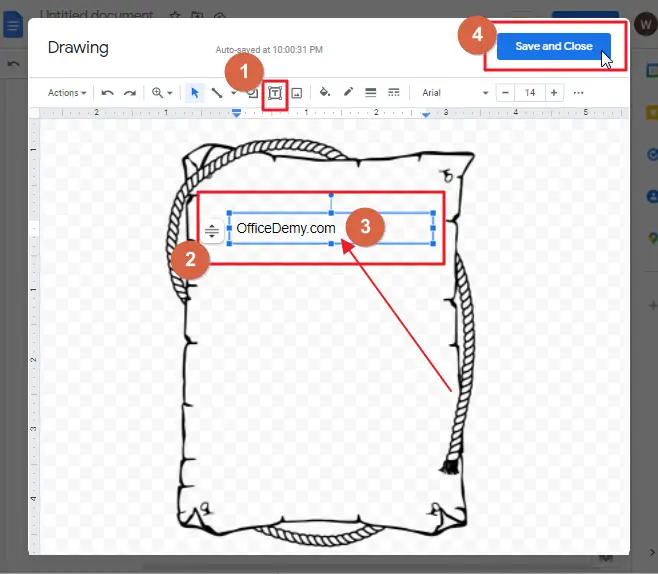
Step 5: click on the text box option in the menu bar. Draw a text box inside the borders and add your desired text inside the border.
Step 6: Click on Save and close at the top right corner of your screen.
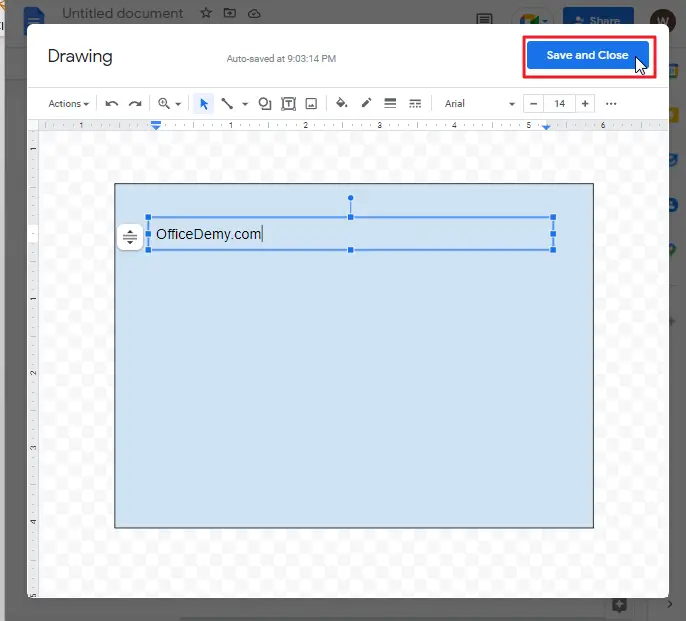
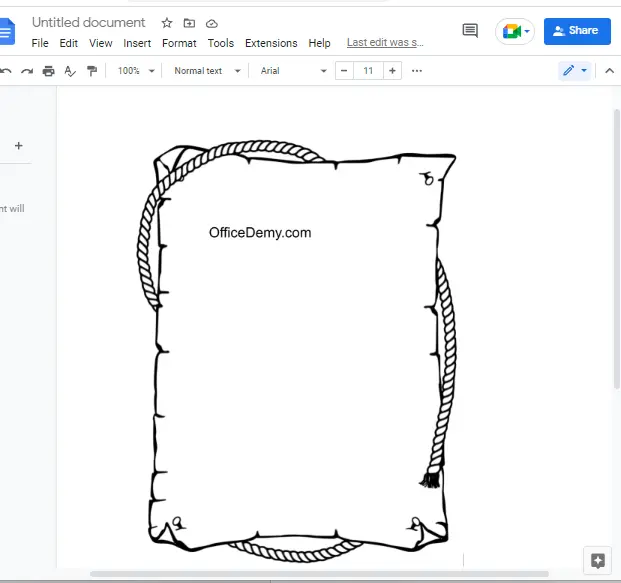
Border drawing and text will be automatically added to your document.
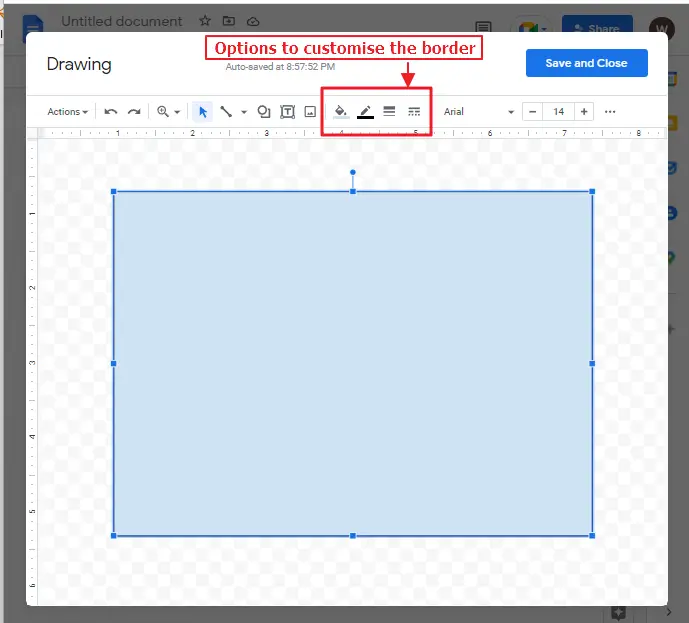
Step 7: Have you noticed that the background of that rectangle is blue? You can change this easily too. Click on the rectangle so that the edit option will appear on your screen.
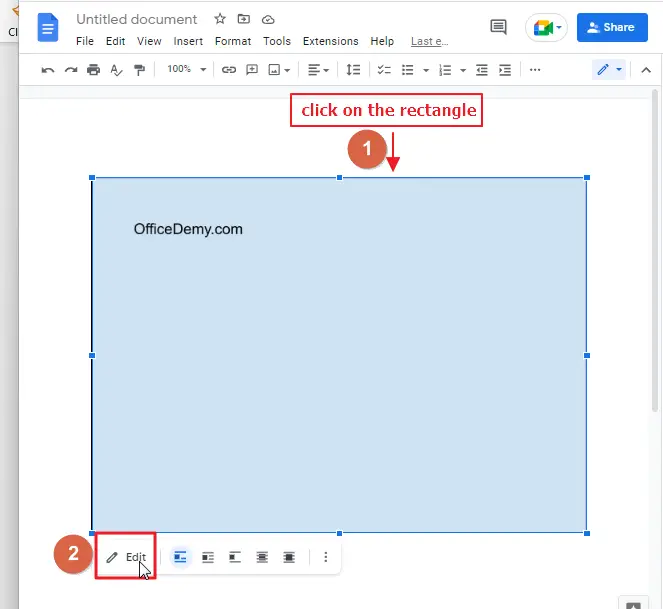
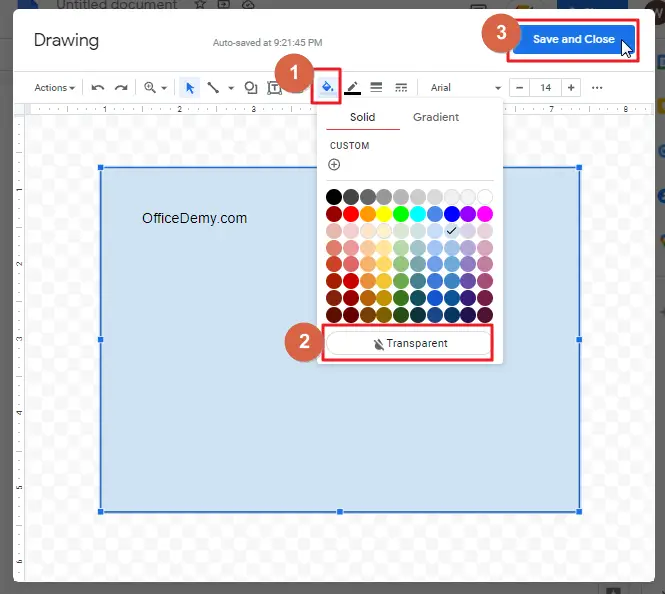
Step 8: Click on edit. Click on fill color. A list of colors will appear on your screen. click on transparent. Click on Save and close to save the changes.
You will have a clear background afterwards.

That’s it. You are done.

How to Create a Border in Google Docs using Image Border Option
If a simple rectangular border isn’t to your liking, you may instead upload a fancy border picture from the world wide web to your article. Like the previous technique, to enclose text or images into the body, you will require putting in a text box in the body.
As a secondary technique, we recommend this process only if we do not get the desired results with the previous methods. The benefit of using this method is that it allows you to add any border pattern.
To insert a page border image in Google Docs, follow these steps,
Step 1: Go to the page in Google Docs where you want to insert your page border.
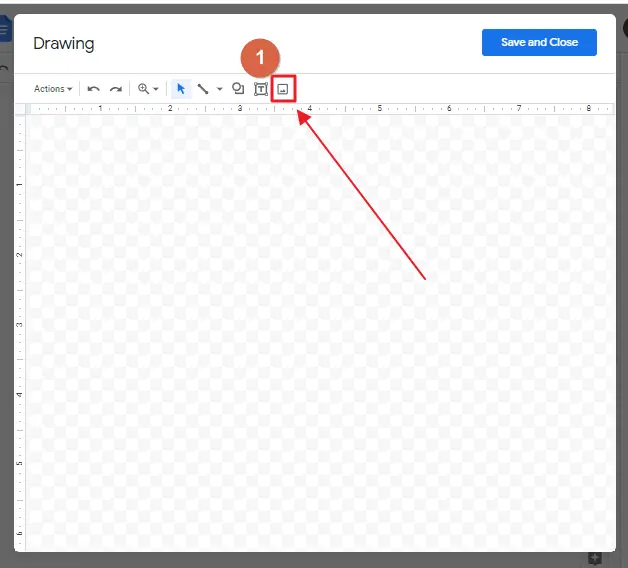
Step 2: Click on insert in the menu bar at the top of your screen. a dropdown menu will appear. click on Drawing. Click on New.
This will open up a new window on your screen where you can draw. This feature will be used to generate a new page border.
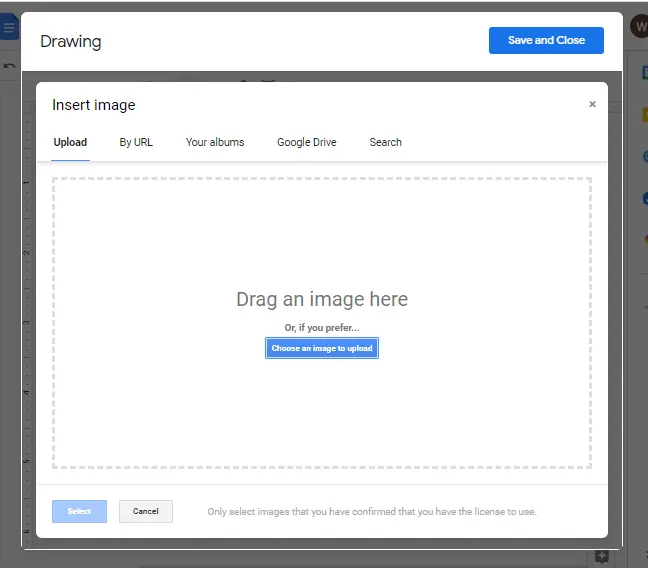
Step 3: click on the image at the top of your screen.
A new browsing window will be opened for inputting pictures. Here you can either upload the picture from your computer or locate a picture on the internet.
Step 4: click on the search and look for Border. Several designs will appear on your screen. choose one according to your preference. Click on Select.
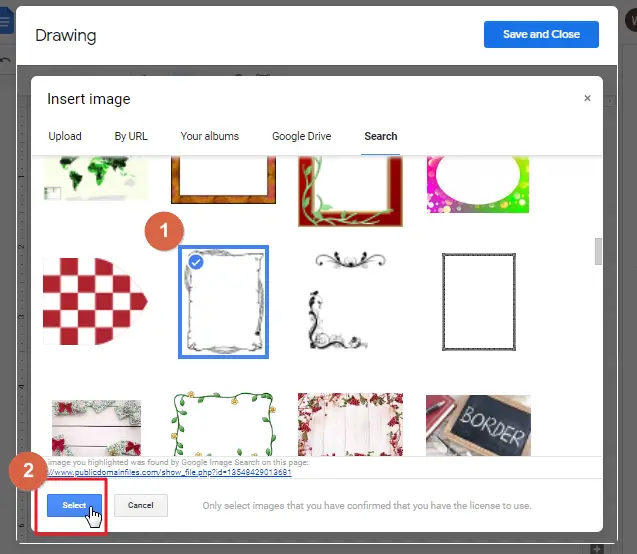
Your border image will be inserted in the drawing page.
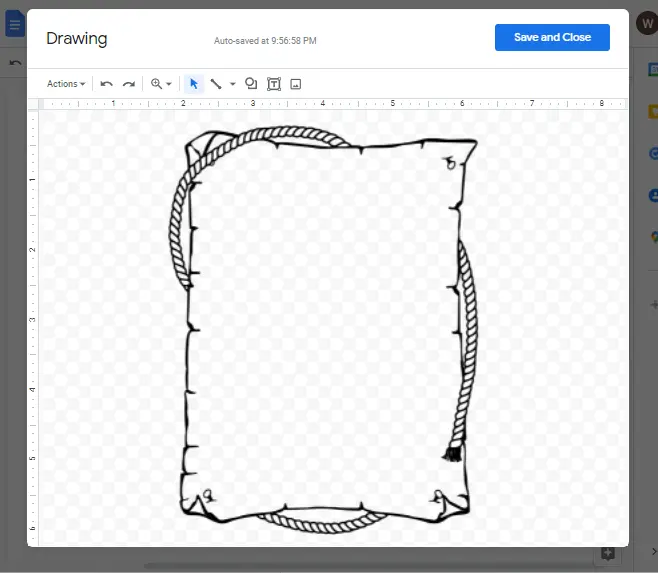
Step 5: Click on the text box in the menu bar. Place the text box inside the border image. type whatever you want. Click on Save and close at the end.
Your border image as well as text inside it will be inserted in the google docs page.
That’s it. You are done.
How to Create a Border in Google Docs using Paragraph Styles Option
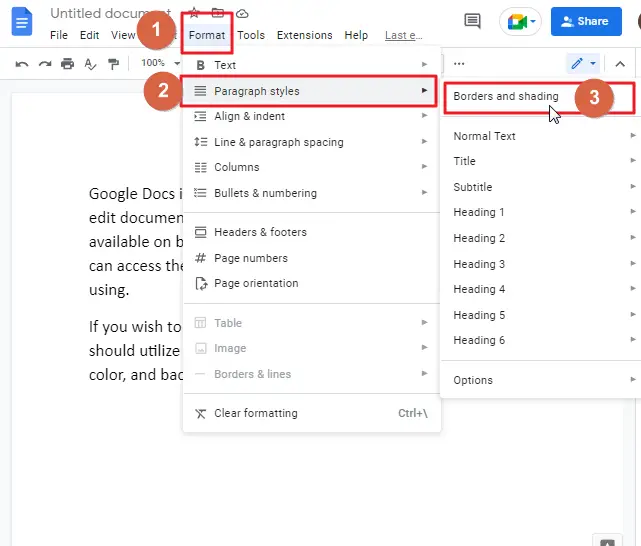
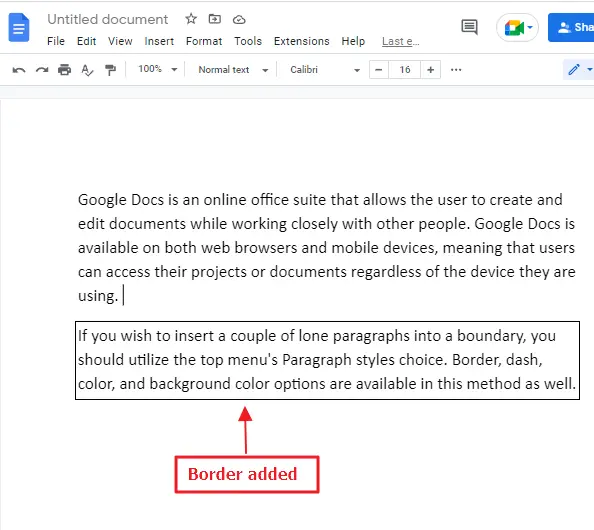
If you wish to insert a couple of lone paragraphs into a boundary, you should utilize the top menu’s Paragraph styles choice. Border, dash, color, and background color options are available in this method as well.
Follow these instructions to make a border around a particular paragraph,
Step 1: Go to the page in Google Docs where you want to insert your paragraph border.
Step 2: click on the paragraph on which you would like to add a border.
Step 3: click on the Format in the menu bar. A dropdown menu will appear. select paragraph styles from the list. Click on borders and shading.
Borders and shading windows will appear on your screen.
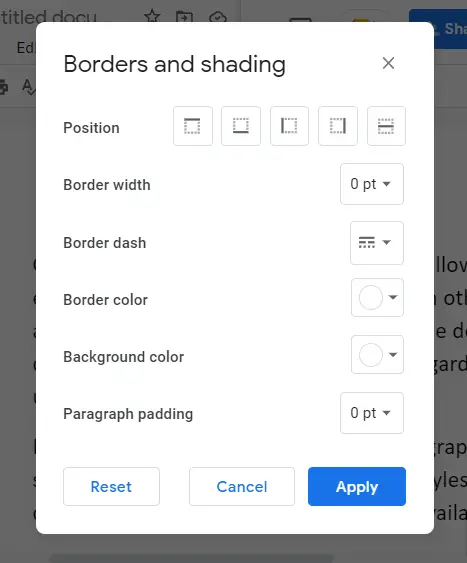
Step 4: in the new window, you will find the border position at the top. Select your border positions according to your need. In most cases, you need to select the top, bottom, left and right border in order to make a rectangular border.
As soon as you select these options, this will turn the option boxes blue. Click on Apply when done.
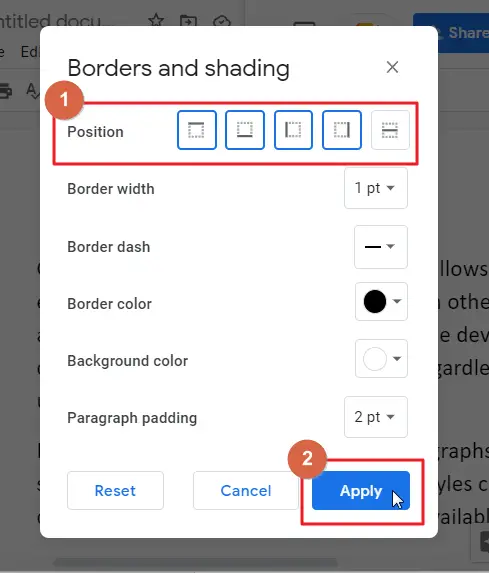
Border will be inserted into your paragraph.
Bonus Tip
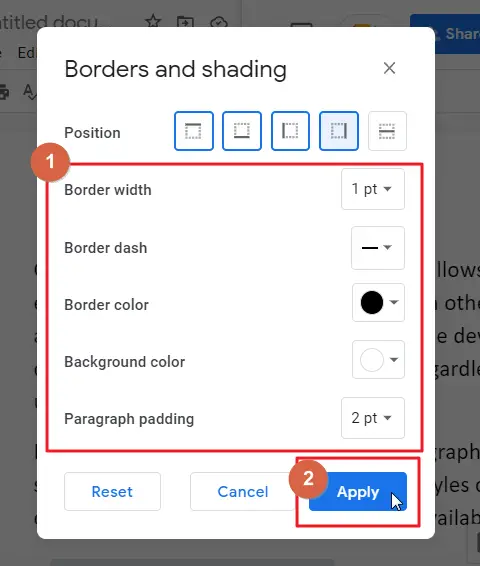
- Increase border width setting to your preferences. The higher the number, the thicker your border will be.
- Choose the border symbol that you want, from solid to dashes to dots.
- You may choose your own color as the default external border color.
- You can change background color and text padding.
- Click to apply when you are done to save the changes.
How to Add a Border Around an Image in Google Docs
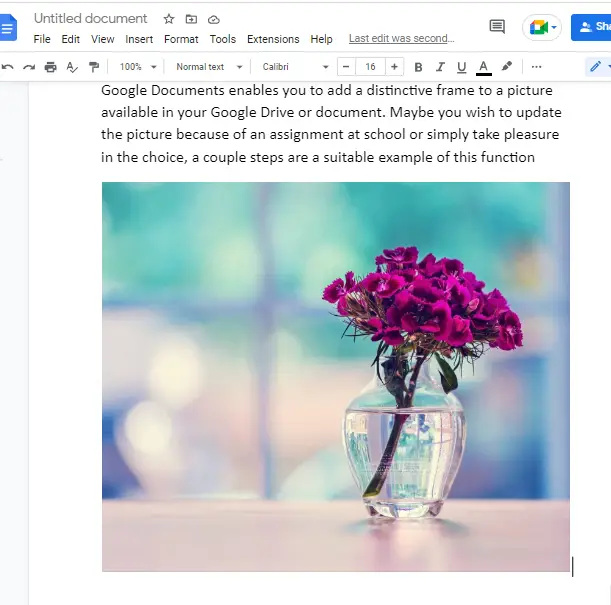
Google Documents enables you to add a distinctive frame to a picture available in your Google Drive or document. Maybe you wish to update the picture because of an assignment at school or simply take pleasure in the choice, a couple steps are a suitable example of this function.
Step 1: Create a new document in Google Docs.
Step 2: click on insert in the menu bar. A drop-down menu will appear. choose an option to upload an image according to the location of that image.
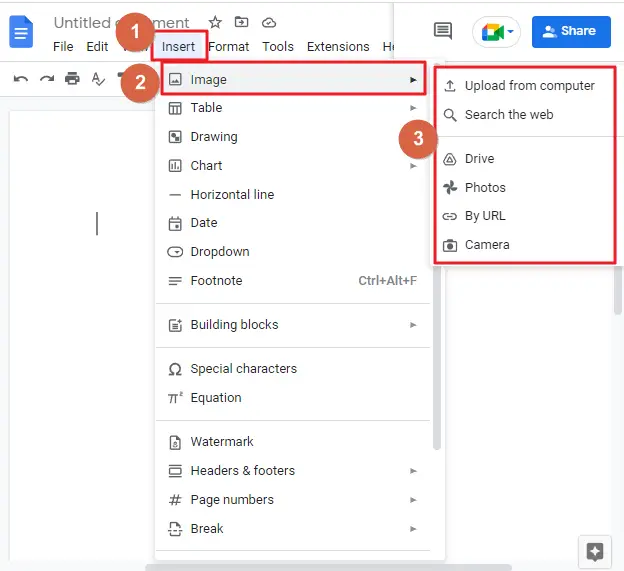
I have uploaded an image from my computer.
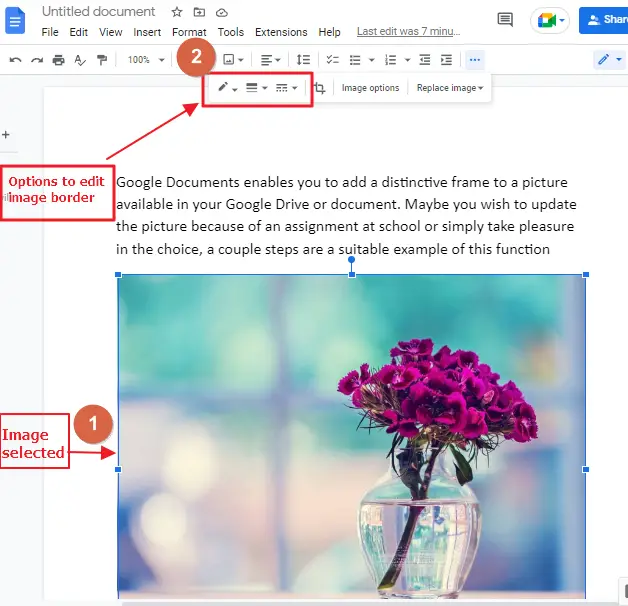
Step 3: now, click on the image to enable border color, border width, border dash icon in the menu bar. Select these icons one by one and apply the necessary changes to your image.
Border color icon will let you change the border color of your image. Border width icon will let you change the border width. Border dash icon will let you change the border style.
Video Tutorial: Add Border in Google Docs
FAQs to help you organize your work
Why are borders important in google docs?
Borders give an added benefit to your document by giving it a cleaner and more sophisticated look. Borders allotted to the text can also be used to draw the reader’s attention to a specific location in the text or a graphic. Borders also appear in many corporate documents, resumes, and many other types of documents. Google Docs doesn’t have any native options to add or edit the border. Certainly, you can download a copy of your document and add a border.
Can I use fancy images as a border?
Yes, by selecting the insert drawing method. You have the ability to find an image to use as a border, then save the photo either on your system, or on Google Drive. The disadvantage to this method is that you have to add the text to the image manually.
Can you add borders above the text once it has been typed?
You can only add a border using the paragraph method. Using an image, or a table will result in text wrapping around this image. You can either get the text into the table or the picture by cutting and pasting it.
Can I use my own border template?
yes, only as an Image, there are no available ways to obtain additional formats on the paragraph or table method. The only way to produce your own borders is following Inserting Drawing instructions.
Can you modify individual strips of a border?
Paragraph border mode can let you pick and choose which lines are displayed. In table border mode, you can specify either column width, or row height. The arrow in the upper-right corner of the table indicates the visible rows.
How can you insert a page border in Google Documents?
To add the table of Google docs, you can select the insert tab followed by the table. Increase the size of the box according to you need.
How can you apply a color border to a Google Doc?
You can use the drawing tool pivotal to the addition of the color border to your document. You just need to add the header and footer and then insert a color border in the drawing tool, and then insert that color outline into the document.
How to attach a decorative border to Google Docs?
Click the Insert tab, then open the drawing tool. Attach a decorative border in Google Docs by drawing with the tool.
How to add a border to the image in Google docs?
Paste your image into Google Docs, then copy the image and open the drawing tool. Choose the border feature that’s available in the drawing tool, then add the border to your work.
Conclusion
In this article, we have discussed the most effective methods for adding page borders in Google Docs. We also discussed how to customize them and what types of formatting options are available at your disposal. Now it is up to you to decide which method suits your needs and preferences. The methods we have discussed will not be able to provide all possible formatting options but they do provide a good range of choices that can be used in different scenarios. We recommend trying each way for at least one time and then deciding which one works best for you.
At first glance, this may seem like a simple task but there are a lot of different things to consider when doing so. For example, it is important to choose the right type of border according to your document’s content and audience. Moreover, you will have plenty of options available for customizing the look of these borders as well. However, keep in mind that these methods are not very detailed and do not allow much customization overall.
So, there you have it, how to add a border to Google Docs. We hope that this article has given you some insight into how these borders are added, and what their different uses are.
If you have any questions, please leave them in the comments below!


