
To Add Read Receipt in Outlook
For a single Email:
- Compose Email.
- Access Options.
- Enable Receipts.
- Select Receipts.
- Send Email.
For all Emails:
- Access Outlook Settings.
- Choose Mail Settings.
- Enable Receipts.
- Delivery Receipt.
- Read Receipt Save Changes.
Hi. Welcome to our Microsoft Outlook series of tutorials. Today, we will learn how to add read receipt in Outlook. Well, in today’s fast-paced digital age, email has become an integral part of our lives, and it’s essential to know if the recipient has read our emails or not. Adding a read receipt feature in Outlook can help us to confirm if the recipient has opened our email or not.
In this article, we will discuss how to add read receipt in Outlook, which can help you keep track of your emails and ensure that you receive notifications when the recipient views your messages. So, if you are curious to learn how to add a read receipt in Outlook, keep reading to find out more.
Importance of Adding Read Receipt in Outlook
Adding a read receipt in Outlook has several advantages. Firstly, it allows you to track the status of your emails. With the read receipt feature, you can confirm if the recipient has opened your email, which is especially useful for important messages that require urgent attention. It also helps you to keep track of whether or not you need to follow up with the recipient. Additionally, the read receipt feature can help you to determine if the email was delivered successfully. If the recipient’s email server is down or if the email address is incorrect, you will receive a notification that the email was not delivered.
The read receipt feature in Outlook can improve communication between you and your colleagues or clients. Knowing when an email has been read can help you to gauge the recipient’s level of interest and prioritize your follow-up actions accordingly. It can also help you to avoid miscommunications and misunderstandings by ensuring that the recipient has received and read your message. Overall, learning how to add read receipt in Outlook can save you time and improve the effectiveness of your email communication.
How to Add Read Receipt in Outlook?
The methods are going to learn are not fool-proof, I will show you how. I will teach you some methods step by step to add read recipient in Outlook, there is more than one way of doing it, so you can choose any method you like or find easiest, So let’s get started with the first method.
Add Read Receipt in Outlook – For a Single Email
In this section, I will show you how to add a read receipt in Outlook email for a single message that you want to send to someone and want to get a read receipt for it. This method will not change any settings, nor add the read receipt to other emails you will send. So, follow the below steps to see how it’s done quickly.
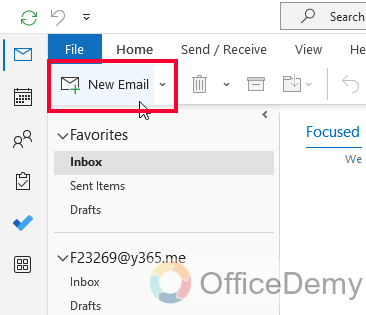
Step 1
Open the Microsoft Outlook App, and click on the “New Email” button
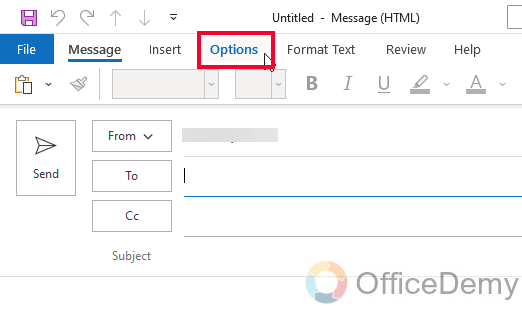
Step 2
Inside the new Outlook window for the new message, click on the “Options” tab in the main menu.
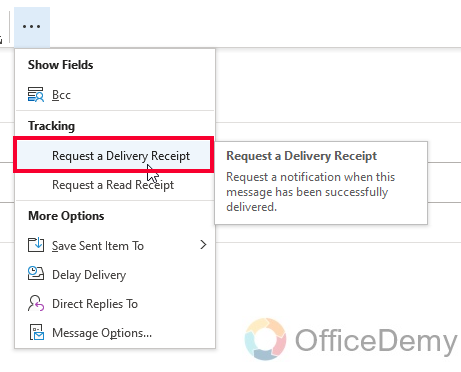
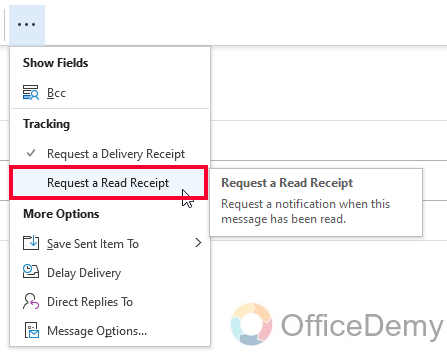
Step 3
Look for the “Tracking” section, if you don’t have one, click on the three dots in the right corner of the main menu

Step 4
Here you can see a Tracking section, and two options underneath it, “Request a Delivery Receipt” and “Request a Read Receipt”. Click on both of them, and you will see a small tick mark on them.
Step 5
Now you will get Delivery, and Read receipts depending on the receiver email server settings and restriction rules, but only for this specific email.
Add Read Receipt in Outlook – Default Settings for Read and Delivery Receipts
In this above section, we learned how to add read and delivery receipts for a single message, now we will learn how to add read receipts in Outlook by default, which means for all of your messages, you will get a read and delivery receipt if allowed by the receiver, and not restricted by the system administrator. I will also show you how you can turn off your system settings so that any of the senders will not get the read or delivery receipts from you.
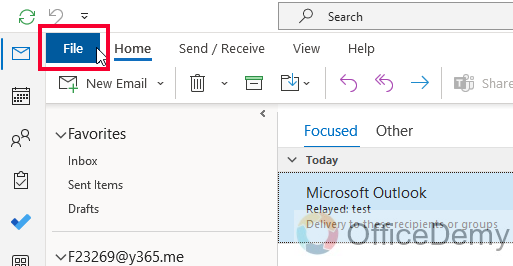
Step 1
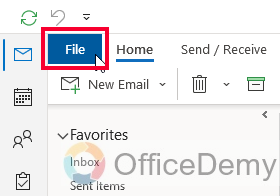
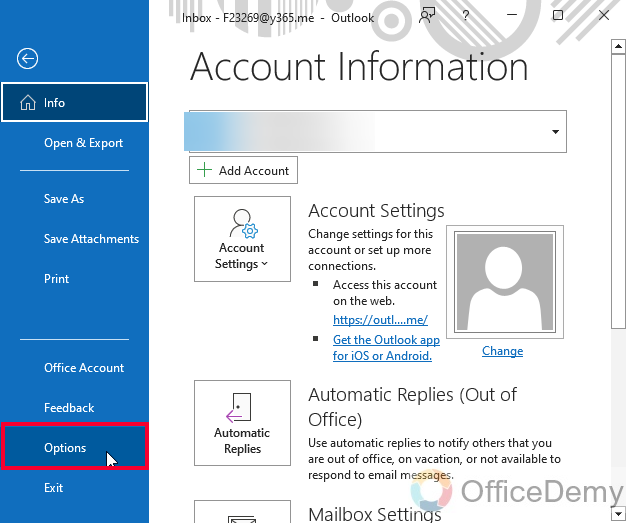
Open the Outlook App, and choose the File option from the main menu.
Step 2
Now, on the left side pane, click on “Options”

Step 3
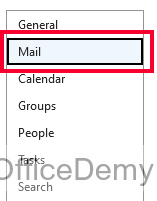
Click on the “Mail” option from the left sidebar
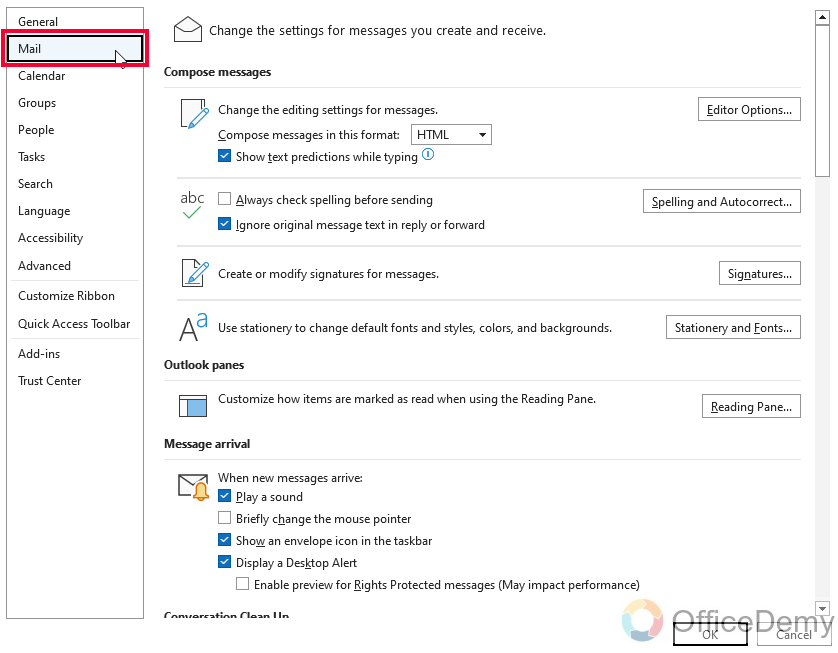
Step 4
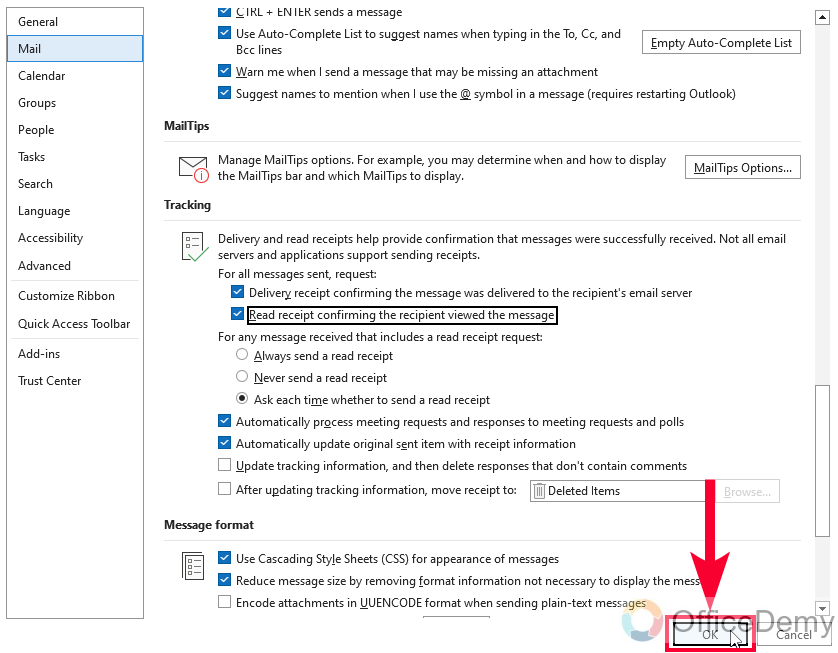
Scroll down, and look for the Tracking section
Step 5
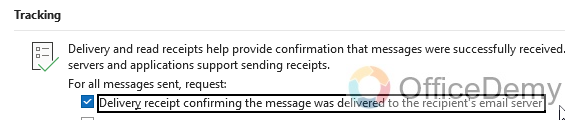
The first checkbox is “Delivery receipt confirming the message was delivered to the recipient’s email server”
Check on it to add delivery receipts for all emails
Step 6
Below we have another checkbox “Read receipt confirming the recipient viewed the message”.
Check on it to get the read receipts for all emails.

Step 7
Click on the Ok button to save the settings.
Note: Not all email clients support read receipts, so you may not always receive a notification when someone reads your email. Additionally, some recipients may choose to decline to send a read receipt, so you may not always receive a notification even if the recipient’s email client supports read receipts.
So? can we do this too? can we deny reading or delivering receipts to all the receiving emails? Well yes.
Add Read Receipt in Outlook – Manage Emails that Include a Read Receipt Request
Ok, so in this section, we will see how we can manage our settings to allow or deny the read receipt requests for all the emails we receive. Similarly, if you are not receiving receipts, there can be two reasons, either it’s the system admin that has restricted receipts, or it’s the individual account that is denying sending a read or delivery receipt. It is up to you if you want to allow sharing your read and delivery receipts with your senders.
Step 1
Go to File in the main menu
Step 2
Click on the Options button
Step 3
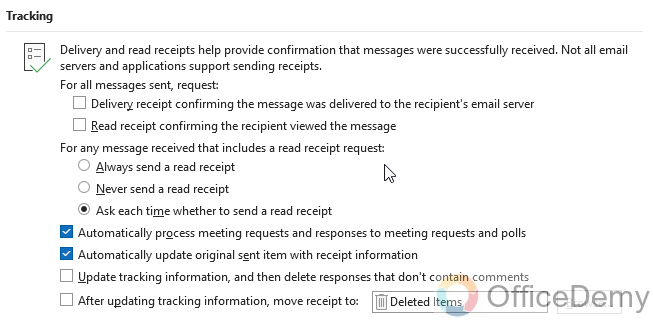
Select “Mail” and go to the Tracking section
Step 4
Now you have three radio buttons inside the section “For any message received that includes a read receipt request:”
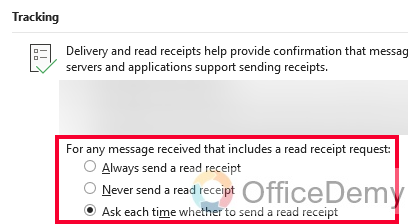
Option 1: Always send a read receipt
Will always send the read receipt to the sender without letting you know
Option 2: Never send a read receipt
Will never send the read receipt to the sender.
Option 3: Ask each time whether to send a read receipt.
Will ask you that the message contains a read receipt and give you two options, allow, and deny you can choose any for that specific message.
Note: You can select any one option from the above radio buttons, Option 3 is selected by default so you will be asked every time for a read receipt if you receive any message having a read receipt request.
I hope you understand how “read and delivery receipts” work and now you can decide better if you want to allow read receipts or not.
Frequently Asked Questions
Can I Turn Off Outlook Notifications when using the Read Receipt feature?
Yes, you can turn off outlook notifications when using the Read Receipt feature. By navigating to the Outlook settings, you can disable notifications to avoid distractions while still benefiting from the Read Receipt functionality. This allows you to have more control over your notifications and manage them according to your preferences.
Conclusion
That’s all about how to add read receipt in Outlook. We learned how to add read and delivery receipts in Outlook, we also learned how to manage emails having read receipt requests. I showed you all three methods, these are very simple and free methods and very easy to use even for beginners. Thank you so much for reading. I will see you soon, keep learning with Office Demy.


