
To Autofill in Google Sheets
- Select the cell containing your initial data.
- Grab the fill handle (the small square at the cell’s bottom-right corner), and drag it in the desired direction (down for columns, right for rows).
OR
- This method works when an adjacent column with data exists.
- Double-click on the fill handle to copy the data from the adjacent column.
We have so many new features coming in Google Sheets every day. Today, Google Sheets has got some great keyboard shortcuts and on-screen features that help us in many ways when working with sheets. Today, we are going to learn how to autofill in Google Sheets. Autofill as the name suggests means auto-filling the content of the same type, this has become very common. We don’t write sequential content because some great features are doing these types of operations for us very quickly. So, today our goal with this article is how to autofill in Google Sheets. We will see how to autofill numbers, dates, formulas, functions, etc.
Fill down is an autofill type in Google Sheets, we can use this on columns and rows, and Google Sheets try to depict the already written pattern, and based on that it auto fills out data, and save so much time for us.
Importance of using Autofill in Google Sheets
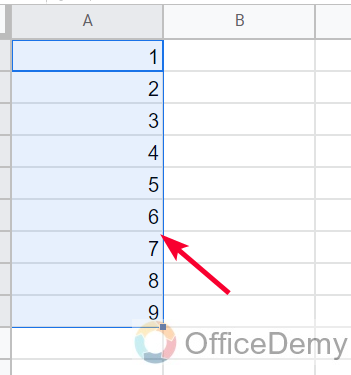
There are so many advantages to learning how to autofill in Google Sheets. For a simple example, let’s say you want to get a series of 100 numbers (i.e., 1, 2, 3… 100). This can easily be done manually by writing one number in one cell and keep changing cells for each number, but this wastage of time, and very hectic, can cause mistakes as well. So, avoiding this manual way, instead, we can use the fill-down Google Sheets feature to get this series in no longer than seconds.
For example, suppose you want to quickly get a series of 100 numbers (i.e., 1, 2, 3… and so on). While you can do this manually, that’s a waste of time. Instead, you can use the fill-down Google Sheets function to get this series in a few seconds. Google Sheets can autofill numbers based on the previous numbers.
Similarly, you may have months January and February, and now you need to have the rest months’ names in the same row/column, all you need to do is to select two months and from the fill handle anchor point hold and drag to left (for row), and down (for columns), and it will give you automatically written months name.
This is done by seeing the previous pattern, so if you have written January only, then there can be a problem because Google Sheets don’t know whether you want to go the normal way (January February March), or reversed way (January December November), so that’s why we must have at least two initial values to define the pattern appropriately. So, these are some good reasons we need to learn and use how to autofill in Google Sheets.
How to Autofill in Google Sheets?
We will learn autofill in Google Sheets from scratch. We will first see what is autofill, and how to use it. Then we will see different types of autofill with different types of data. We will see how to autofill numbers, dates, months, years, months years, formulas, and functions, and we will also see some scenarios where autofill does not work. So, let’s get started with the definition and basic usage.
What is Autofill in Google Sheets?
Autofill is a Google Sheets feature that is designed for auto-filling sequential data that has a defined pattern. We should use this feature to fill data quickly without writing so much content manually. We can use the autofill feature with dates, number series, functions, formulas, and so on.
We can use autofill in two ways, the first way is the dragging method, in which we drag our already written data from the last cell fill handle and drag it left or down.
The second method is double-clicking on the fill handle.

Note: Double-clicking method does not work where there is no other data column exists.
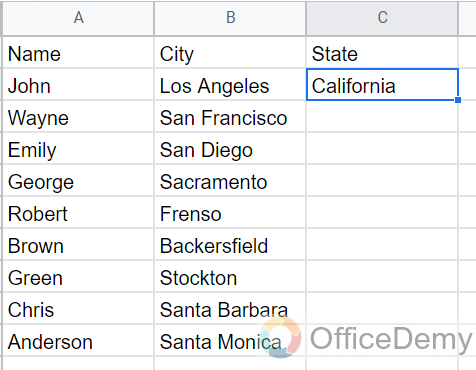
How to Autofill in Google Sheets – Autofill Same Values
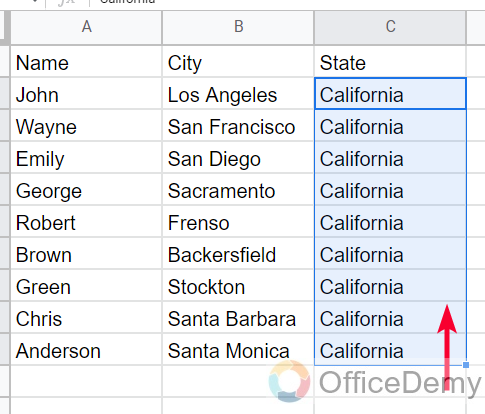
In this section, we will learn how to autofill in Google Sheets, and we will first see how to autofill the same values. We sometimes need to have a single value on an entire range. For example, you have some products and all have the same price, so you can write the price in one column and then autofill it for every product. This can be done with text, such as you have to write the country for all of your products, you can write in one, and then you can use autofill
Note: This can also be done by copy-paste, but autofill is more convenient and dynamic.
Step 1
Write the text or number that you want to autofill in the entire column or row
Step 2
Select the cell, and hold the fill handle on the right bottom corner of your cell.
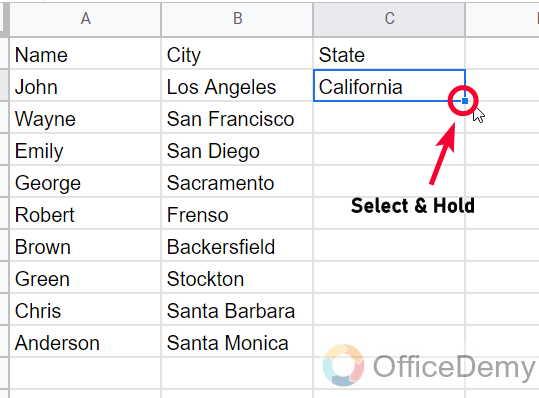
Step 3
Drag down, and you will see a gray color guide that will specify your position if you leave your mouse button.
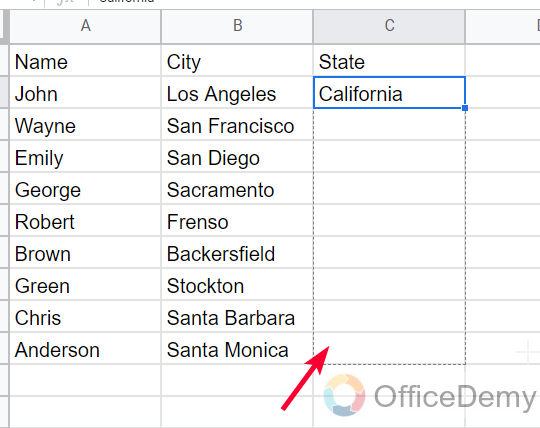
Step 4
When you reached to destination, leave your mouse button, and you can see your data has been auto-filled by Sheets.
Using auto-fill will fill your data accurately 100 out of 100 times.
The above is the simplest usage, but this is not the way we commonly use the auto-fill feature. Let’s see how to fill a series using auto-fill.
How to Autofill in Google Sheets – Autofill a Series of Numbers
In this section, we will learn how to autofill in Google Sheets. We will learn how to autofill a series of numbers. This can be used for writing serial numbers, ranks, and so on. So, let’s see how to do that.
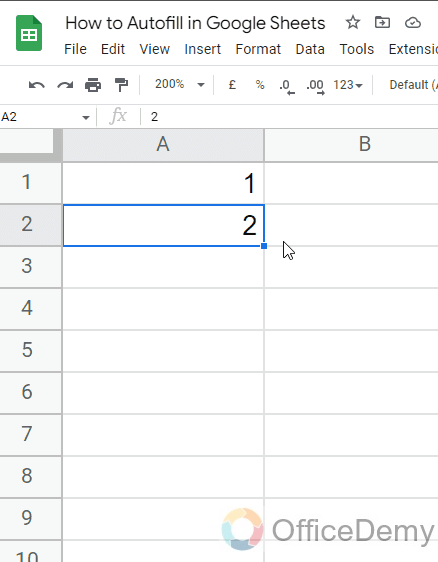
Step 1
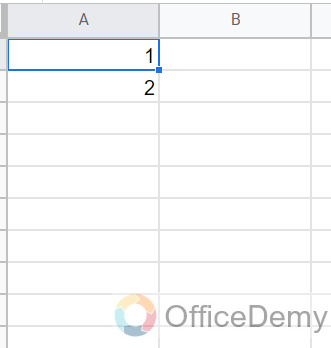
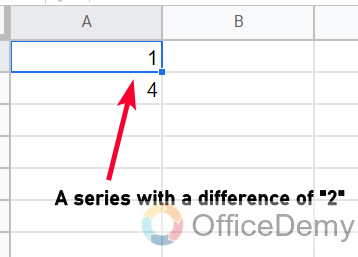
Write at least two initial numbers for your series. Let’s say 1,2
Step 2
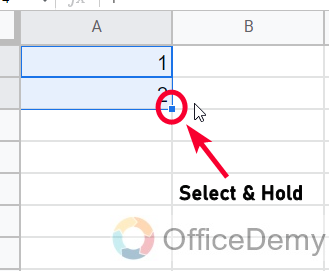
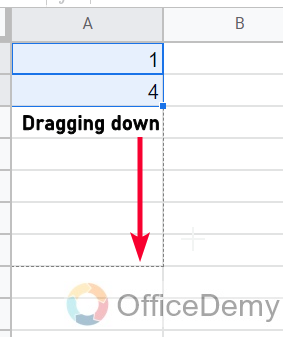
Now select both and hold the fill handle of the last cell, in this case, it would be 2
Step 3
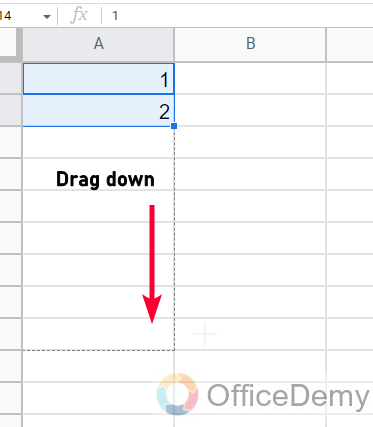
Hold and drag with your mouse to the bottom (if you are filling a column), and right (if you are filling a row)
Step 4
Leave your mouse, and you can see you have got the series with the right pattern you gave to Sheets.
This is how easily we can make large series of numbers using the simple method. This can be done using the fill handle double click, but that method requires at least one adjacent column with filled data. Because, Google Sheets does not know from where you want to fill your data in double-clicking cases, if you have an adjacent column with data, then Sheets will consider it as your data span and will fill your data exactly equal to the adjacent column.
How to Autofill in Google Sheets – Autofill Non-Contiguous Numbers
In this section, we will learn how to autofill in Google Sheets, and we will see how to autofill non-contiguous numbers. Contiguous numbers are 1,2,3,4…. and non-contiguous numbers can be 10,20,30,40. When we have some distance between the numbers, but the distance should be the same on every data point, then we can use autofill to fill such a series of numbers as well. Wow, that’s great let’s have a look into an example to see if it works.
Step 1
I am writing two initials, and I want to have the same distant values from the autofill feature.
Step 2
Dragging to the bottom, let’s see if it works.
Step 3
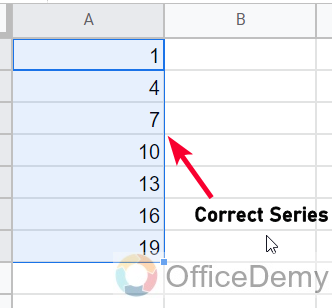
It is working. Let’s try another non-contiguous series.
Step 4
It’s also working properly.
So, this is how you can auto-fill non-contiguous series of numbers with the same pattern using Google Sheets.
How to Autofill in Google Sheets – Autofill Date and Years
We often need to autofill dates. So, in this section, we will learn how to use Autofill in Google Sheets and we will see how Google Sheets autofill function fills different formats of dates and years.
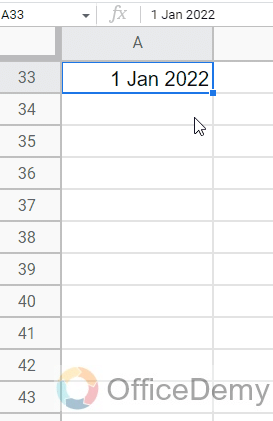
Step 1
Let’s say you have 1 January 2022, even when you have only 1 initial, the Google Sheets autofill feature will give you the next dates here
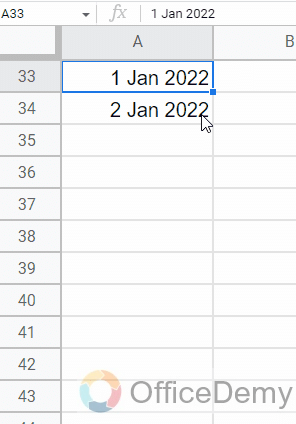
Step 2
Let’s say I have 1 January 2022, and 2 January 2022 now it will give me the same result.
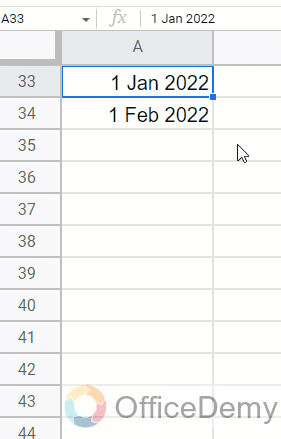
Step 3
If I have 1 January 2022, and 1 February 2022, now it will give me the next months because the pattern says the first
date of every month
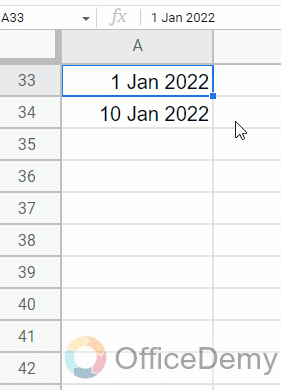
Step 4
Now, I have some non-contiguous dates such as 1 Jan 2022, and 10 Jan 2022, now it will give me 8 days difference in the series
Step 5
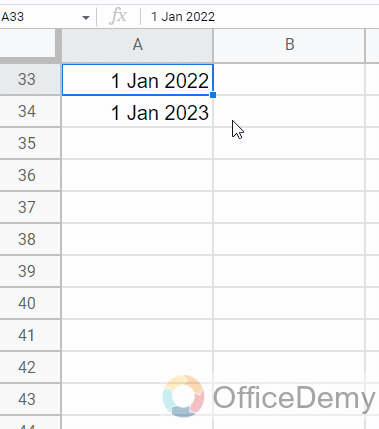
I am writing January 2022, and then January 2023, and this is how I will autofill all the years with their first months
So, these are some ways to autofill dates and years in Google Sheets.
How to Autofill in Google Sheets – Autofill Formulas / Functions
In this section, we will see how to autofill in Google Sheets, and we will learn how to use autofill for formulas and functions. Now the point to be noted here is the type of references you used within your formula or function. There are two types of references we will use appropriately when needed.
Absolute References: The cells will change relatively depending on where the formula is written.
Relative References: The cells will not change, when you drag the formula, the original cells will not change and will be locked for the entire column.
We mostly use relative reference because we want to change cells when we autofill the formula/function.
Step 1
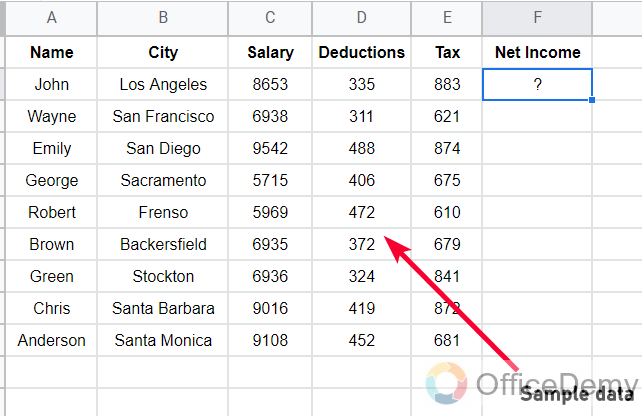
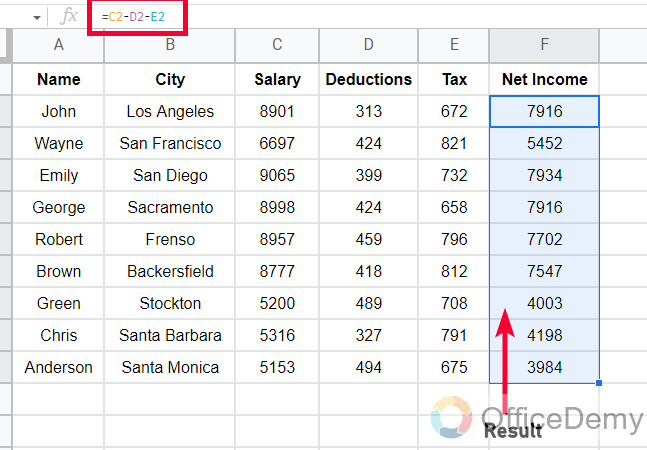
Let’s say, I have the below data, and I have a simple formula to calculate the value of Net Income
Step 2
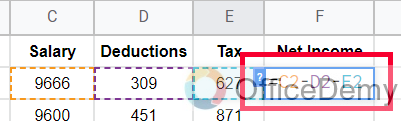
Now, you can see I have relative cell references in my formula
Step 3
After auto-filling this formula, I will get accurate results for all the rows in my data table
Step 4
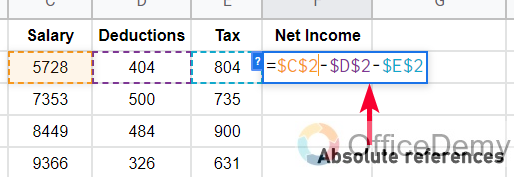
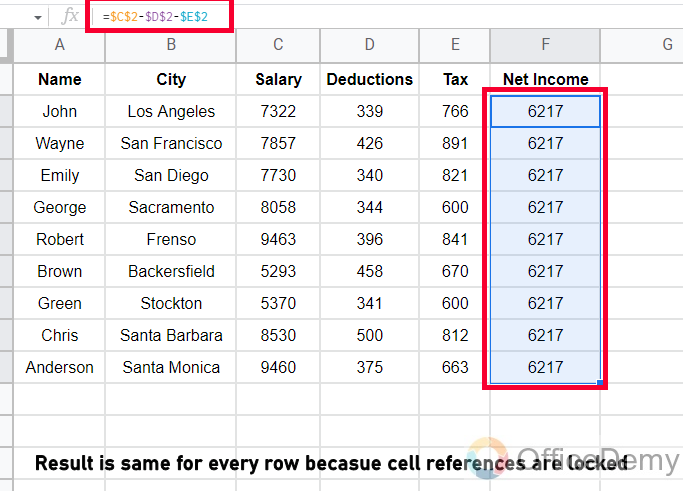
If I use absolute references here, then I will get the same result in every row because now the cells are not changing relatively.
So, this is how to use autofill with formulas and functions, you only need to take care of your cell references type and the rest is the same.
Frequently Asked Questions
Is the Auto-Fill Series feature in Google Sheets the same as Autofilling in Google Sheets?
The auto fill series feature in google sheets is different from autofilling in Google Sheets. While both options involve populating cells, the auto fill series feature allows you to create a customized series of values based on a pattern. Autofilling, on the other hand, simply fills in adjacent cells with the same value as the initial selection.
Can Google Sheets autofill non-contiguous dates?
Yes. Google Sheets can autofill non-contiguous dates very accurately
Why my data is not auto-filling?
If you are using the double-click auto-filling method, then you probably have only one column or row and you want to fill that using double-click. The problem here is the range, Google sheets don’t know whereto you want to fill, there are two solutions. 1. Use the dragging method instead of double-clicking. 2. Add another row or column to tell Google Sheets whereto you want to autofill
How to use Autofill for rows?
Autofill for rows works exactly identically to columns.
What are keyboard shortcuts for Autofill in Google Sheets?
You can simply highlight the cells you want to autofill, including at least one with the formula
Then use the below shortcut keys.
- Fill Right: Ctrl + R
- Fill Down: Ctrl + D
- Fill Range: Ctrl + Enter for Mac OS, use the ⌘ button instead of Ctrl
Conclusion
That’s all from how to autofill in Google Sheets. I tried to cover all the methods, all the use cases, and all the ways to use the Autofill feature of Google Sheets. Try yourself and explore more. I will see you soon with another useful guide. Keep learning with Office Demy.


