
To Make Hanging Indent on Google Docs
- Select the paragraph.
- Go to “Format” > “Align & indent” > “Indentation options“.
- Select the type of indent and enter a value (usually between 0 and 1).
OR
- Select the paragraph or line.
- Go to the ruler and find two small blue icons: a triangle below and a flat rectangle above.
- Click the rectangle and drag to adjust the first line’s position.
Have you ever wondered how the hell some google docs documents have a hanging indent? The wait is over, in today’s article, we are going to learn how to do a hanging indent in google docs. Google doc is itself a marvelous creation that empowers people of this century to live better life around documentation.
A hanging indent is a built-in feature in google docs that can be used for kind design purposes. Handing indent can be used by two methods, in both methods, the results are identical but the technique is a little different. Let’s understand what are these handing indents? and how to do a hanging indent in google docs.
What is a Hanging Indent?
Hanging indents are nothing but a fancy way to transform your text’s first line with a little contrast of position. Yes, hanging indents allow us to customize our indent and leave a fancy first line on the paragraph. It is not recommended when you’re working on a professional project. It should be limited to your assignments, personal documents, etc. However sometimes in most professional projects as well, it is used rarely in some special situations.
Why do we need to do a hanging indent on google docs?
For many reasons, we may want to add some custom styling to our documents, such as a special spacing, a first very large letter, or a hanging indent. All these features are for personal, and mostly for academic projects. But we may need it oftentimes in a corporate document that is highly professional. So, everyone out there should learn it and see how marvelous google doc’s features are.
- To make our document look more elegant
- To emphasize designing
- To present an exciting start of the document (to attract kids & teenagers)
How to Do a Hanging Indent on Google Docs
Method 1: Hanging Indent using Indentation Option
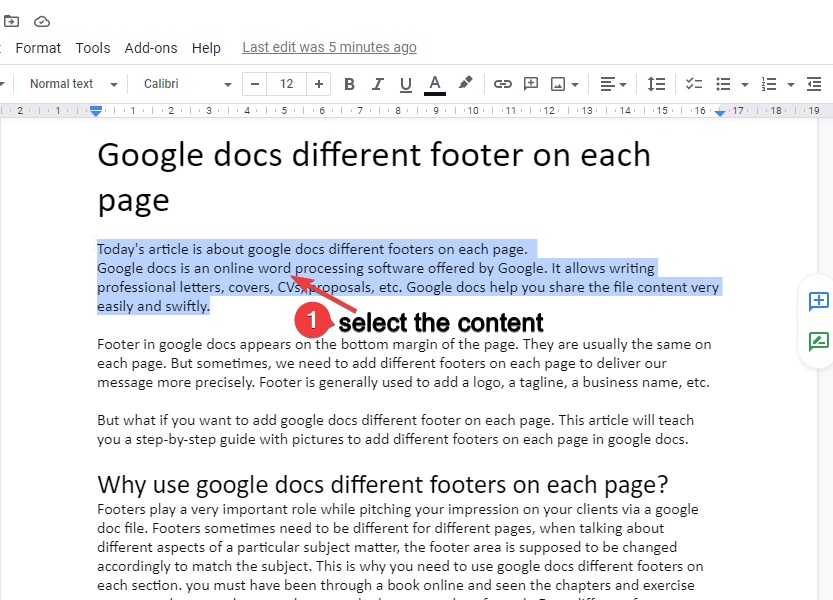
Step 1: Open your document and select the paragraph to which you want to apply hanging indent.
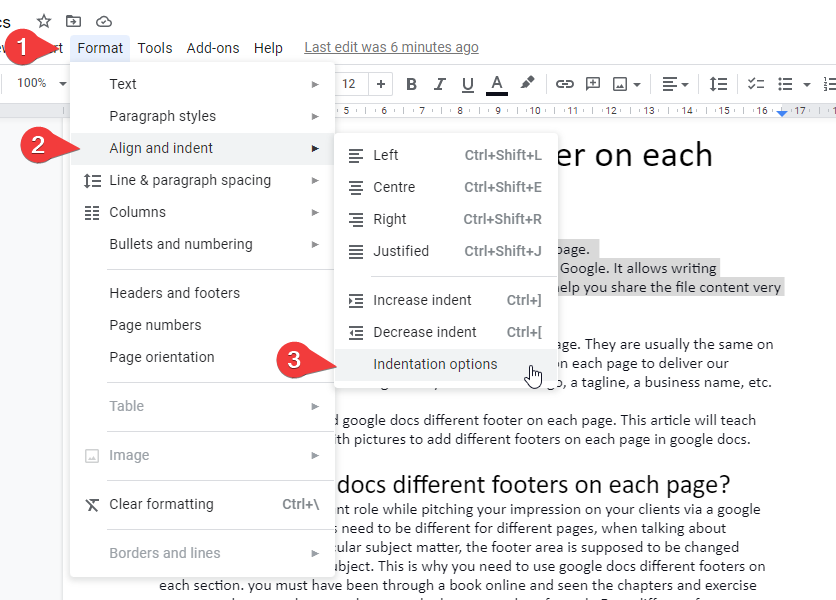
Step 2: After selection, go to format > align and indent > and click on indentation options.
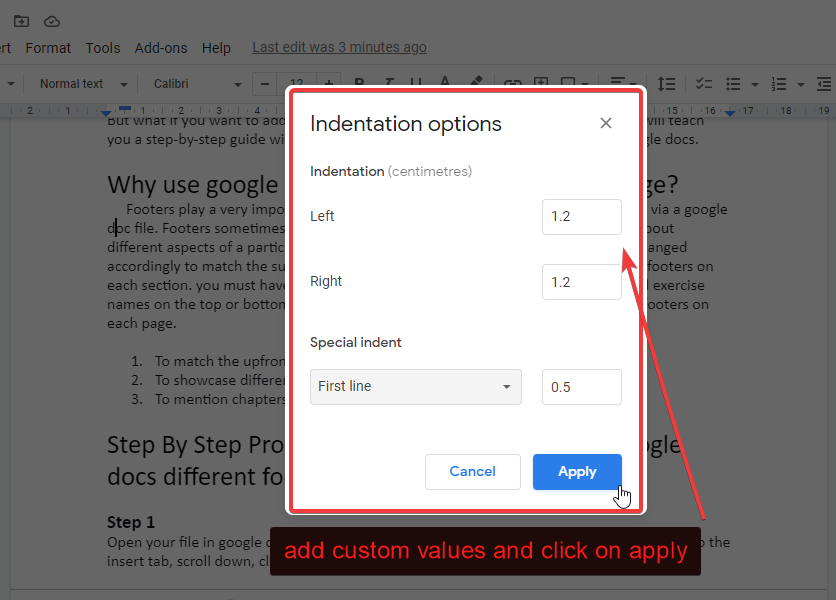
Step 3: Now a dialogue box will appear, select any indent type and enter a value for indentation. (Suitable values are between 0 and 1) Although, you can use any value according to your requirement.
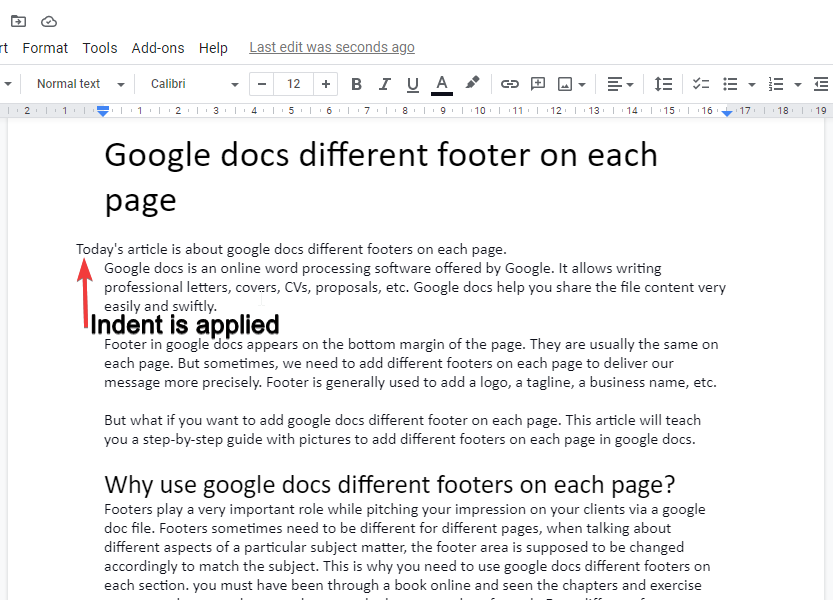
That’s all, you have applied a hanging indent on google docs.
Method 2: Hanging Indent using Ruler Option
The second method is by using a ruler, this method is not recommended for beginners, because it may harm your default scaling and margins. But, you should use the ruler method after the first one described in the above three steps.
To use handing method, you need nothing but to select your paragraph or line and go to ruler where you have two small blue icons, one is a triangle below and the other is a flat rectangle above the triangle click on it and drag where you want to move your first line. you can undo the changes if you think something has gone wrong.
Video Tutorial
Notes
- Always select your paragraph before you do a hanging indent in google docs.
- Do not adjust your ruler randomly if you are not comfortable with it, it will destroy your document formatting and scaling if you are new to it.
- The ruler method is recommended to expert users only, but if you’re a newbie you can rely on the above menu bar method which is quite easy and will give you identical results.
- If you are using the ruler method, it is highly recommended to undo any changes instantly if you think it is going wrong.
- If you understand the ruler method, then always use the ruler method because it takes only 10 seconds to do a hanging indent using the ruler method.
Frequently Asked Questions
Can I Use the Same Method to Create a Hanging Indent in Microsoft Word and Google Docs?
Creating a hanging indent in microsoft word is straightforward. Firstly, select the text you want to format, then go to the Paragraph section, click on the small arrow in the bottom right corner, and navigate to the Indentation menu. Under Special, choose Hanging and set the desired measurement. However, the process differs in Google Docs, requiring you to click on the Format tab, choose Align & indent, then select Indentation options and specify the desired indentation.
Are the Methods for Doing a Hanging Indent on Google Slides Similar to Google Docs?
When it comes to indenting text on google slides, the methods may differ slightly from those on Google Docs. However, with a little familiarity, achieving a hanging indent on Google Slides is indeed possible. By utilizing the ruler or adjusting the text box’s margins, you can effortlessly create a professional and visually appealing presentation.
Can the Methods for Indenting in Google Docs be Used for second line Hanging Indents as well?
Yes, the methods for indenting the second line in google Docs can indeed be used for hanging indents as well. By selecting the desired text and adjusting the indent settings, you can create hanging indents effectively. Remember to use the appropriate options under the Format menu to ensure your paragraphs are formatted correctly.
Conclusion
So today we learned a fancy feature of google docs that is how to do a hanging indent in google docs. It is a very performing feature especially when your document is for kids, they love designing and can be attracted with custom-made indents of your paragraphs. Although this is a preset feature and can be used in any type of document when needed. So, after this comprehensive guide, you have learned; What is a hanging indent in google docs? How to do a hanging indent in google docs? When to use a hanging indent in google docs? What is the ruler method to do a hanging indent? Why do we need to do a hanging indent in google docs, etc.?
If you like our article then consider sharing it and do not forget to follow the OfficeDemy blog for a lot of upcoming articles related to google docs, and much more.


