
To Make all Headers the Same in Microsoft Word
- Go to the “Insert” tab.
- Click “Header” and choose a built-in header style.
- Edit the header as needed.
- Double-click the document body, or select “Close Header and Footer” to apply the changes.
This article will explain you step-by-step how to make all headers the same in word document. Well, before going deeper we must know what the header is?
What is a Header in Microsoft Word?
The top margin in the word document file is called header. It is used to separate some space and text in every page that is created. This also makes the page look well organized. Information such as company name, author name, address, time, date etc. is separated with the help of header. The header appears automatically in every page if created once.
Use Cases of Header in Microsoft Word
- Display company name in every page
- Mention page number chronologically
- Information of writer
- Date of the created document
- Address of workplace
- Any custom text including designs.
How to Make all Headers the Same in Word
How to Select Header Style
- At first OPEN a new WORD file or existing WORD file.
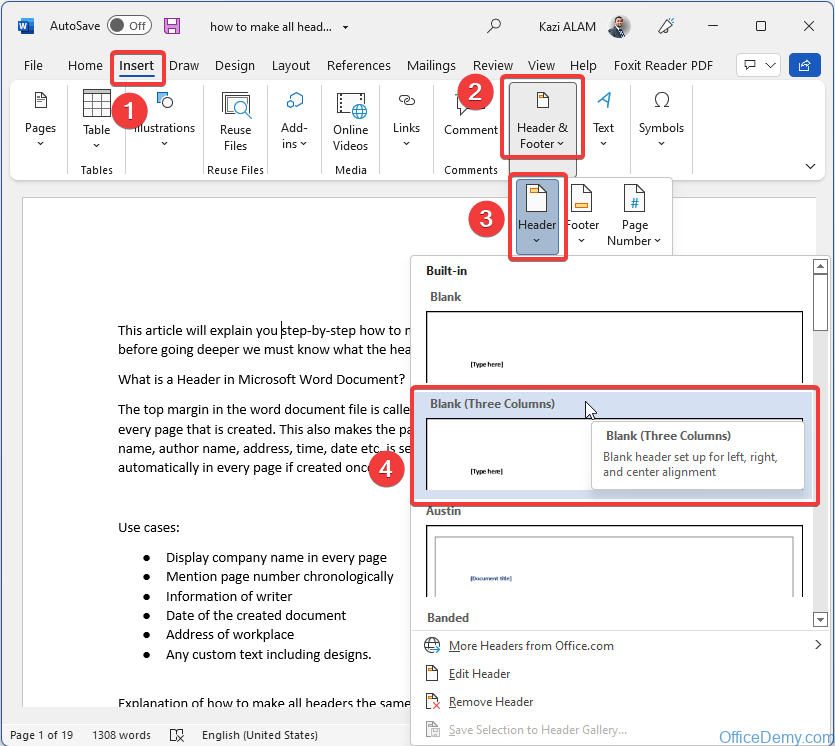
- Click on “Insert” tab
- Click on “Header”
- Choose your needed Header style from Built-in list.
Now you can Edit your selected header style which will look like the picture below.
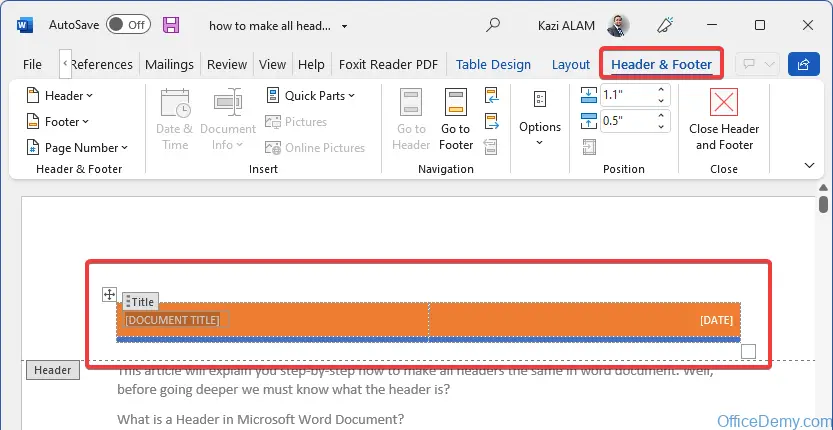
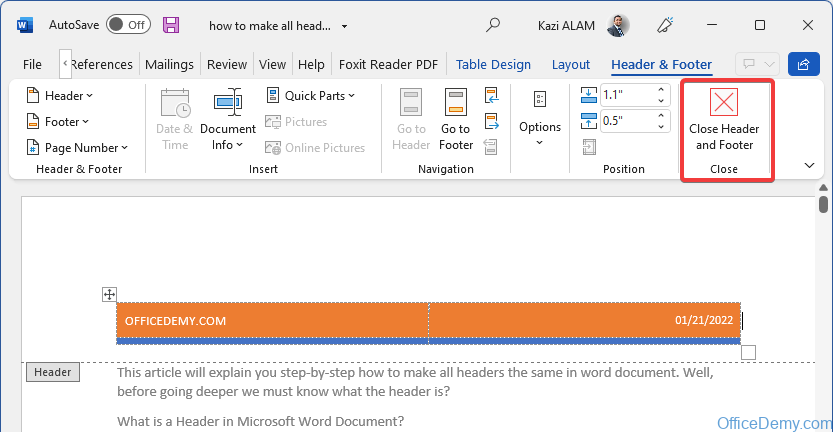
After editing you must need to double click on the document body or click “Close Header and Footer” to apply the changes to all the pages.
How to Edit and Apply Header Style
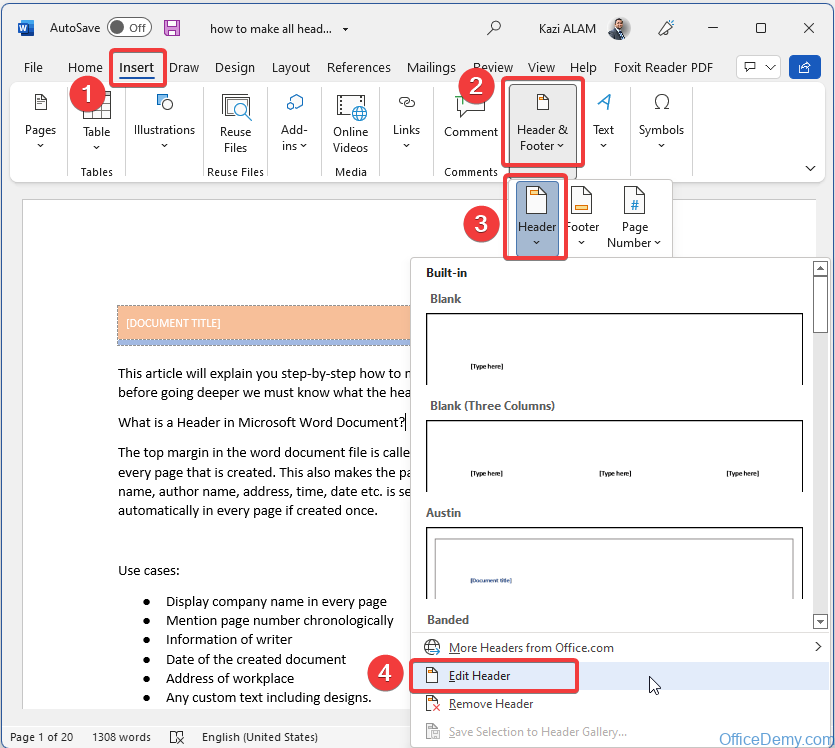
In order to edit the text of a selected built-in header style follow the procedures below.
- Double click on document Header OR Select “Insert” > “Edit Header” from the “Header & Footer” option
- Edit text or other information according to your need
- Double click on the Document main part OR, Select “Close Header & Footer” from the “Header & Footer” option
List of Built-in Header Styles in Microsoft Word
There are 20 types of “Built in” header templates available. which are ready to use to make all headers the same in Word.
- Blank
- Blank (Three columns)
- Austin
- Banded
- Facet (Even Page)
- Facet (Odd Page)
- Filigree
- Grid
- Integral
- Ion (Dark)
- Ion (Light)
- Motion (Even Page)
- Motion (Odd Page)
- Retrospect
- Semaphore
- Sideline
- Slice 1
- Slice 2
- ViewMaster
- Whisp
- BLANK
Blank is the very first style that appears in the list of headers. The style is very simple and good for simple office work. Here a precise margin appears with some space for text. After adding the Blank style to your workspace, make sure to press “Close Header and Footer” to apply the changes and to make it appear on every page automatically that you create.
- Blank (three columns)
The style comes with a precise margin and the space for three columns. After adding the Blank (Three column) style make sure to press “Close Header and Footer” to apply the changes in the current page and to make it appear on every page automatically that you create.
- Austin
The style comes with a precise margin and the space for mentioning any title of your choice as well as a very precise rectangular border line around the work space. After adding the austin style header make sure to press “Close Header and Footer” to apply the changes in the current page and to make it appear on every page automatically that you create.
- BANDED
The style comes with a precise margin and the space for mentioning any title of your choice in the Bold color band. After adding the Banded style header make sure to press “Close Header and Footer” to apply the changes in the current page and to make it appear on every page automatically that you create.
- FILIGREE
The style comes with a precise margin and the space for mentioning the title as well as the author name at the top right corner of your work space. After adding the Filigree style header make sure to press “Close Header and Footer” to apply the changes in the current page and to make it appear on every page automatically that you create.
- GRID
The style comes with a precise margin and the space for mentioning document title and date in the opposite margin. After adding the Grid style header make sure to press “Close Header and Footer” to apply the changes in the current page and to make it appear on every page automatically that you create.
- Integral
The style comes with a precise margin and the space for mentioning the document title with a shaded header so that the title is highlighted on every page. After adding the Integral style header make sure to press “Close Header and Footer” to apply the changes in the current page and to make it appear on every page automatically that you create.
- Ion (Dark)
The style comes with a precise margin and the space which highlights the page number chronologically in every page. The number appears at the top right corner of the workspace with the accent tab. After adding the Ion (Dark) style header make sure to press “Close Header and Footer” to apply the changes in the current page and to make it appear on every page automatically that you create.
- Ion (Light)
The style comes with a precise margin and with the page number at the top right corner in every page. With space for your own left and center aligned content. After adding the Ion (Light) style header make sure to press “Close Header and Footer” to apply the changes in the current page and to make it appear on every page automatically that you create.
- Retrospect
The style comes with a precise margin. Here you can add document title and date on the opposite margin with a two tone accent color block. After adding the retrospect style header make sure to press “Close Header and Footer” to apply the changes in the current page and to make it appear on every page automatically that you create.
- Semaphore
The style comes with a precise margin. This style is to mention the center aligned name and the document title in two lines. After adding the semaphore style header make sure to press “Close Header and Footer” to apply the changes in the current page and to make it appear on every page automatically that you create.
- Sideline
The style comes with a precise margin. Here the document title appears at the top left corner of the workspace with the vertical accent bar. After adding the sideline style header make sure to press “Close Header and Footer” to apply the changes in the current page and to make it appear on every page automatically that you create.
- Slice 1
The style comes with a precise margin. Here a plain right aligned page number appears on every page. After adding the Slice 1 style header make sure to press “Close Header and Footer” to apply the changes in the current page and to make it appear on every page automatically that you create.
- Slice 2
The style comes with a precise margin. Here page number appears at the top right corner as well as slice accent graphic. After adding the Slice 2 style header make sure to press “Close Header and Footer” to apply the changes in the current page and to make it appear on every page automatically that you create.
- ViewMaster
The style comes with a precise margin. The document title appears at the top right corner on every page. After adding the ViewMaster style header make sure to press “Close Header and Footer” to apply the changes in the current page and to make it appear on every page automatically that you create.
- Whisp
The style comes with a precise margin. The header contains space for right aligned author name and date in two lines with document title at the center. After adding the Whisp style header make sure to press “Close Header and Footer” to apply the changes in the current page and to make it appear on every page automatically that you create.
Supported Microsoft Word Versions
- Word for Microsoft 365 & Word for Microsoft 365 for Mac
- Word for the web Word 2021 & Word 2021 for Mac
- Word 2019 & Word 2019 for Mac
- Word 2016 & Word 2016 for Mac
- Word 2013 & Word 2010 & Word 2007
- Word for Mac 2011 & Word Starter 2010
Notes
If you are not satisfied with your current workspace header line, you can change it anytime you want. Simple click on “Insert” tab> “Header”> (Choose any style you prefer).
Conclusion
Here in this article, extended detail is discussed about how to make all headers the same in word. So, selecting a perfect header for your document should be much easier now. Do not forget to check other sections on this website. If you need information on “How to make all footers the same in word” please press the link below. “How to make all footers the same in word”.


