
To use Named Ranges in Google Sheets
- Select the desired cell range.
- Click on “Data” > “Named Ranges“.
- Assign a name to the range following specific naming guidelines.
- Confirm the cell range in the input field and click “Done“
OR
- Go to “Data” > “Named Ranges“.
- Click the pencil icon next to the named range.
- Modify the name or the selected cell range as needed.
- Click “Done” to save the changes.
Hi, in this article we will learn about the “Named Range“, what a named range is, and how to use named ranges in google sheets.
The named range can be any range of data let’s say A2:C5, that is named. A2:C5 is not named that’s why we have to use its cell addresses to refer to the range. But, in google sheets, we can give names to various cell ranges, and these ranges of the cell after being named become Named ranges. We use named ranges for clean, clear, and easy-to-remember data locations in our large google sheets file.
A google sheet file may have a lot of data substituted into many sections for example a file may contain data of a company in which we may have multiple sections, sections such as “Marketing team“, “Customer support”, “Management”, “Human resource“, “R&D“, “Purchase“, etc. We can pull the sections wise data and make them named ranges by using the concept of Named Range.
Use Cases of Named Range in Google Sheets
The biggest problem comes when we use a lot of functions and formulas within the sheet and we may forget the formula we used to calculate something after 1 month or so. Or we may have a team of people who are working on the same sheet, so making it easy and understandable for everyone, we assign names to our ranges and then we can call that range from that name, for example, I have the data of employees in the cell range of A2:D200, now every user who is working on the sheet needs to remember this address along with many other addresses for the different sections of the file to use in the formula or function. Isn’t it great if we give these ranges some names in plain English?
The meaningful name for this range can be Employees-data, this becomes very easy for every user to use names of ranges instead of their addresses which are difficult to memorize. Named range makes it easy for us and saves a lot of time and increases productivity. Therefore, it’s a good reason to learn how to use named range in google sheets.
How to use Named Range in Google Sheets
Here we will see the important things about the Named ranges and also, we will look at the methods to use Named ranges practically.
First, let’s see some essential things to know about naming a Named Range.
Things to remember when Naming
- A Named Range cannot start with words like “true”, “false”, and “=”
- A named Range cannot be of more than 250 characters.
- A named Range also cannot be named as the reference of a cell or range, for example, you cannot name a Named range such as A2, A2:B6, and so on.
- A Named Range cannot have any punctuation or spaces, you can use only underscore as a space, or delimiter. For example, write “Employees_data” instead of “Employees data”. Named ranges can contain numbers, letters, and underscores, no spaces are allowed.
How to use Named Range in Google Sheets – Making A Simple Named Range
Here in this section, we will make a simple Named Range in our google sheets file, and we will see how it’s made and how we can see them.
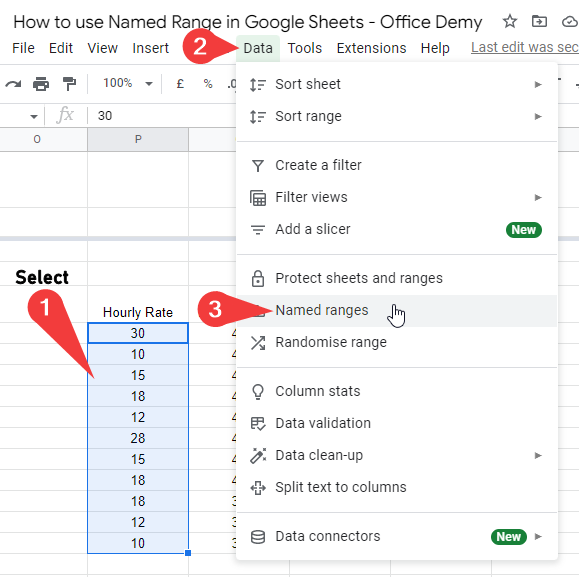
Step 1
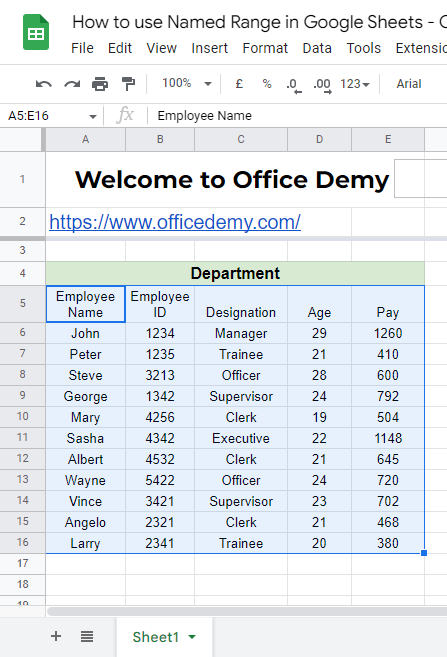
Select the range you want to name, simple drag by mouse drag.
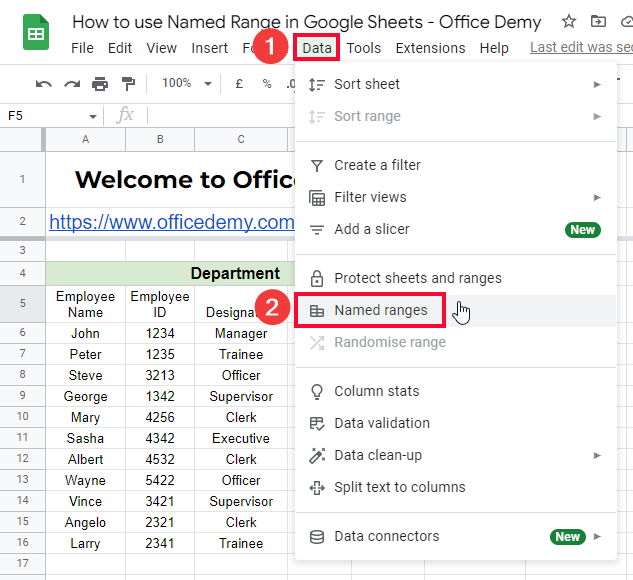
Step 2
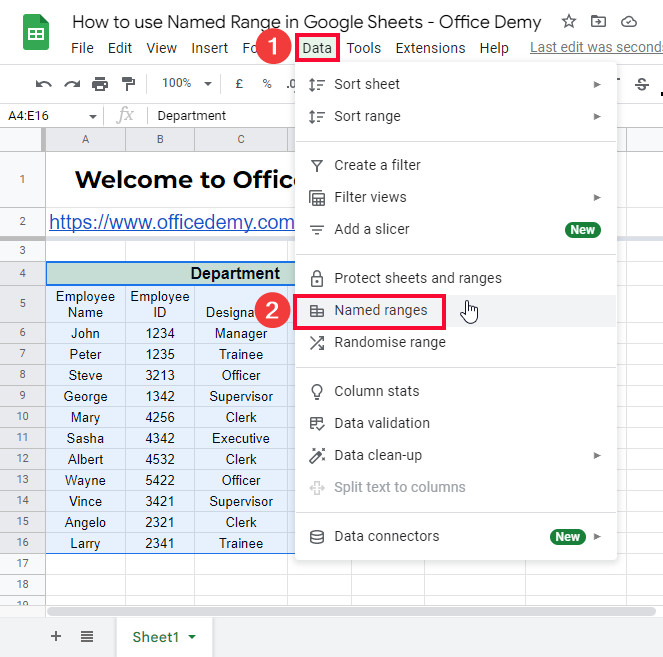
Keep selected, and click on Data > Named Ranges
Step 3
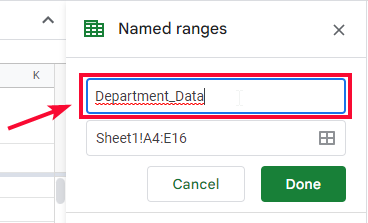
Assign a name to the range, remember the points about naming discussed above
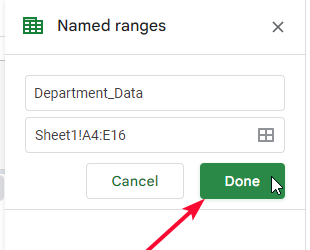
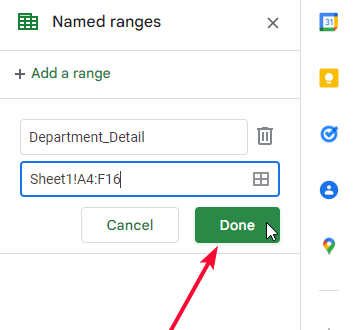
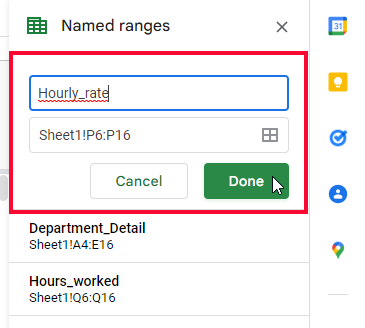
Step 4
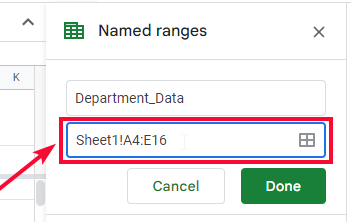
Confirm the range in the below input field.
Step 5
Click on Done
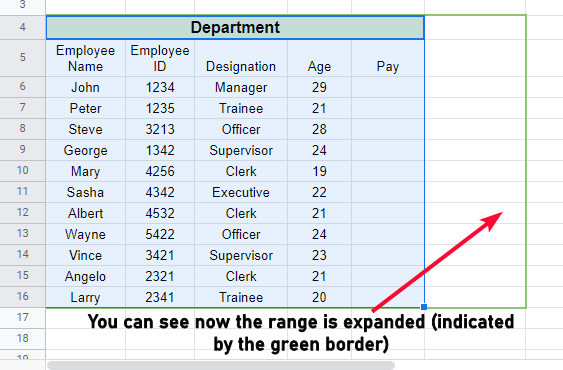
Step 6
Your Named range is created. Yes, this is so simple.
In the next method, we will see about the edit, we will learn how to edit the Named range already been made.
How to use Named Range in Google Sheets – Edit A Named Range
In this section, we will learn how to edit a named range, edit means we can change the name of the Named range, and also, we can edit or change the range that is selected under that Named Range.
For this, understandably we must have a named range pre-made. So, let’s see how to access it and then edit it.
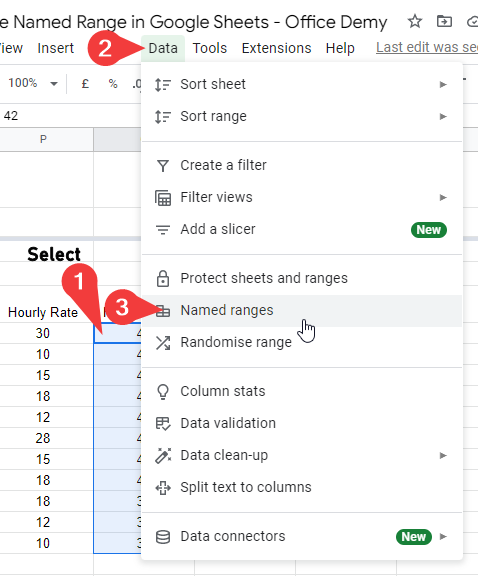
Step 1
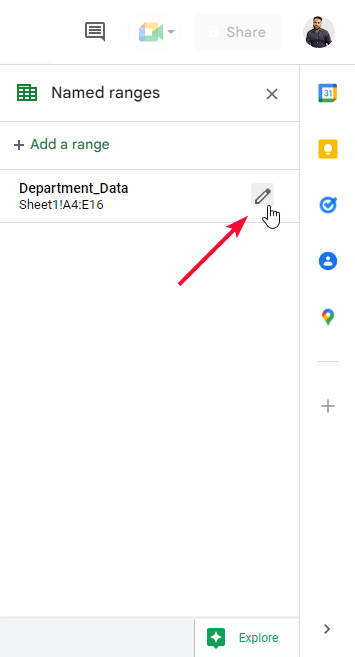
Simply go to Data > Named Ranges
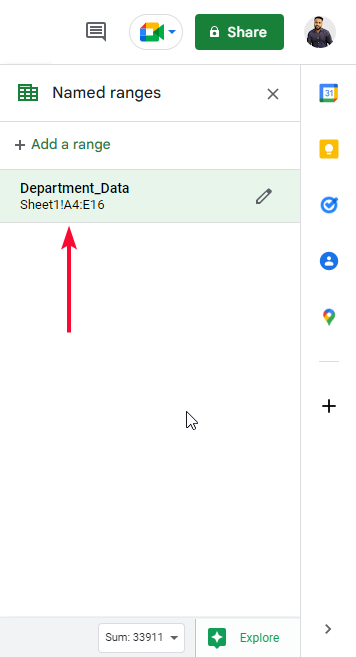
Step 2
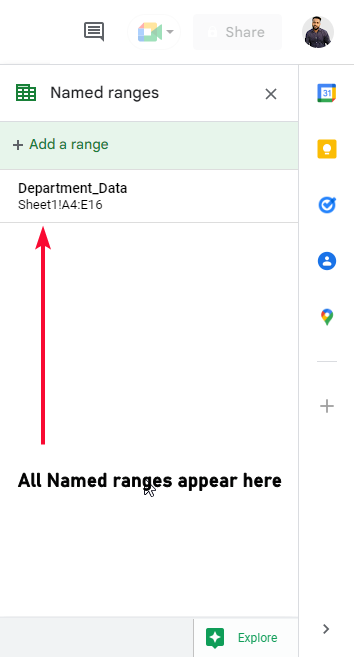
All you Named Ranges will have appeared on the right-hand side
Step 3
A small pencil icon is there with all Named Ranges made, click on the pencil icon.
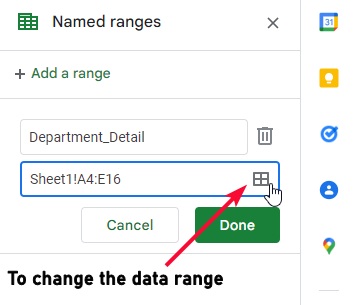
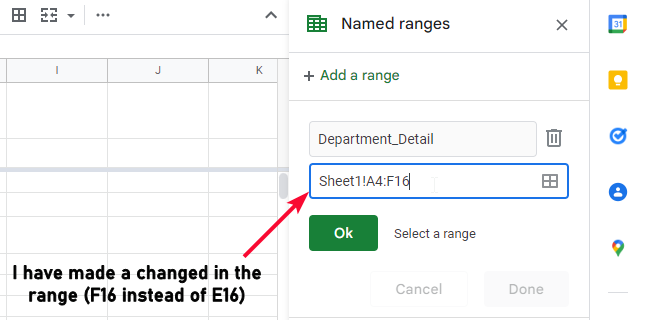
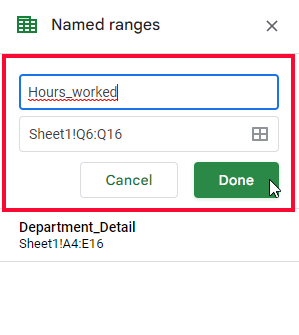
Step 4
Now here you can change the Name of the Named range, and can also re-select the cell range
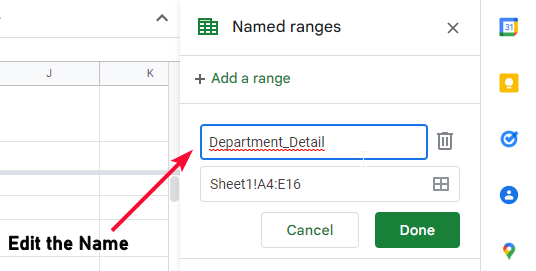
Step 5
Make corrections and click on Done.
Note: This is how you can edit the name, or range of the Named range.
Now the most important thing, we have made Named ranges, but how to use them? Now in the next section, we will learn how to use them in formulas and functions in google sheets.
How to use Named Range in Google Sheets – Using in Formulas and Functions
In this section, we will learn how to use Named ranges in google sheets with formulas and functions and how we can save time working with formulas and functions.
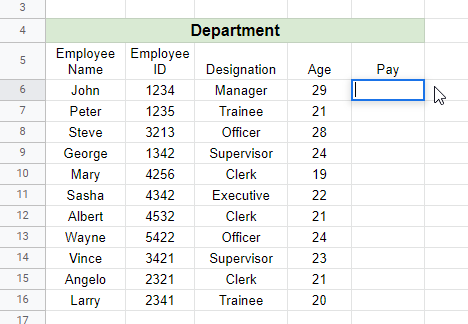
I have a dataset where I need to calculate the Salary of employees, we have an hourly rate and the hours worked written on the other side of the sheet (because its confidential data), so we can simply multiply these two cells, but for a more meaningful way and to help other users understand it, we will use named ranges. It will also help us not to memorize the addresses of these two columns.
Step 1
Make a Named range of working hours, and give a meaningful name (don’t include headers)
Step 2
Make a Named range of hourly rate, and give a meaningful name (don’t include headers)
Step 3
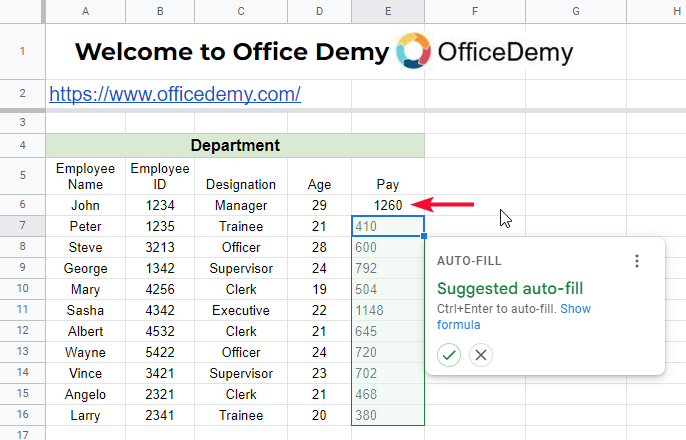
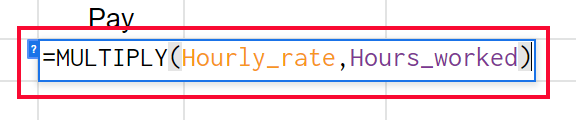
Now come to your main data set, and apply the simple multiplication formula in the “Pay” column.
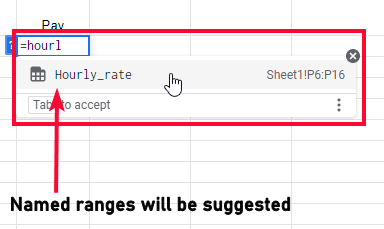
Step 4
Use Names of ranges instead of cell references.

Step 5
Press Enter key when you’re done.
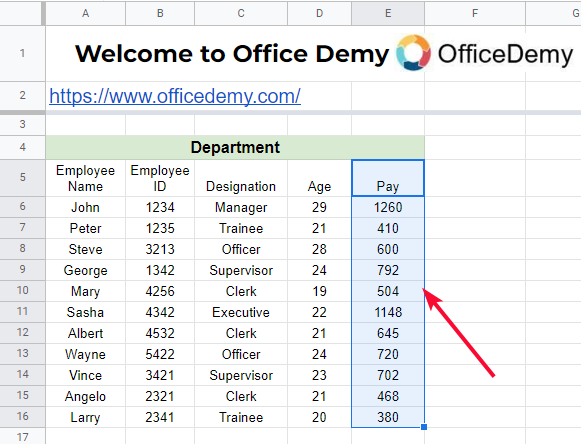
Step 6
Result
Optional: We can also use the below function for multiplying ranges
This is how you can do simple calculations without memorizing the data ranges and make it understandable for other users as well.
Note: You can make as many Named ranges as you want, simply remember that Named ranges cannot be of the same names. If you know the basics of programming, the Named ranges work like variable names, which have some naming guide, and more than one range can’t be of the same name.
I hope you have found this tutorial helpful.
You can use any function or formula with the Named ranges.
Common Functions using Named Range
To find the Average of the Named Range
=AVERAGE(Name_of_Range)
To find the Sum of the Named Range
=SUM(Name_of_Range)
To find the Count of the Named Range
=COUNT(Name_of_Range)
To simply multiply two Named ranges
=(Name_of_Range , Another_Name_of_Range)
Download/Copy Google Sheets Practice Workbook
Important Notes on Named Ranges in Google Sheets
- Named Ranges are dynamic.
- Never name a range with bad names such as A, 101, B, X, Y, etc.
- Always assign meaningful names under 250 characters such as “Employees_data”, “Sales_2022”, etc.
- Named Ranges can be of a single cell as well.
- Named Ranges cannot be of the same name.
- You cannot use spaces in the Name of Named ranges.
- The scripts code to work with Named ranges uses “Camel Case”
Some Script codes to work with Named Ranges
| Script Code | Functionality |
| getName() | fetches the name of the range passed |
| getRange() | fetches the range associated with the name of the range passed |
| remove() | deletes the named range |
| setName(name) | sets or resets the name of the selected range |
| setRange(range) | sets or resets the range associated with the name of the range passed |
Frequently Asked Questions
Can we delete the named ranges?
Yes, we can directly delete the named range, simply click on the named range and then click on the pencil icon to edit it. You will see a trash icon (delete icon), simply click on it to delete the named range, you can also use the script code remove() to delete a named range.
Can Named Ranges Help Me Jump to Specific Cells or Ranges in Google Sheets?
Yes, named ranges can help you with specific cell jumps in Google Sheets. By assigning a name to a range of cells, you can easily navigate and jump to that specific range whenever needed. This feature not only saves time but also enables efficient data analysis and organization within your spreadsheets.
What is the naming guidance to name a range?
Cannot start with reserved words such as true, false, or = equal sign, cannot have spaces anywhere, and cannot be the reference of a cell or range such as A1, or A1:B10. Two named ranges cannot be of the same names.
Conclusion
This is how to use Named ranges in Google sheets. We have learned what are named ranges and why they are helpful, we discussed the benefits of Named ranges and the primary purpose to use Named ranges. We have seen how to make a simply named range in google sheets, then we learned how to edit it, and then finally we have seen how to use it in a formula or function with the names and save our time and make it understandable for every other user by giving meaningful names to Named ranges. We have covered the 5 basic script codes and their functionalities that can be used as a piece of code in the Apps script editor. We used a simple data set in this article, you can access the sheet and make a copy for your practice.
I hope you find this tutorial helpful. I will be bringing more of these articles for you to learn google sheets and improve your skills it helps boost your productivity whether you’re a student a job-doing person or a self-employed freelancer or a businessman. Thank you so much I will see you next time. Keep learning with Office Demy.


