
To Create a Breakout Room in Microsoft Teams
- Open the meeting invite in your Teams calendar.
- Click on “Breakout Rooms” > Click “Create Rooms“.
- Select the number of breakout rooms and click “Add Rooms“.
- Click “Assign participants” to add people to their rooms (choose between Automatic or Manual assignment).
OR
- Click the Rooms icon on the top section.
- Select the number of breakout rooms.
- Choose whether to assign participants Automatically or Manually.
- Click “Create Rooms“
Hello, welcome back. Today, we will teach you how to create a breakout room in Microsoft Teams. The Breakout Room feature in Microsoft Teams allows organizers to establish distinct group meetings within the overarching meeting. By forming these sub-groups, participants can engage in more focused and intimate discussions, fostering collaboration. They were initially introduced in December 2020, during the peak of the Covid-19 pandemic.
Microsoft Teams responded to the heightened demand for communication platforms. Since its inception, the Breakout Room feature has evolved with additional functionalities, streamlining the process for organizers. This tool proves invaluable for organizations or classes that necessitate segmented group discussions without the need to exit the main meeting.
Whether you’re just discovering Microsoft Teams Breakout Rooms or seeking a quick mastery of the feature, this guide will serve as your comprehensive resource.
Benefits of Creating a Breakout Room in Microsoft Teams?
Microsoft Teams Breakout Rooms are very helpful, especially for online classes or virtual meetings. They make it easy for teachers or team leaders. You can quickly share messages with everyone in their breakout rooms, making communication smooth.
The cool part is you can create up to 50 breakout rooms and even pick someone to manage each room.
Plus, you can switch people between rooms if needed. Looking back at the chat history during and after the breakout sessions helps everyone catch up on what was discussed.
Another neat feature is setting time limits for the breakout rooms, which keeps things on track. In simple terms, Microsoft Teams Breakout Rooms make online collaboration and learning much easier by giving you lots of options to manage and organize your virtual space.
Step-by-Step Procedure to Learn – How to Create a Breakout Room in Microsoft Teams
In this article, we will show you how to create a breakout room in Microsoft Teams.
Few things you need to know
- You need to be a Meeting Organizer to manage breakout rooms.
- Breakout rooms can only be organized in the Microsoft Teams desktop app.
- Attendees can access breakout rooms in the Microsoft Team web, desktop, or mobile app.
How to Create a Breakout Room in Microsoft Teams – Before the Meeting
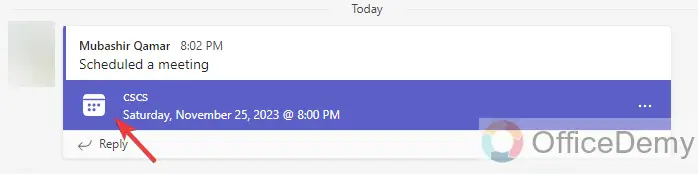
Step 1
Open the meeting invite in your Teams calendar.
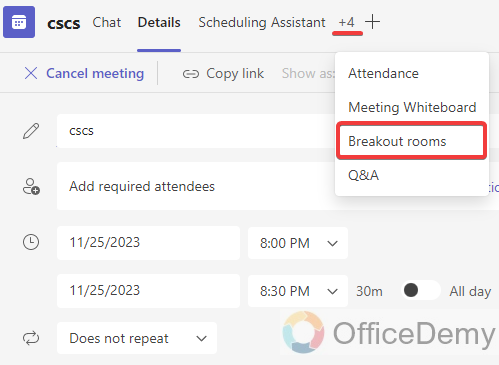
Step 2
Click Breakout Rooms.
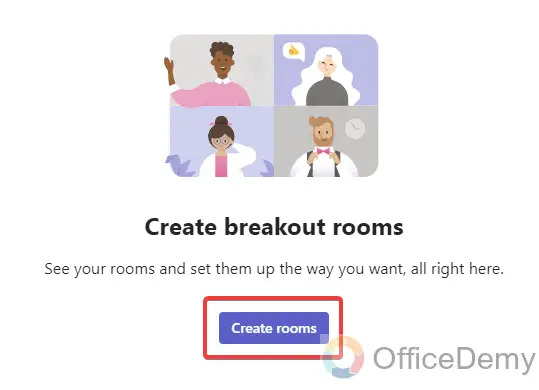
Step 3
Now, click on “Create rooms”
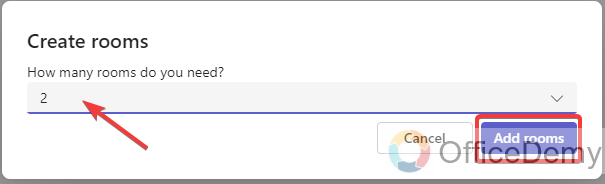
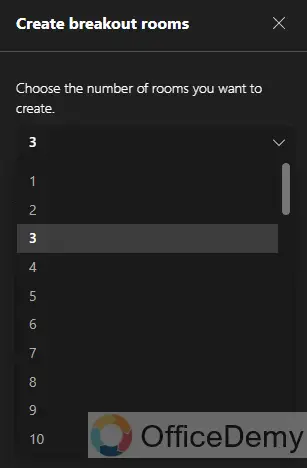
Step 4
Select how many breakout rooms you want and then Click Add Rooms.
Step 5
New Rooms have been created. Now, Click Assign participants to add people to their respective rooms.
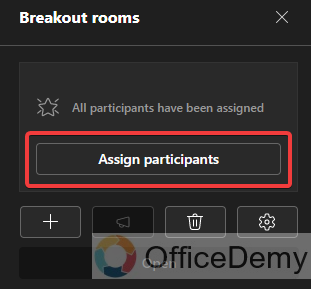
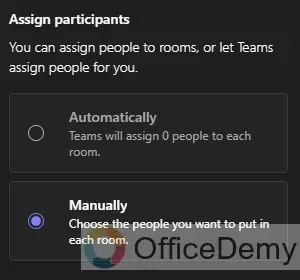
You can choose whether to assign participants Automatically or Manually to breakout rooms
How to Create a Breakout Room in Microsoft Teams – During the Meeting
Step 1
Click the Rooms icon on the top section.

Step 2
Select how many breakout rooms you want.
Step 3
Choose whether to assign participants Automatically or Manually to breakout rooms.
Step 4
Click Create Rooms.

How to Create a Breakout Room in Microsoft Teams – FAQs
Q: What happens if a participant leaves a breakout room?
A: If a participant leaves a breakout room, they can rejoin the main meeting or be reassigned to a different breakout room by the organizer.
Q: How do I end breakout rooms and return to the main meeting?
A: To end breakout rooms and return to the main meeting, click on the “Close rooms” option in the breakout rooms settings. Participants will be brought back to the main meeting.
Q: Are breakout rooms available in all Microsoft Teams plans?
A: Breakout rooms are available in Microsoft Teams for Education and some business plans. Check your specific subscription details to confirm availability.
Conclusion
In conclusion, understanding how to create a breakout room in Microsoft Teams is a great way to make online meetings better. By dividing participants into smaller groups, they can easily talk and share ideas. You can choose who goes where, or do it randomly, making sure everyone gets a fair chance to join in.
Each breakout room is like its own little space, so people can work together without any disruptions. Also, there are more features like showing your screen, private chatting and asking for help, which make it feel almost like meeting in person. Thanks for reading!
