![How to Share Screen on Microsoft Teams [Guide 2023]](https://www.officedemy.com/wp-content/themes/rehub-theme/images/default/noimage_450_350.png)
To Share Screen on Microsoft Teams
- Join a meeting and click “Share“.
- Choose what to share (screen, presentation, whiteboard, or a specific window).
- Your content is shared; click “Stop Sharing” to end.
OR
- During a meeting, tap three dots and select “Share“.
- Choose “Share screen” and grant permissions.
- Share starts; return to Teams and tap “Stop Presenting“.
Learn more in the full article!
Hello, and welcome back. Today, I will teach you how to Share Screen on Microsoft Teams. Screen sharing in Microsoft Teams is a fundamental feature that enables seamless collaboration in virtual meetings and presentations. It allows participants to view and interact with shared content, making it an invaluable tool for team discussions, presentations, and training sessions.
By effortlessly displaying your screen, you can convey information, showcase documents, or walk through presentations in real time. In essence, screen sharing in Microsoft Teams is a powerful resource that facilitates productive and engaging virtual interactions.
Benefits of Screen Sharing on Microsoft Teams?
Sharing your screen with your team on Microsoft Teams is very useful and indeed very important. It empowers seamless collaboration by enabling the visual representation of ideas, documents, and presentations.
This feature transcends geographical barriers, making it indispensable for remote teams and clients. Additionally, it catalyzes efficient problem-solving and troubleshooting, as colleagues can provide real-time assistance.
Learning to share screens on Microsoft Teams is not just a technical proficiency, but a fundamental tool for fostering productive, inclusive, and engaging virtual workspaces. In a world where virtual meetings and remote work are becoming increasingly prevalent, this skill is indispensable for fostering a cohesive and efficient team dynamic.
Step-by-Step Procedure – How to share screen on Microsoft Teams
In this guide, we will take you through each step of how to share screens on Microsoft Teams. The following are the steps of how to share screen on Microsoft Teams on Windows, web browsers, and mobile phones.
How to Share Your Screen on Microsoft Teams – Desktop App
Step 1
Open the Microsoft Teams App in the window.
Step 2
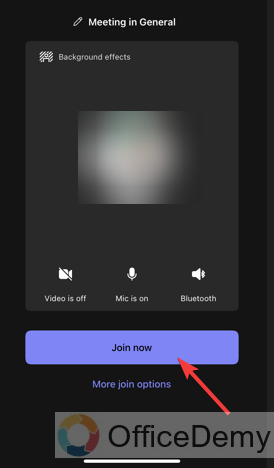
Then Join a meeting in Microsoft Teams.

Step 3
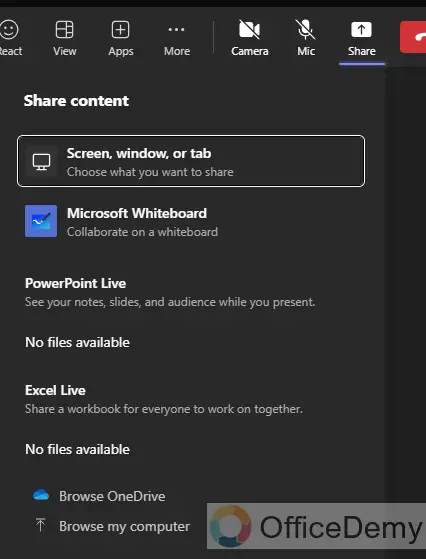
Then Click on the “Share” button, located next to the red “Leave” button.

Step 4
A menu will appear in the lower portion of your screen.
Step 5
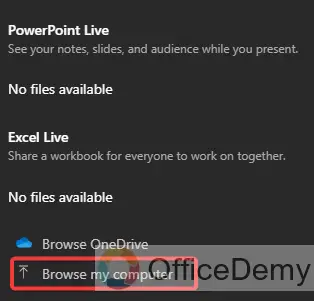
In the menu, there are several buttons. Click on the one that best represents what you wish to share. For this article, I chose a browse my computer to share on screen.
Screenshare: Choose to share everything shown on your entire screen.
PowerPoint Live: This is a special option for sharing PowerPoint slideshows – a great option for presentations.
Microsoft Whiteboard and Freehand Invasion: This is a fun feature, where you can share an interactive whiteboard that other meeting participants can draw on. It’s a great tool for brainstorming.
Window: This option lets you choose a specific window or app to share.
Step 6
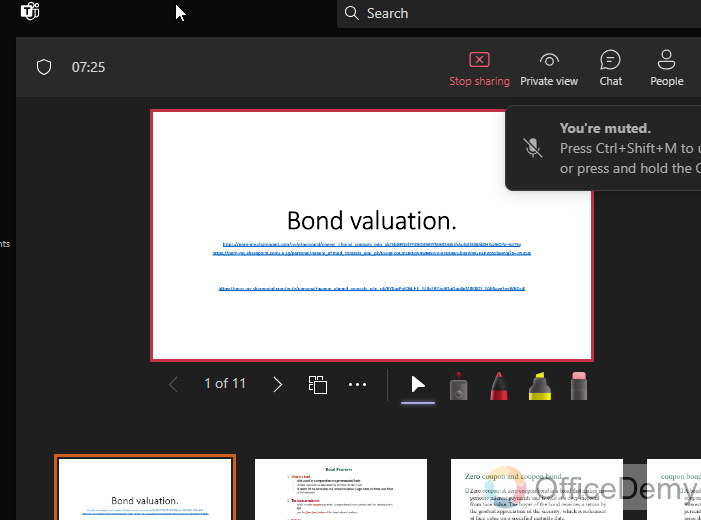
Your screen will begin sharing the media you selected.
Step 7
Once you have chosen which option you want to share, a red border will appear around your screen or the specific part of your screen that you’re sharing.

Step 8
When you are ready to end your presentation, select Stop Sharing.
How to Share Your Screen on Microsoft Teams – Android App
It’s also possible to share your screen on Microsoft Teams if you attend a meeting from your mobile device.
Step 1
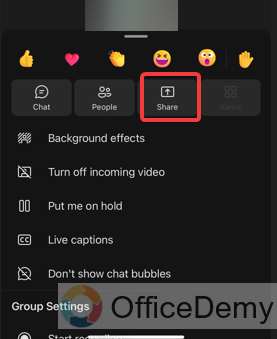
When you are in the Meeting call, tap on the three dots at the bottom of the screen. A menu will appear. Then Tap on “Share”.
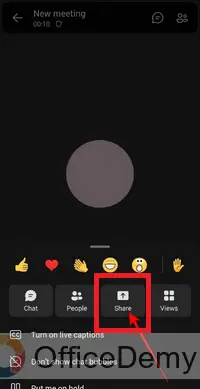
Step 2
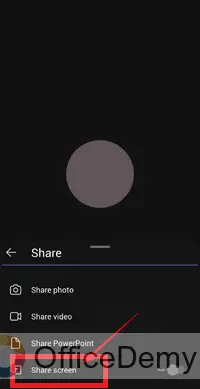
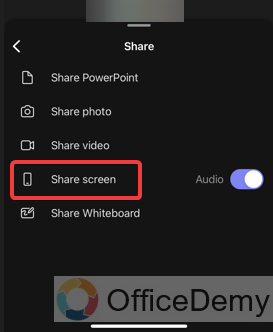
Now four options will appear. These are to share a PowerPoint presentation, share a photo, share a video, or share your screen. Tap on “Share screen”.
Step 3
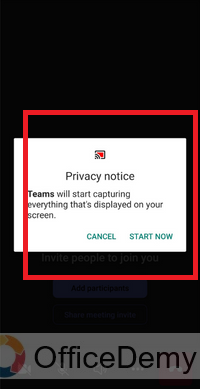
A prompt might appear asking your device to allow Microsoft Teams to share your screen. If this happens, grant permission to do this.
Participants will now be able to see your screen. They will only be able to see the Microsoft Teams app, but you can switch apps while screen sharing, and they will see this.
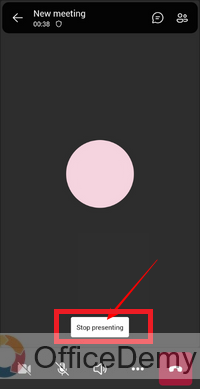
Step 4
When you are ready to stop sharing your screen, go back to the Microsoft Teams app and tap on Stop Presenting.
How to Share Your Screen on Microsoft Teams – iOS
Step 1
Start or join a Zoom meeting from your iPhone or iPad.
Step 2
In the meeting controls toolbar, tap Share.
Step 3
Now, Tap on Share Screen.
Step 4
Tap Start Broadcast.
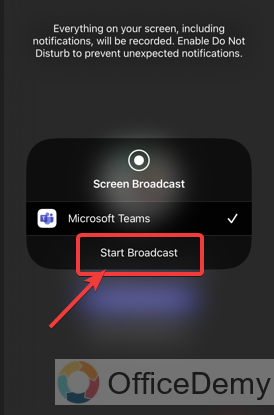
A three-second countdown will begin, and then your screen will start sharing.
How to Share Your Screen on Microsoft Teams – Windows Browser
If you’re using Microsoft Teams on your browser, follow these steps to share your screen with your peers:
Step 1
Select the contact and initiate a call.

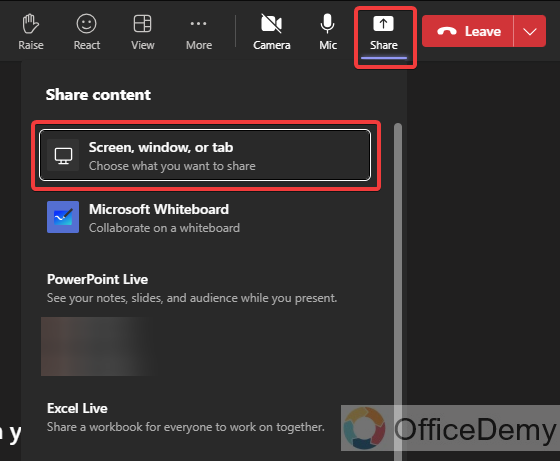
Step 2
Once the call is accepted, you can click on the ‘Share’ button and then click on ‘Screen, window, or tab’.
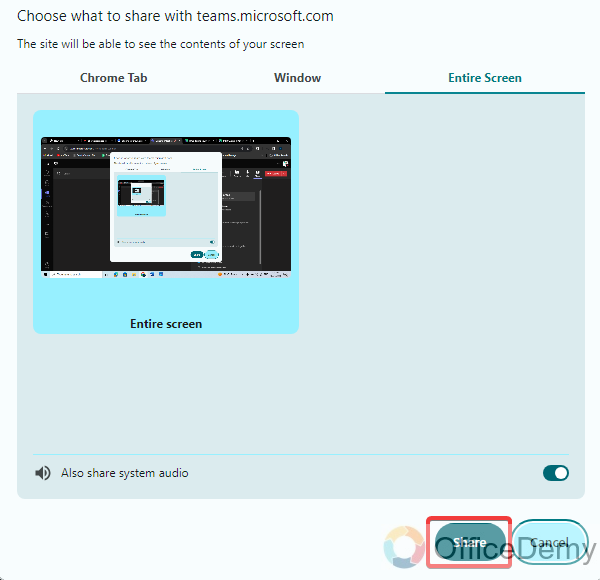
Step 3
After that, you will have multiple options to select the desired window.
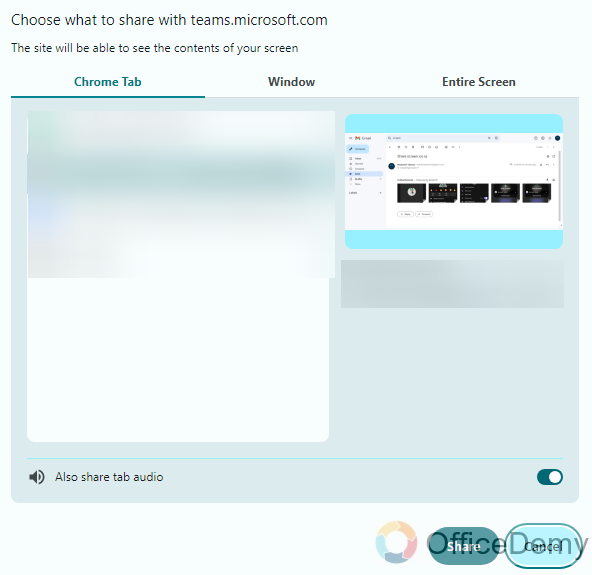
Step 4
Select the window that you want to share with the participants on the call and then click on Share.
Step 5
The chosen window will now be displayed on the screen of the end-user.
When you are ready to end your presentation, select Stop Sharing.
How to share screen on Microsoft Teams –FAQs
Q1: How do I initiate screen sharing on Microsoft Teams?
Initiating screen sharing on Microsoft Teams is straightforward. While in a meeting or call, locate the toolbar and click on the “Share content” icon. Select “Desktop” to share your entire screen or choose a specific application or window to share.
Q2: Can I share multiple screens simultaneously?
Yes, Microsoft Teams allows you to share multiple screens at once. Simply select the screens you want to share when prompted. This can be useful for showcasing multiple documents or applications simultaneously.
Q3: Can I grant control of my screen to another participant?
Yes, you can. After initiating screen sharing, click on the “Give Control” option in the toolbar and select the participant you want to grant control to. They can then interact with your shared content as if it were on their screen.
Q4: What if I only want to share a specific application, not my entire screen?
You have the option to share a specific application window. Instead of selecting “Desktop” when prompted to share, choose the specific application you wish to share from the list provided.
Q5: Why can’t I share my screen on Teams?
If you have not enabled screen-sharing permissions on your device, it is likely you won’t be able to share your screen with someone on Microsoft Teams. If you’re facing such an issue, make sure that you have enabled the permission for Camera, Microphone, and Screen sharing/screen recording on your device.
Conclusion
In conclusion, how to share screens on Microsoft Teams is a valuable skill that greatly enhances collaboration and productivity in the digital workspace. I hope you find this guide helpful. I will see you soon with another Microsoft Teams Guide. Take care, and keep learning with Office Demy.

