
To Check Outlook Storage
- Go to “Settings” > “General” > “Storage”.
OR
- Right-click on your “Email“.
- Select “Data File Properties” > Click “Folder Size“.
In this section, we will learn how to check Outlook storage. Although an Outlook account is free to use, it does not have unlimited storage. The free tier of Outlook storage is only 15 GB, it may be enough space for most home users and some commercial users, but the day comes when it will run out.
To check the Outlook storage here’s the complete guide in a nutshell on how to check Outlook storage.
Why we need to Check Outlook Storage?
You probably get messages from Outlook that, you are out of storage. How to check Outlook storage can be found very helpful to you to check the actual usage of your account. You can also know which folder is occupying how much space. You can also get statistics about the calendar and contacts consumption of storage.
If you want to know all these things, then learn the following article on how to check Outlook storage.
How to Check Outlook Storage?
Microsoft Outlook provides complete information regarding user account exchange, therefore checking Outlook storage is an easy task. In the following section, we are going to learn three methods of checking Outlook storage.
- Checking Outlook storage in Outlook Web
- Checking Outlook storage in Desktop App
- Checking Outlook storage in Outlook by Cleanup Mailbox
Check Outlook Storage – On Outlook Web
If you are a user of Outlook online and want to check Outlook storage on the Outlook web version, then the following method of checking Outlook storage is for you.
Step 1
If you are on Outlook online, first log in to your account you will be directed to the home page of your account as follows. On this page look at the right top corner of the window you will find a gear icon, click on it to open Outlook settings.

Step 2
When you click on this small gear icon, a drop-down panel will open where you will see fewer seconds. If you want to see all settings, then click on the “See all settings” button as highlighted below.

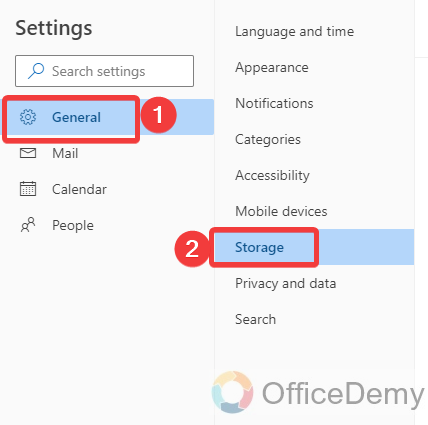
Step 3
A new window will open containing all settings regarding Outlook. On this window click on the “General” tab from the main menu, in this general tab you will find the “Storage” option as highlighted in the following picture.
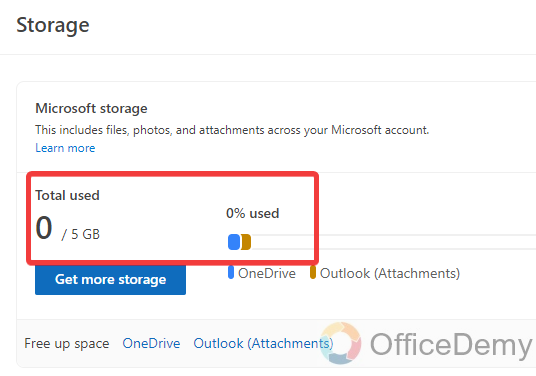
Step 4
You can check storage for your Outlook account by clicking on this “Storage” button. When you click on the “Storage” button, you will see the following statistics for your Outlook account as shown in the following screenshot.
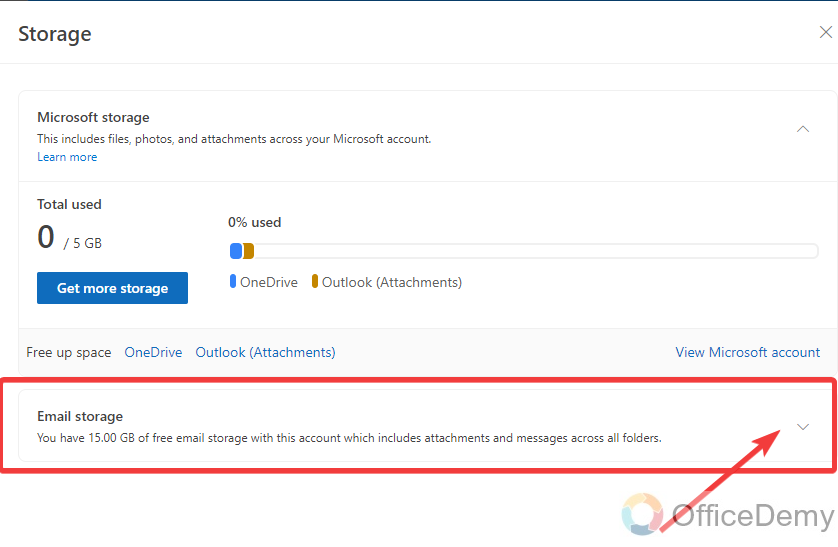
Step 5
To see more detail about Outlook storage, you will see a bar menu just below the storage section as highlighted below. Click on the following small arrow to see all storage details for your Outlook account.
Step 6
As you can see in the following example all folders are individually described with their storage through which you can easily monitor your Outlook storage.

Check Outlook Storage – On Desktop App
Most of the users are using the desktop version of Outlook due to its unlimited features. So, if you are on Outlook desktop and looking for your Outlook’s account storage then follow the following instructions to check storage n Outlook desktop.
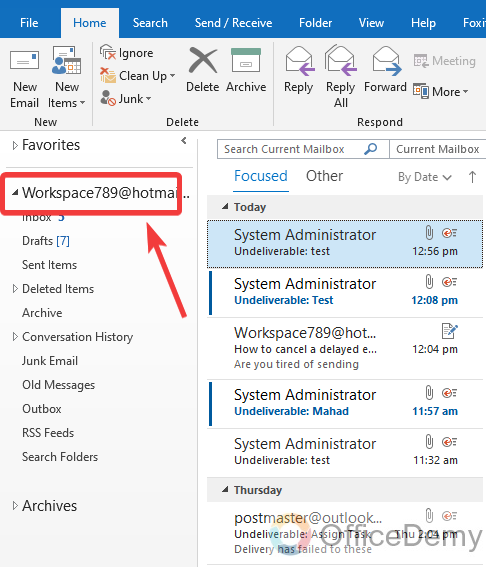
Step 1
When you open Microsoft Outlook, if you look at the left side of the window you will see a separate section for the folder list. In this folder list, the parent folder is your account folder as highlighted below.
Step 2
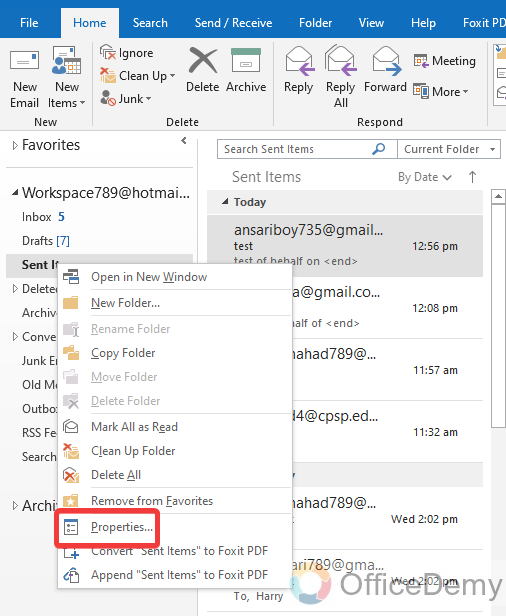
Press the right click of the mouse on this parent folder, and a drop-down menu will open where you will see a “Data File Properties” option at last. Click on it to check account storage.
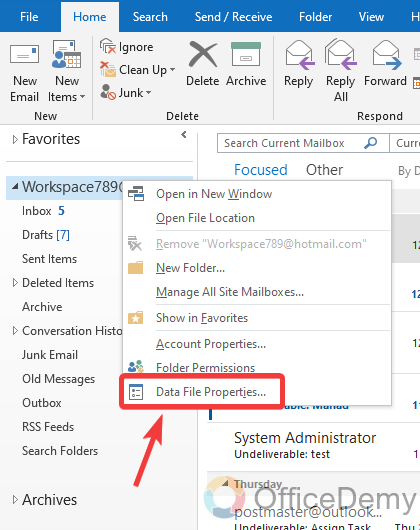
Step 3
Clicking on the “Data File Properties” option will give you a new small window as can be seen in the following picture. On this window find the “Folder Size” button as highlighted below.
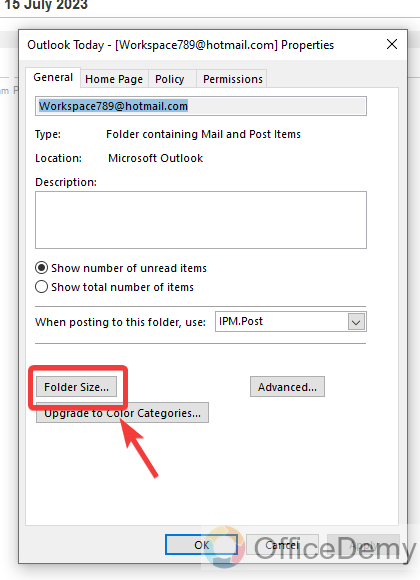
Step 4
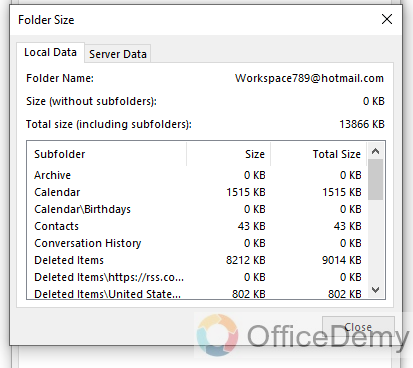
When you click on this “Folder Size” button, it will give you a complete storage description box as can be seen in the following screenshot. You can easily check the storage for your account’s all folders.
Check Outlook Storage – Using Cleanup Mailbox
Although the above method of checking storage is good enough in the Outlook desktop version there is an additional method of checking Outlook storage that is below.
Step 1
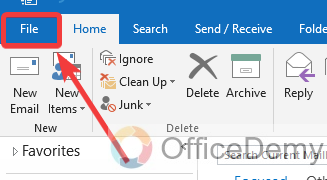
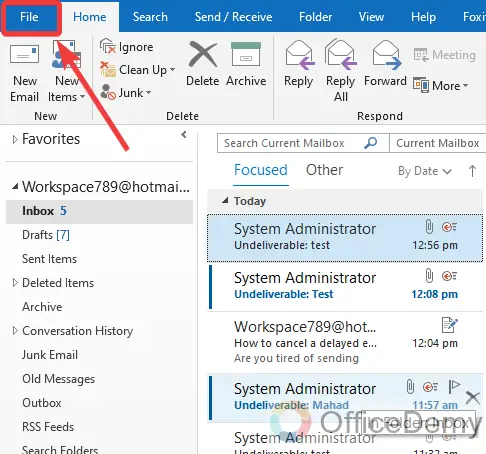
Go into the “File” tab of the menu bar located at the left top corner of the window as directed below.
Step 2
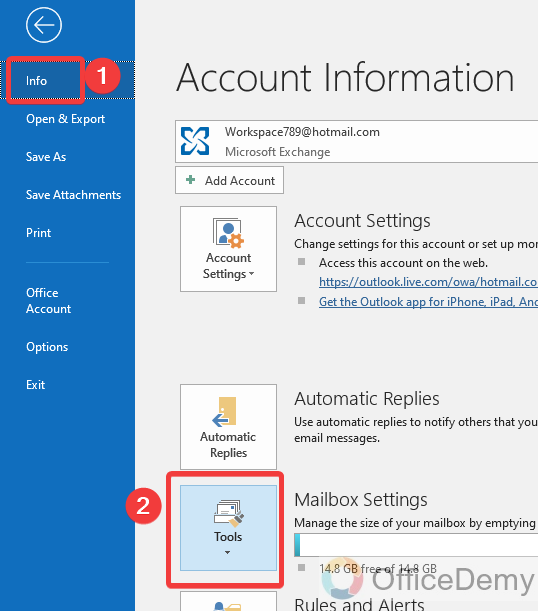
When you click on the “File” tab you will switch to the following window. Click on the “Info” tab from the blue panel at your extreme left then click on the “Tools” button as highlighted in the following picture.
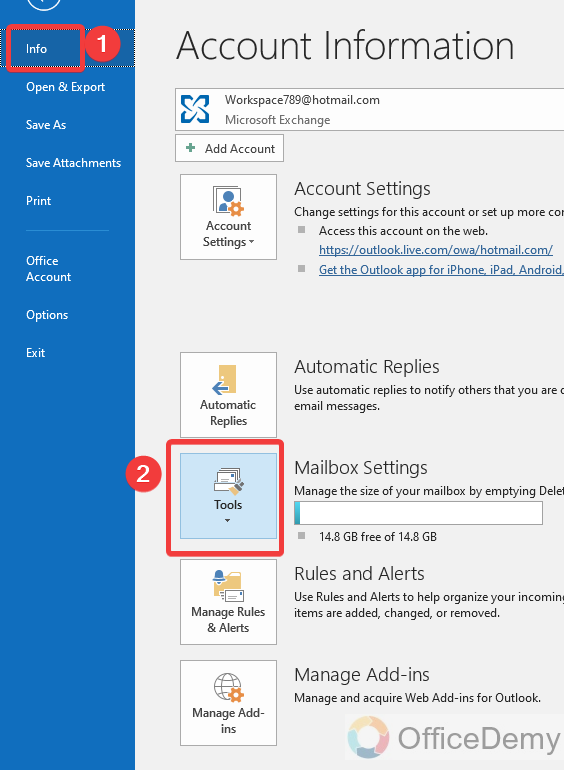
Step 3
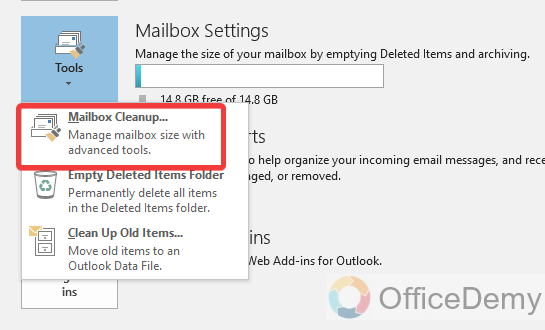
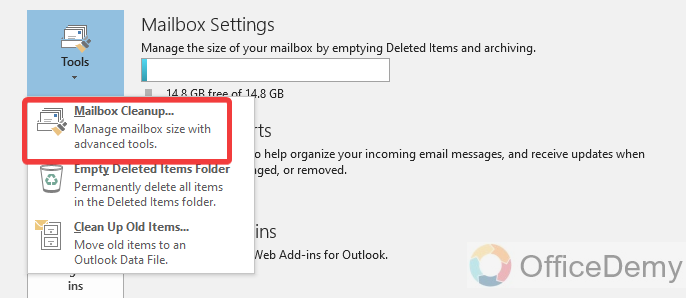
When you click on this “Tools” button, a small drop-down will open where you will find a “Mailbox Cleanup” option at first. Click on it to open it.
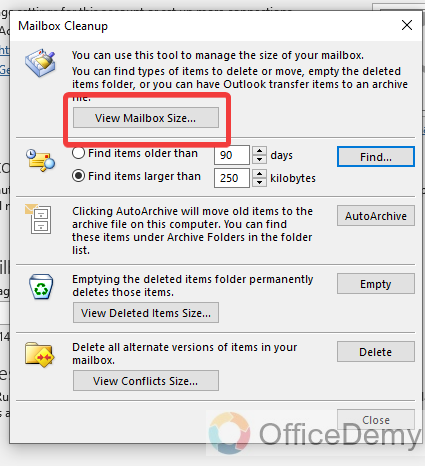
Step 4
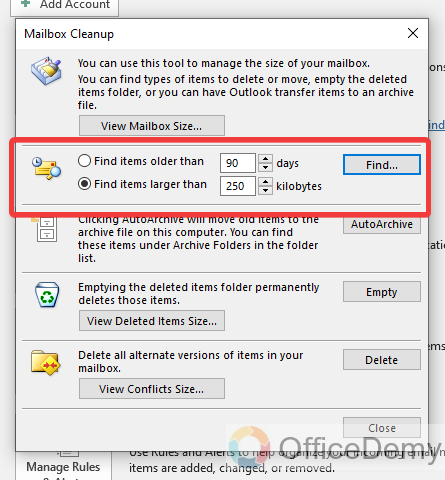
When you click on the “Mailbox Cleanup” option, a new dialogue box will open containing several options. But in the first section, you will find a “View Mailbox Size” button through which you can easily check the storage of Outlook accounts.
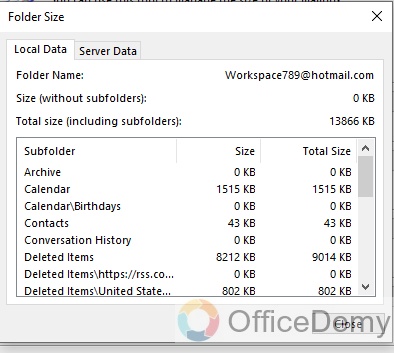
Step 5
The result is in front of you as you can see all the statistics regarding Outlook account storage with individual size of all folders as can be seen in the following screenshot.
Frequently Asked Questions
Q: How to check a folder size in Outlook?
A: In the above article, we were learning about the checking storage of an entire Outlook account, if you want to check only for a specific folder in an Outlook account then you can check a folder size in Outlook with the help of the following steps.
Step 1
When you open Microsoft Outlook, you will see three section divisions in front of you, at your right you will see all email details and descriptions then all conversations in the center, and on your extreme left there is a section containing a folder tree to your account. Select the folder that you want to check for storage.
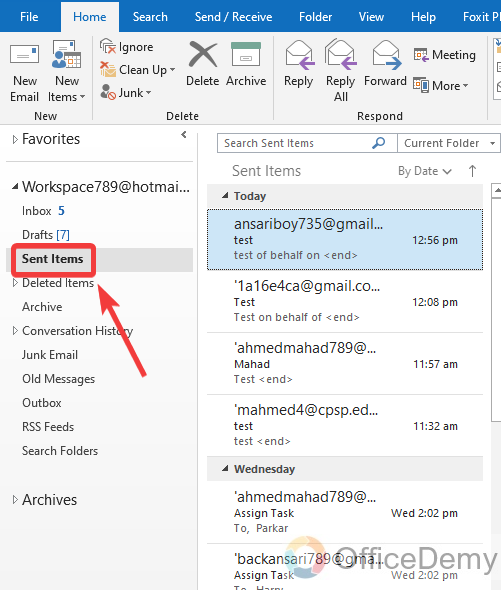
Step 2
Once you find the folder that you want to check for storage, first press the right click of the mouse on it, you will find the “Properties” option from the drop-down menu. Click on it to open it to check the folder size.
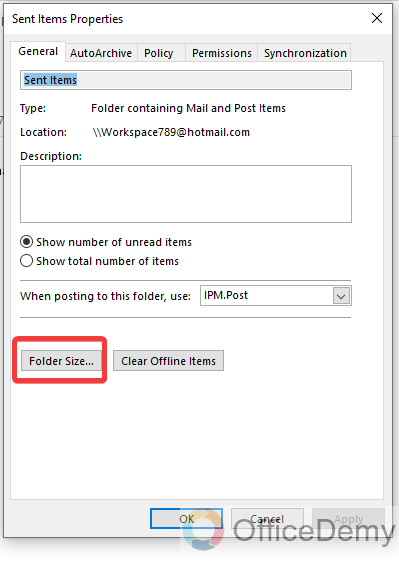
Step 3
As you can see in the following picture properties dialogue box has been opened in front of you. Now find the “Folder Size” button on this window. You can navigate the “Folder Size” button from the following picture.
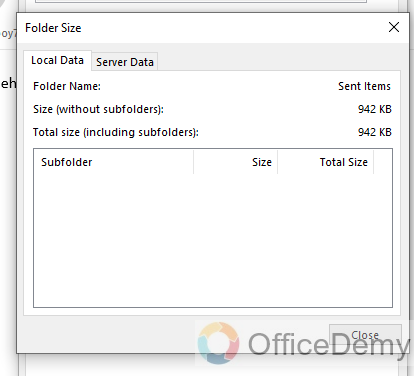
Step 4
When you click on “Folder Size Button” another small pop-up will appear in front of you where you can see and check all the storage details for the selected folder.
Q: How to clean up Outlook storage?
A: If you deal with a business account and have hundreds or sometimes thousands of emails per day then it may get full for storage. If you are suffering from getting messages from Outlook administration to free up space, then the following tutorial can be found very helpful to you.
Step 1
Look at the extreme left top corner of the window and you will see a “File” tab of the menu bar. Click on it to open it.
Step 2
When you click on the “File” tab of the menu bar the following window will open. Go into the “Info” tab from the left blue panel and then click on the “Tools” button in this tab as highlighted below.
Step 3
The tools button will drag down a small drop-listed menu, where you will find a “Mailbox Cleanup” option through which you can easily clean up your Outlook storage. Click on it to open it.
Step 4
When you click on the “Mailbox Cleanup” option the following dialogue box will open in front of you. On this window, there are different ways to clean up Outlook storage.
Let me teach you all of them one by one in the following step-by-step guide.
The first way to clean up the mailbox is by finding and deleting old and large emails.
Step 5
In the second section of mailbox cleanup, you will see an “AutoArchive” feature of Outlook. With the help of enabling this feature, you can automatically archive your emails and can get free up space in your account’s storage.

Step 6
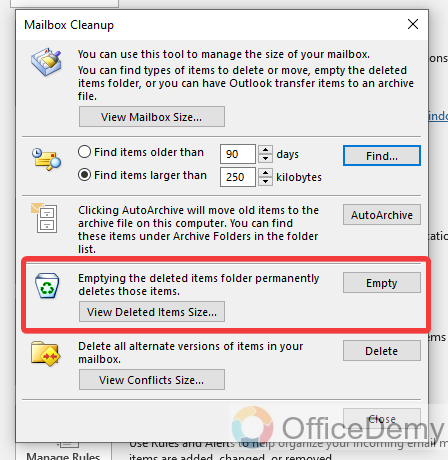
When you delete any email in Outlook it will automatically move towards the deleted items folder that occupied a lot of account storage.
In the next way of mailbox cleanup, there is an option for “Emptying deleted items folder“. You can empty the deleted items folder with just one click from this option.
Step 7
Usually, most Outlook accounts have different alternate versions of mailboxes or contain different sites that may take up much space in your Outlook storage. You can delete all these sites and versions from this option.
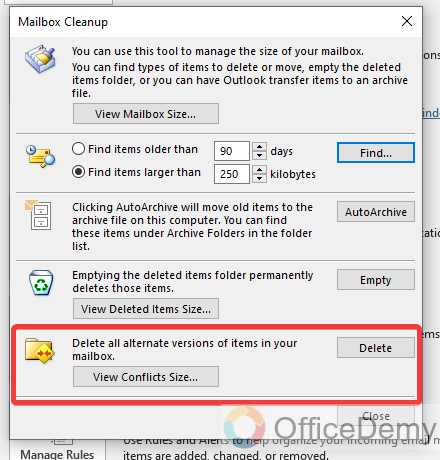
In this way, you can easily clean up your Outlook storage.
Conclusion
This was all about how to check Outlook Storage. Now, you know, how to check Outlook storage, in case of having any difficulty, let us know in the comment section. Thanks and keep learning with Office Demy.


