
To Change the Owner of the OneDrive Folder
- Inside OneDrive, select the folder.
- Click the three dots for additional settings.
- Choose “Manage access” and then “Start sharing“.
- Add the new owner’s email and set permissions to “Edit“.
- Click “Share” to finalize.
- Now, instruct the new owner to remove your access, and they’ll automatically become the new owner.
Hello Guys. I hope you all are well, Today, we will learn how to change owner of OneDrive Folder. There is no direct method for transferring ownership of the OneDrive folder from one user to another. Instead, the new owner of the file will need to download the folder to their computer re-upload it to their OneDrive account, and re-create any sharing and collaboration permissions. So, using a similar workaround, we can change the owner of the OneDrive folder.
Actual Process to Change Owner of the OneDrive Folder
We have a few steps for the changing owner of the OneDrive folder, First, open the OneDrive web app, then right-click on the folder for which you want to change the ownership, and then click details in the details pane under the access heading, after that click manage access and make a note of all sharing permissions on the folder to pass on to the new folder owner.
Benefits of Sharing OneDrive Folder in Email
If you allow other people to have owner-level permissions over a file or folder in your OneDrive account, it means you made a good decision. For instance, If your OneDrive account is deleted (for example if you leave the company), files that you originally owned will still be removed, even if ownership is shared, further, if you are sharing ownership with others, it means you, and your friends or anyone can work, edit, and make changes in those files or folders on the same time without any trouble. Maybe your account was deleted by mistake, so don’t worry you can recover if you share ownership with someone else before.
Step-by-Step Procedure to Learn – How to change Owner of OneDrive folder
We can change the owner of the OneDrive folder by this different but simple method. So, we are starting to learn step by step how to change owner of OneDrive folder, don’t go from your seat to anywhere keep paying attention to the instructions, we need to focus just for a few moments for learning.
How to Change Owner of OneDrive folder – Using Sharing Options
In this section, we will learn the steps regarding how to change owner of OneDrive folder.
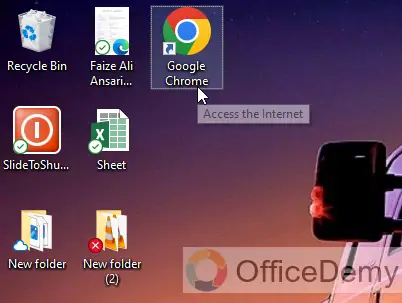
Step 1
Open your preferred browser, I am using Google Chrome in this case.
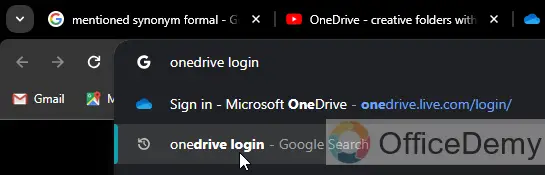
Step 2
Search for the “OneDrive” in your browser.

Step 3
Click on the “OneDrive login” link, or a similar link you got in the suggestions for your search query.
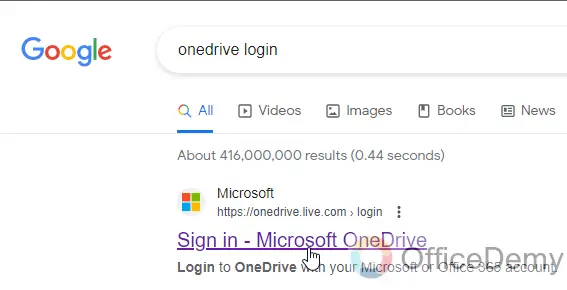
Step 4
Now from the Actual SERPs, click on the Office Microsoft OneDrive sign-in link.
Step 5
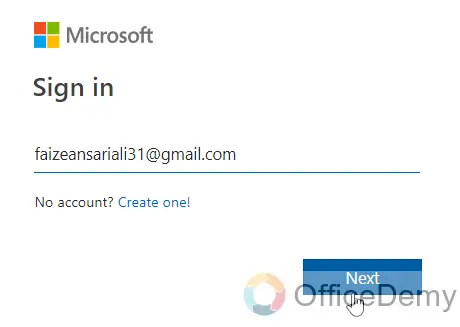
Enter your Gmail Account details. or phone number to log in to your account.
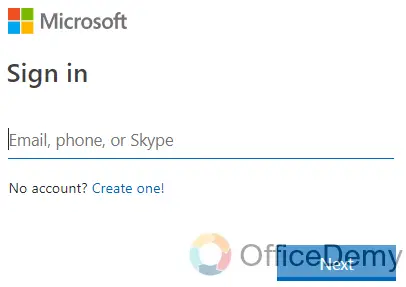
Step 6
Click on the “Next” button.
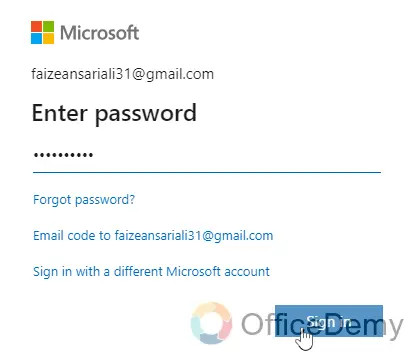
Step 7
Carefully Enter your password, and click on the “Sign in” button to open a Microsoft OneDrive Account.
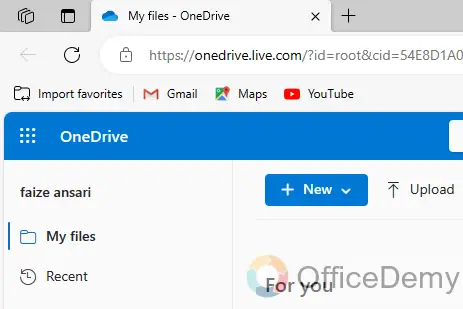
Step 8
Our OneDrive home page is successfully opened with the Gmail account.
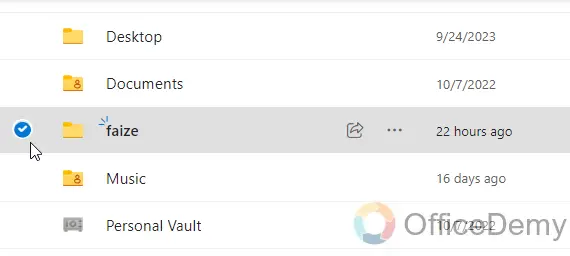
Step 9
Inside my OneDrive, I have a folder with my name, now I will select this folder.
Step 10
Click on “Three dots” to open the details function tab for further settings.
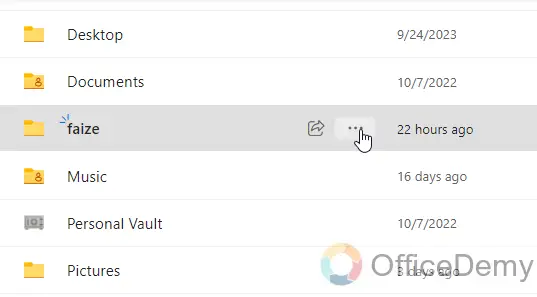
Step 11
Now click on the “Manage access” button to add or change your account.
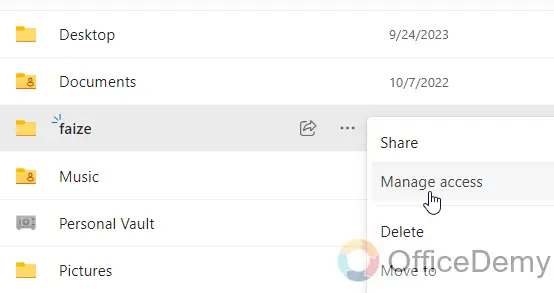
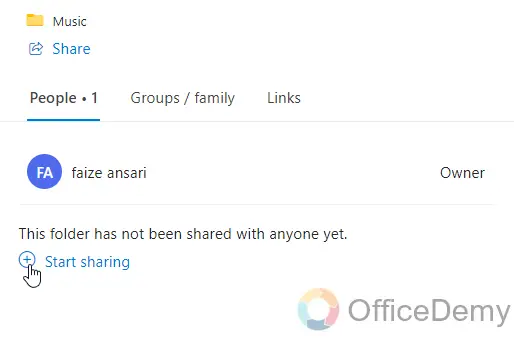
Step 12
Click on “Start sharing”.
Step 13
Add the email address of the person you want to transfer ownership to.
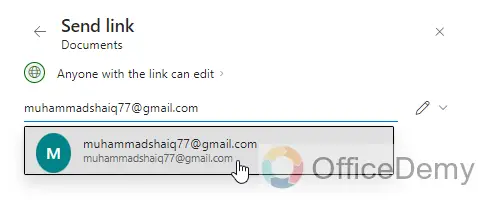
Step 14
Type a custom message to let the recipient know why they received the access from you.
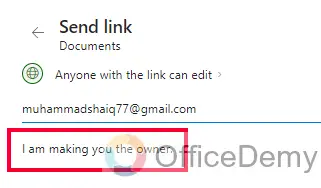
Step 15
Set Sharing permission to “Edit”.
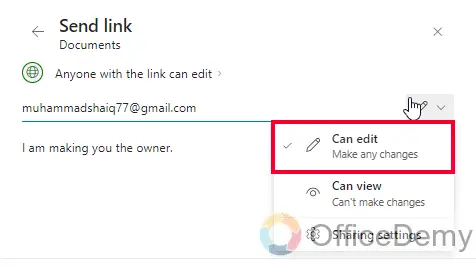
Step 15
Click on the Share button to share the access.

Now from the other end, request the person to remove your access, and automatically they will become the owner of the OneDrive Folder.
FAQs on How to Change Owner of OneDrive Folder
Q1: How can we remove the owner of a OneDrive folder?
A1: We need to follow a few points to remove the original owner from the shared folder
first select the original owner under the people tab then click direct access edit and select the can edit drop-down menu after that select remove direct access and click remove to confirm.
Q2: Does taking ownership of a folder change permissions?
A2: Any users with ownership of files, folders, or other objects have rights and can take control of any object, regardless of the permissions on that object, and then can make any changes that they want to make to that object.
Q3: Who should be the owner of the shared folder?
A3: The creator of a shared folder is automatically designated the owner unless the folder was created in someone else’s shared folder.
Q4: Can I move my OneDrive folder to another account?
A4. If you want to move your OneDrive folder to another account then you can do an automatic OneDrive transfer to another account by using Vault Me, or you can download and upload folders manually.
Q5: Can we share the OneDrive folder with external users?
A5: Yes, we can share OneDrive folder with external users because when sharing OneDrive files, SharePoint files, or lists with other people, it allows us to securely collaborate with people outside our organization. If you sign in with a work or school account, you can send a link to different people, either inside or outside of our organization.
Conclusion
That’s all about how to change owner of OneDrive folder. We hope that we have given enough instructions related to this topic. I hope you find this guide helpful, thanks, and keep learning with Office Demy.
![How to Save Bookmarks to OneDrive [User Guide]](https://www.officedemy.com/wp-content/themes/rehub-theme/images/default/noimage_336_220.png)
