
To Add a Table in OneNote
- Open the notebook and place the cursor.
- Go into the Insert tab.
- Click on the Table option.
- Select the order for the table.
- The table will be added to your notebook.
OR
- Open the notebook and place your cursor.
- Right-click> Click on the Table option.
- Select & write the number of rows and columns.
- Click on the OK button.
Today we will learn how to add a table in OneNote. Microsoft OneNote is also designed like other applications of Microsoft Corporation like Word, Excel, etc. Like other applications, Microsoft OneNote also has features of creating tables to organize data in tabular form.
In this tutorial, we will learn how to add a table in OneNote, so let’s go through this guide to learn in detail. Let’s get started.
Benefits of a Table in OneNote?
Tables are commonly used to organize the text in group information. They are also used in listing data and to represent data elements. Tables can also be used for making calculations and equations.
In these cases, if you go through any of them you may need to add a table in OneNote. Tables can also help visually arrange data in OneNote. If you want to learn how to add a table in OneNote, so let’s move toward the next section of the step-by-step guide.
How to Add a Table in OneNote (3 Ways)
In this tutorial on how to add a table in OneNote, we will discuss three different methods that are below.
- Add a table in OneNote by Insert tab
- Add a table in OneNote by Right Click
- Add a table in OneNote by Spreadsheet option
1. Add a Table in OneNote by Insert Tab
If you want to add or insert a table in OneNote, the official method of adding a table is by using the Table option located in the Insert tab of OneNote.
Step 1
First, we will open the notebook in which we want to add a table and then go into the “Insert” tab from the menu bar of Microsoft OneNote.
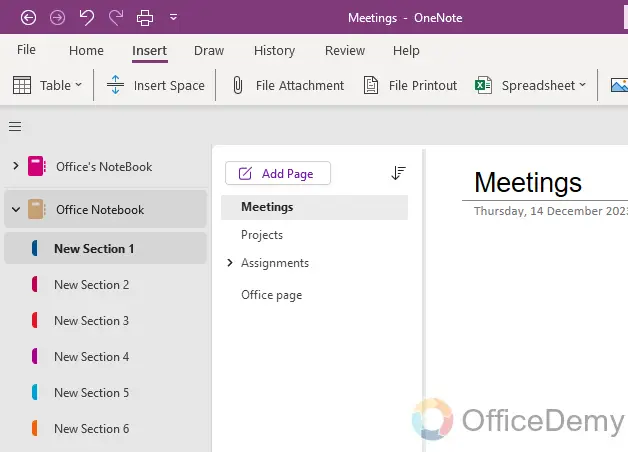
Step 2
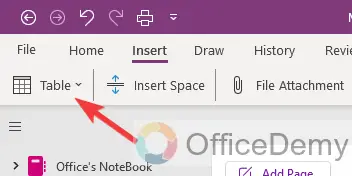
In the insert tab, if you look first in the ribbon, you will see an option for “Table” through which you can easily add a table in OneNote. Let’s click on it to add it.
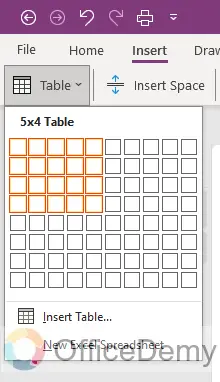
Step 3
When you click on this “Table” option, a small drop box will open where you will see several boxes to select the order of the table that you want to add. Select the number of boxes in rows and columns as you want to create a table.
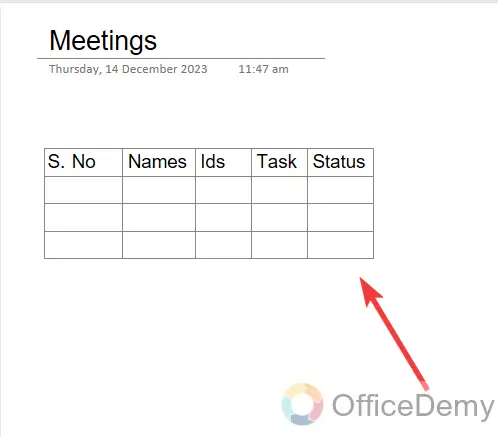
Step 4
Here you can see the result in the following picture that the table has been created according to a given order. Now we are ready to add text to this table.
2. Add a Table in OneNote by Right-Click
This method is almost like the above method of adding tables in OneNote, but this method is a little shorter than above and can save you time. You won’t need to go into the Insert tab or Table option, wherever you are on the notebook just right-click and get your Table. Let me show you practically in the following steps.
Step 1
First, open the notebook or page to which you want to add a table. Now, wherever you are in the notebook just press the right click to open a drop-down. In this drop-down menu, you will have to click on the “Table” option.
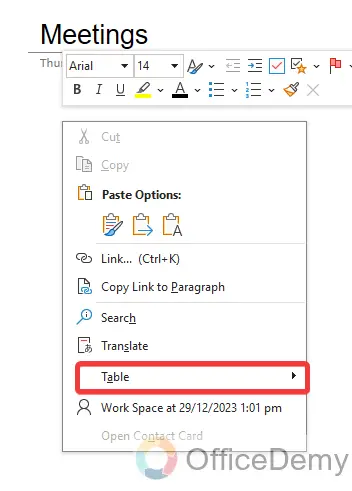
Step 2
Another tab menu will open on clicking on the “Table” option where you will see an “Insert table” option through which you can also add a table in OneNote.
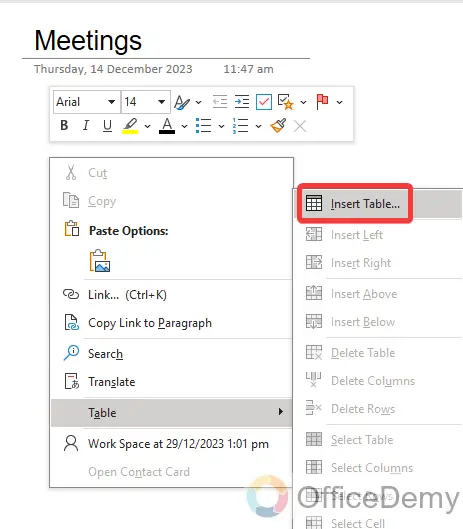
Step 3
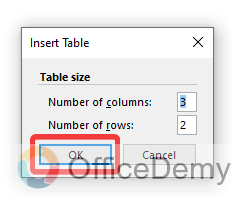
A small dialogue box will appear in front of you where you will be asked for the number of rows and columns in the table that you are going to create. Set the number of rows and columns as you want then click on the “OK” button.
Step 4
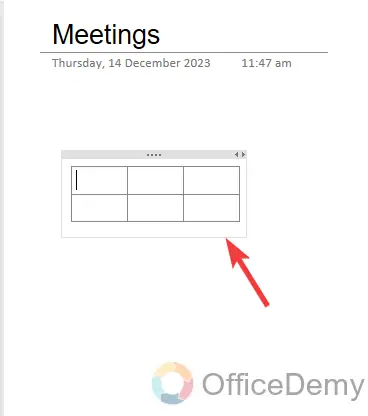
As we selected two rows and three columns, here you can see the result that a table has been created for two rows and three columns. In this way as well, you can add a table in OneNote.
3. Add a table in OneNote by Spreadsheet Option
Microsoft OneNote also provides the facility of adding an Excel Spreadsheet in OneNote that can be used as a Table in OneNote. It provides you with some extra Table features as well. Moreover, if you want to add a Pre-made table in OneNote, you can also add it with this feature. Please read the following guide in which I have described both conditions through which you can get a lot of benefits.
Step 1
In this method as well, we will go into the “Insert” tab of Microsoft OneNote, this Insert tab can be found in the menu bar of OneNote as highlighted below.
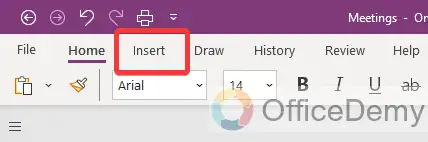
Step 2
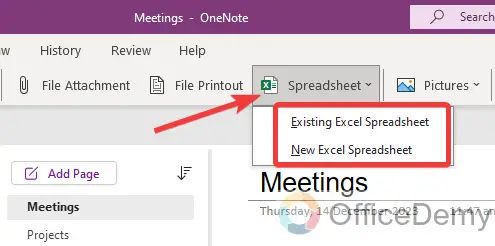
In the Insert tab, you will see a drop-listed option for “Spreadsheet” where you will see a couple of options “Existing Excel Spreadsheet” and “New Excel Spreadsheet” options. Let me describe both options in the below steps.
Step 3
Firstly, we will click on the “New Excel Spreadsheet” option from the drop listed menu of Spreadsheet.

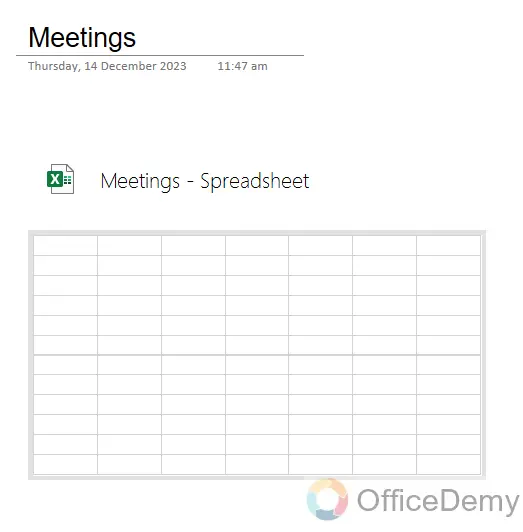
Step 4
This option will give you a new Excel spreadsheet where you can work from scratch, as seen in the following picture. This Excel spreadsheet can be used as a table in OneNote.
Step 5
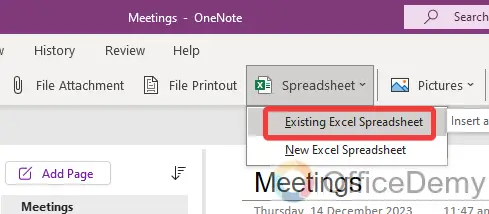
Now, let’s click on the second option “Existing Excel Spreadsheet” from the tab. It will allow you to add an existing spreadsheet saved in your device containing a table.
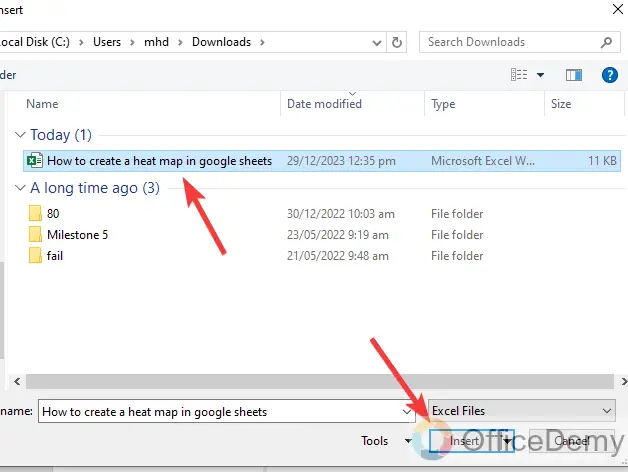
Step 6
A new small separate window will open where you will have to find and choose the Table file that you want to add in OneNote. Once selected the file then click on the “Insert” button as shown in the figure.
Step 7
Here, you’ll get another pop-up window where it will ask you to Attach a file, Insert an Entire Spreadsheet, or Insert a chart or Table, we are adding a table in OneNote, so here we will select the “Insert a Chart or Table” option as highlighted below.

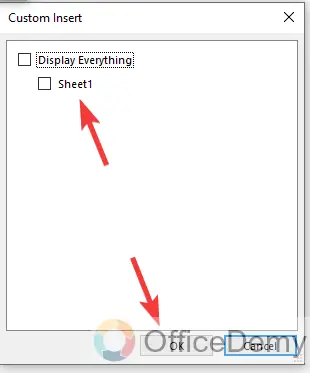
Step 8
It will give you another pop-up dialogue box where it will ask you to select the sheet from the spreadsheet, checkmark the option in which your table is contained, and then click on the “OK” button.
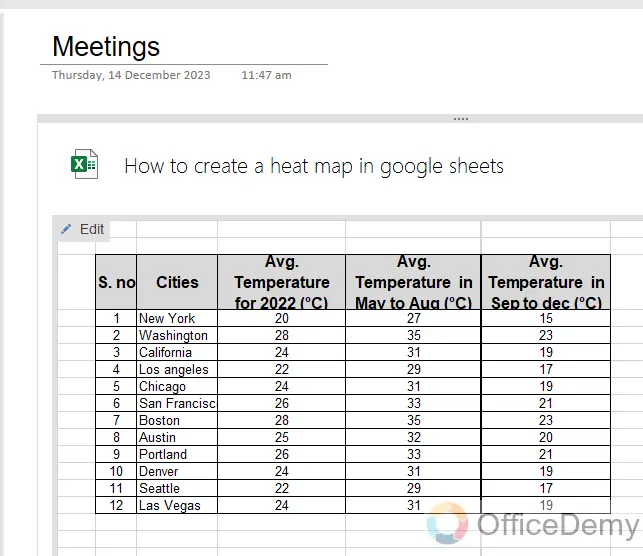
Step 9
You are almost done now; in the result, you will get your table in the OneNote from the Spreadsheet as can be seen below.
Frequently Asked Questions
Can we add a table in OneNote mobile?
Most of the users are handy with OneNote on their mobile, so are you thinking about how you can add a table in OneNote mobile? Yes! You can. Follow the following instructions to add a table in OneNote mobile.
Step 1
If you want to add a table in OneNote mobile, first open the application on your mobile and then open the notebook in which you want to add a table in OneNote.

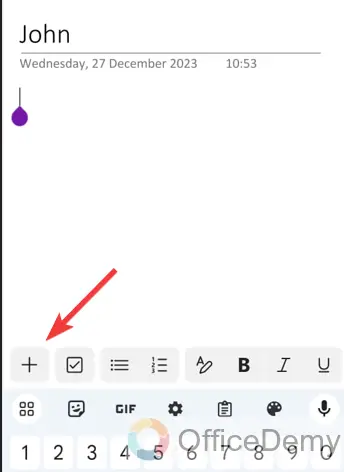
Step 2
When you start writing in OneNote, you see a “+” sign along the tools above the keyboard as directed below. Click on this “+” sign to open more tools in OneNote mobile.
Step 3
Clicking on that “+” sign will give you some additional tools and options where you will see the “Table” option as well through which you can easily add a table in OneNote mobile too.
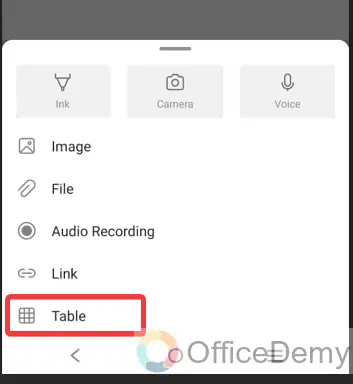
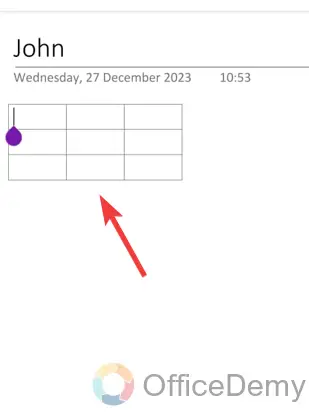
Step 4
As you click on the “Table” option, by default OneNote creates a table of 3×3 which means three rows and three columns, but you can add and remove these number of rows and columns as well according to your need.
How to add or remove table cells in OneNote?
Although OneNote asks for the number of rows and columns before adding a table mostly you may need to add or remove cells from a table in OneNote. You can add or remove cells in the OneNote table with the help of the following steps.
Step 1
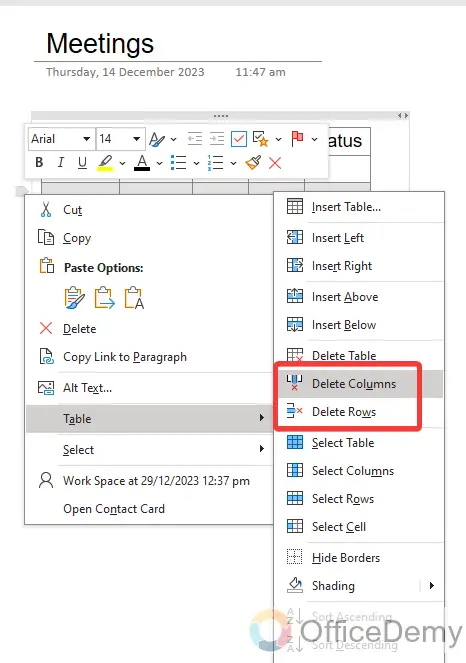
If you have added a table in OneNote, now you want to add or remove cells in that table then hover your mouse over the table and press click, a small drop-down menu will open where you will have to click on “Table” options.
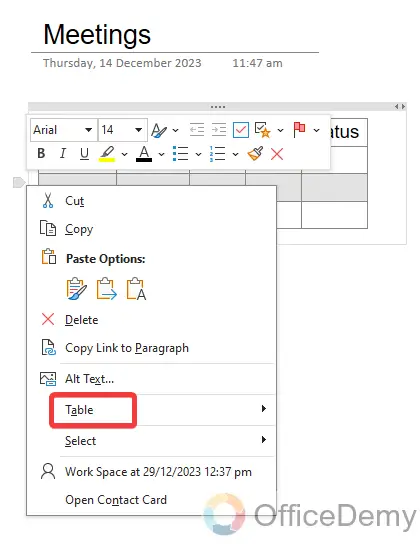
Step 2
As you click on the “Table” option, it will give you so many options in another drop-down menu where you will see Insert Left, Insert Right, Insert Above, and Insert Below options with the help of which you can add cells, rows, and columns in your OneNote table.
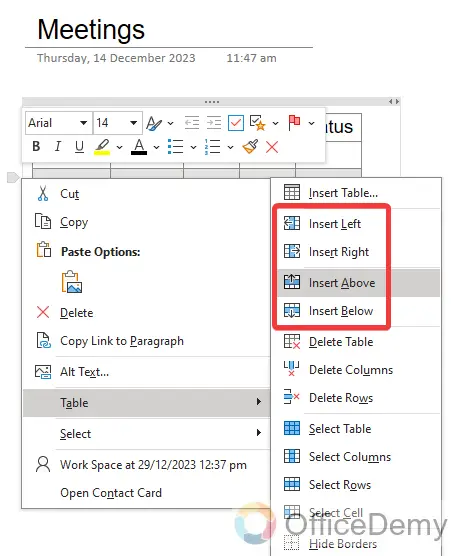
Step 3
Similarly, in the same drop-down menu, you will also see the “Delete columns” and “Delete rows” options as can be seen, through which you easily select rows and columns from the table option in OneNote.
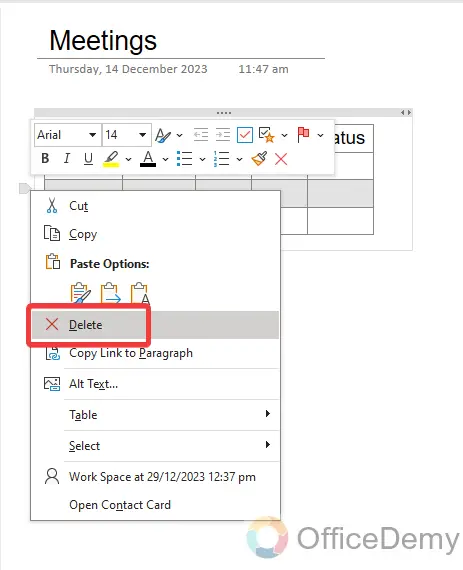
How to remove a table in OneNote?
A: We have learned how to add a table in OneNote but if you have finished your work or for any other reason, you need to remove a table in OneNote then there is nothing to worry about because you can remove it by clicking on Delete option.
Conclusion
Now you know how to add a table in OneNote, in this tutorial we have also discussed adding tables from the spreadsheet option which is going to be very helpful to you. Thanks, and keep learning with Office Demy.

