
To Make Categories in Google Sheets
- Add a new category column next to your data.
- Create a separate sheet for defining categories.
- Select the data range to categorize.
- In the “Data” tab, choose “Data validation“.
- In the data validation window, pick “List from the range” and select the category range.
- Check “Show drop-down list” and “Reject input“.
- Save.
- Click the arrow in the cell to choose a category.
- Your data is now categorized.
In this article we will learn about how to make categories in Google Sheets with example. The practice of organizing data into defined categories simplifies the process of locating and retrieving information, making it easier to use and protect. In past practice, it was quite difficult to categorize data manually in a notebook, etc. There were maximum chances of mistakes and errors as well and took so much time as well while sorting them. But you will be amazed to hear what Google Sheets has to offer in this case. Google Sheets is a spreadsheet program that allows you to calculate and format numbers for you. It can be a powerful tool to help you as a business owner sort out the data and it allows data to be managed centrally and thereby more effectively and, above all, securely. Keep in mind that this method is not limited or restricted to business projects.
If you need to keep track of something else, and you want a free, customizable, and extremely powerful way to do it, then Google Sheets is the right way to go. Google Sheets provide you with a data validation feature by which you can categorize your data and simply sort them by using filters according to specific categories. It also saves you time even if you can find any category data with just one click. Categorizing data can help you in prioritizing the task, status of orders, inventory list, etc.
Importance of using Categories in Google Sheets
Once data has been categorized, the organization can define its access and usage. Data categorization helps teachers and students especially math teachers and students to prioritize their exercises according to the level of difficulty. The act of creating categories for data will create awareness in the organization about the sensitivity of the information and how it needs to be handled responsibly. Data categorization helps to ensure employees are more aware of the type of information they are dealing with and its value.
Similarly, if you have a grocery store or a general store and you have a list of your all products you can organize your all products list by different categories. Simply classification of data helps you to manage riddle data in a good manner. Before evolution in the IT industry, people used to use manual methods of sorting data which consumed a lot of time, effort, and money. Instead, you could not get accuracy in data validation. But now this feature is smartly done by Google Sheets and provides you the features of making categories. If you are not aware of those characteristics of Google Sheets then this article is for you. You need to learn how to make categories in Google Sheets.
How to Make Categories in Google Sheets
Google Sheets mostly deals with financial documents and record-keeping documents so it provides its users with the best features to manage, classify and categorize their data most easily. Yes! Categorizing data in Google Sheets is not as difficult if you retain these steps in practice. For making categories in Google Sheets, you must have different types of data which we can categorize into different categories.
I have prepared an example of an item list for a general store. In this section, we will learn step-by-step the procedure of making categories with the help of that example. Let’s get started.
Step 1
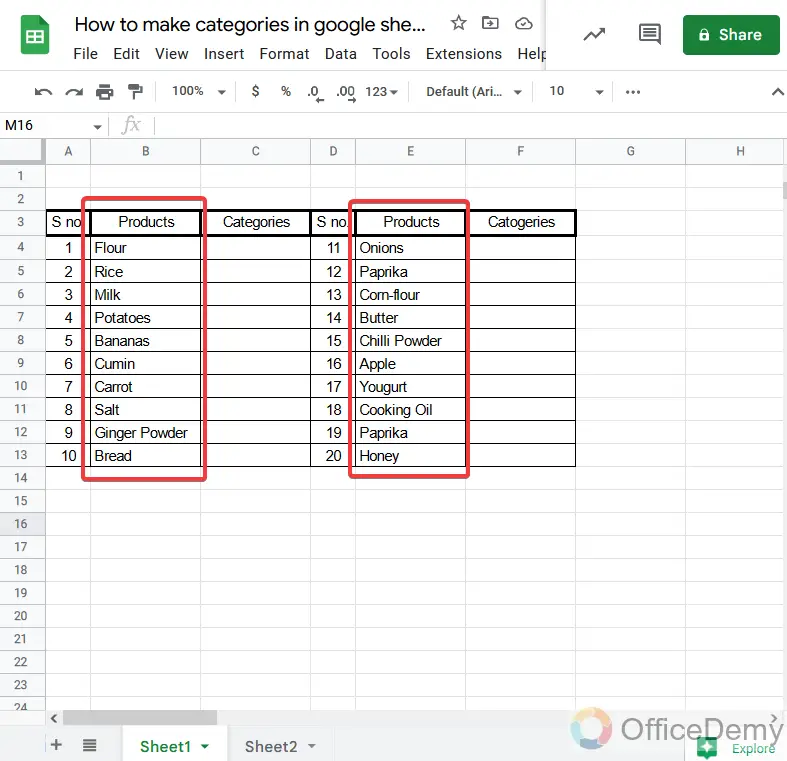
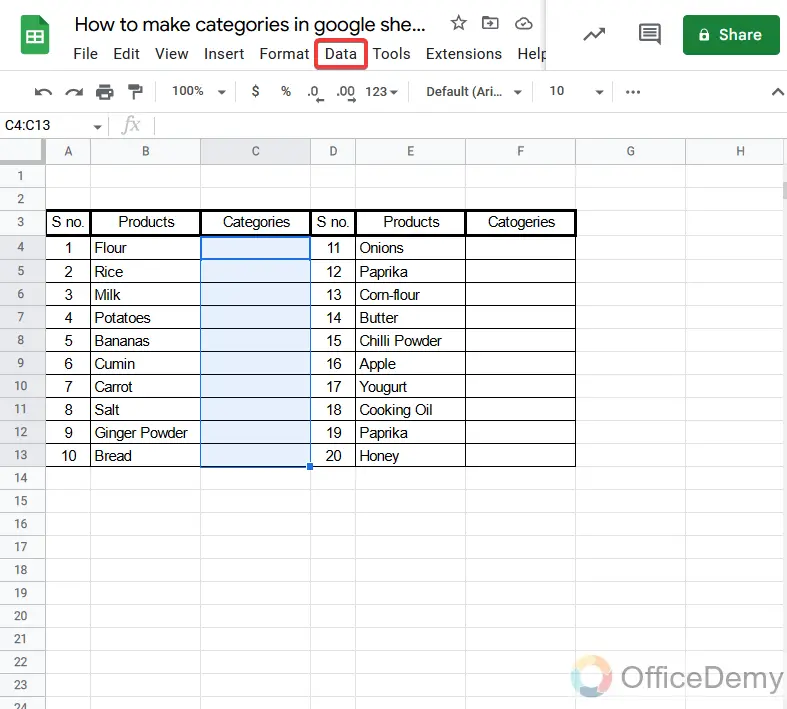
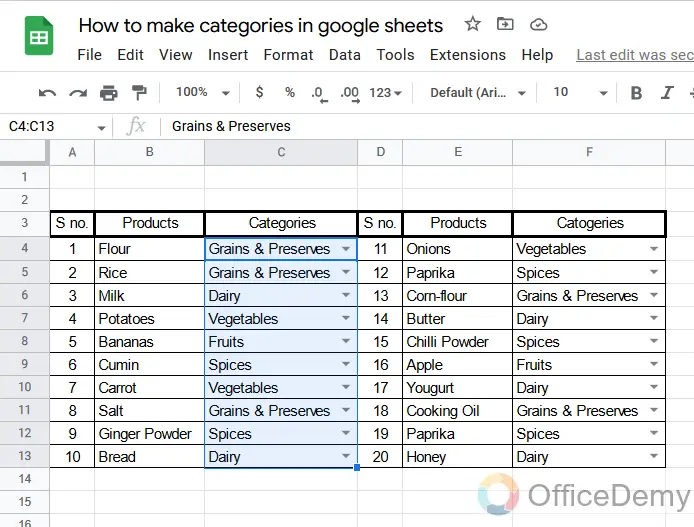
Let’s suppose this is our general items list, in which all items belong to different categories.
Step 2
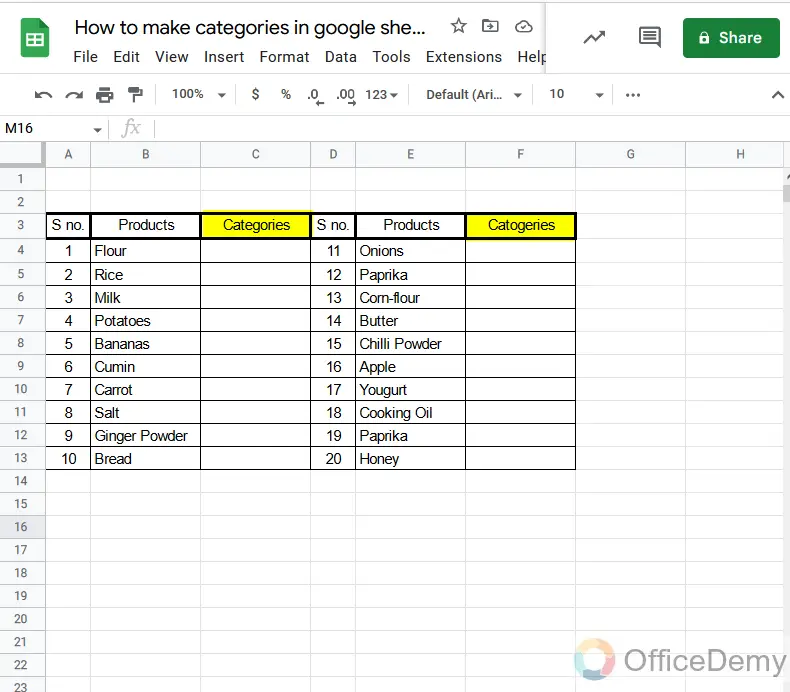
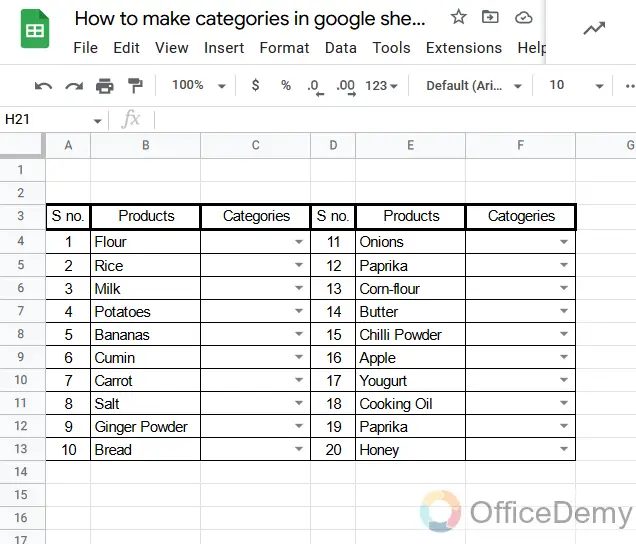
To categorize them, here I have added a separate column of categories with a header.
Step 3
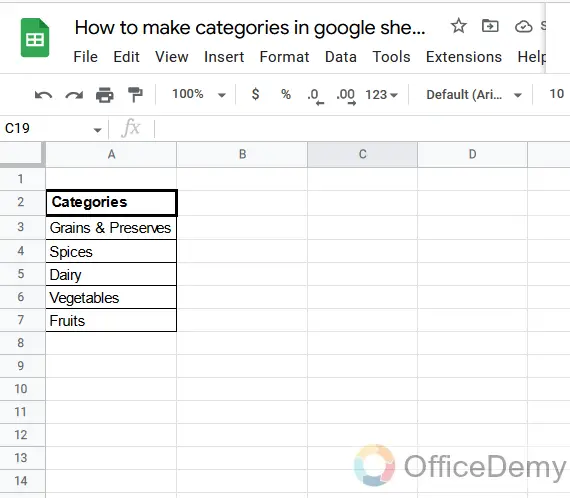
On another sheet, I have made a separate column to specify all categories. You may also name the sheet ‘categories’.
Step 4
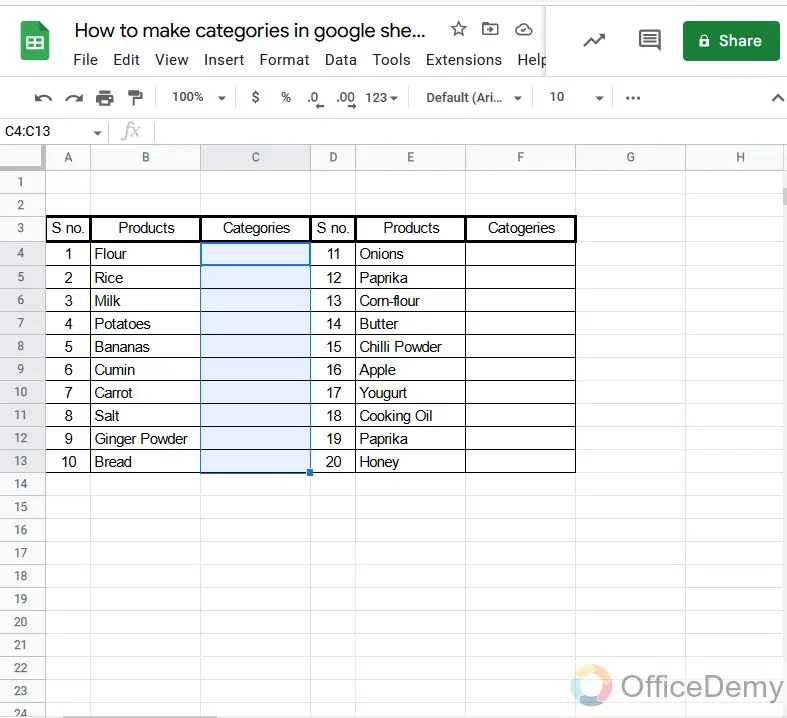
Select the cell range where you want to categorize all your data.
Step 5
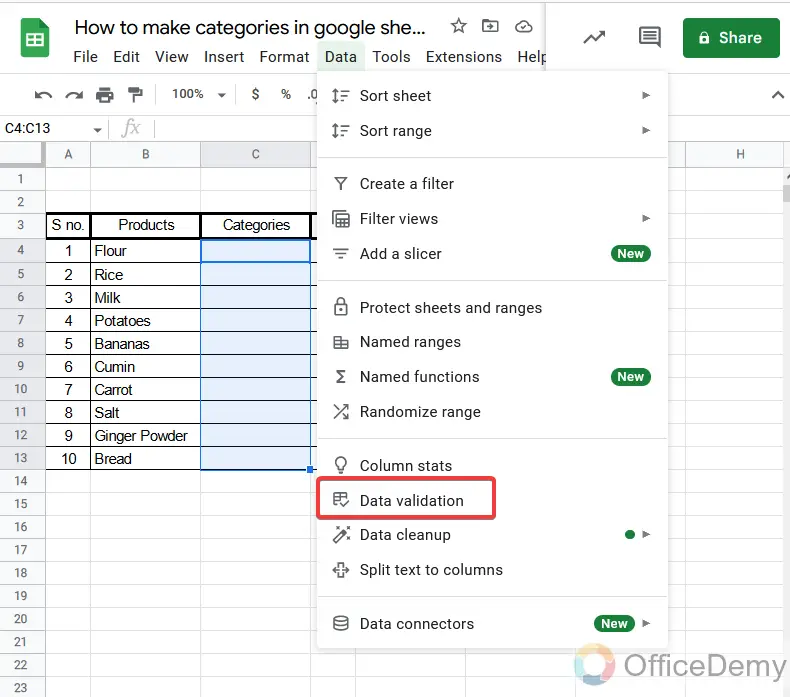
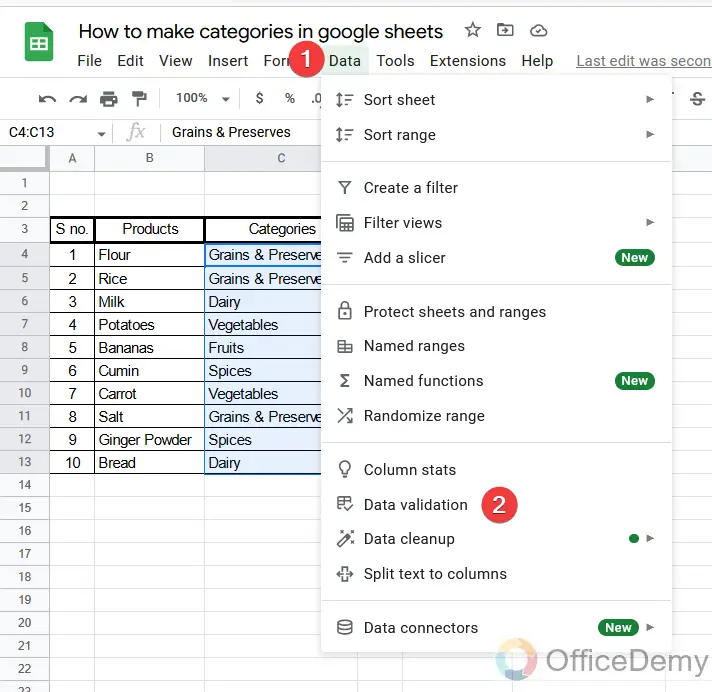
After selecting the cells then go to the “Data” tab in the main menu
Step 6
A drop-down menu will open where you will find the “Data validation“. Click it to open it.
Step 7
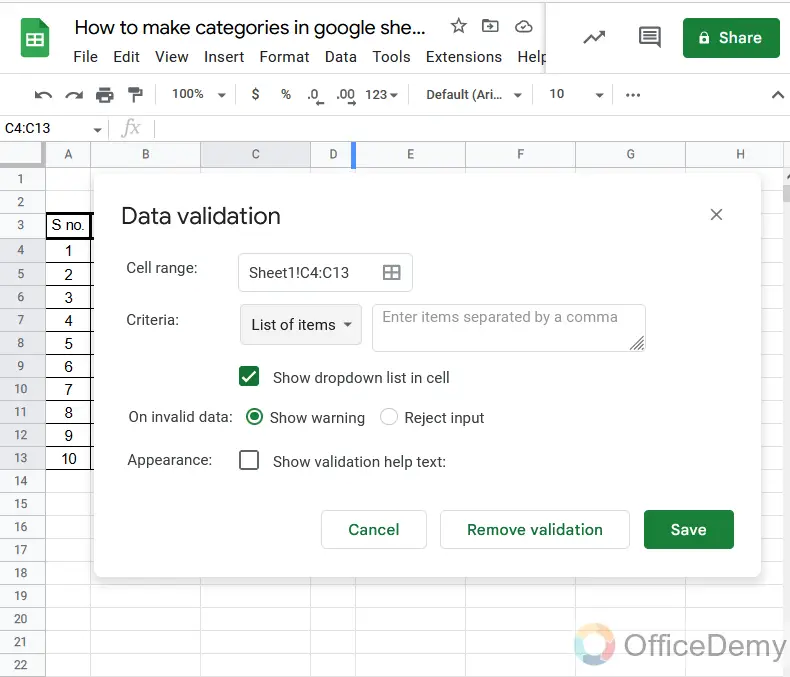
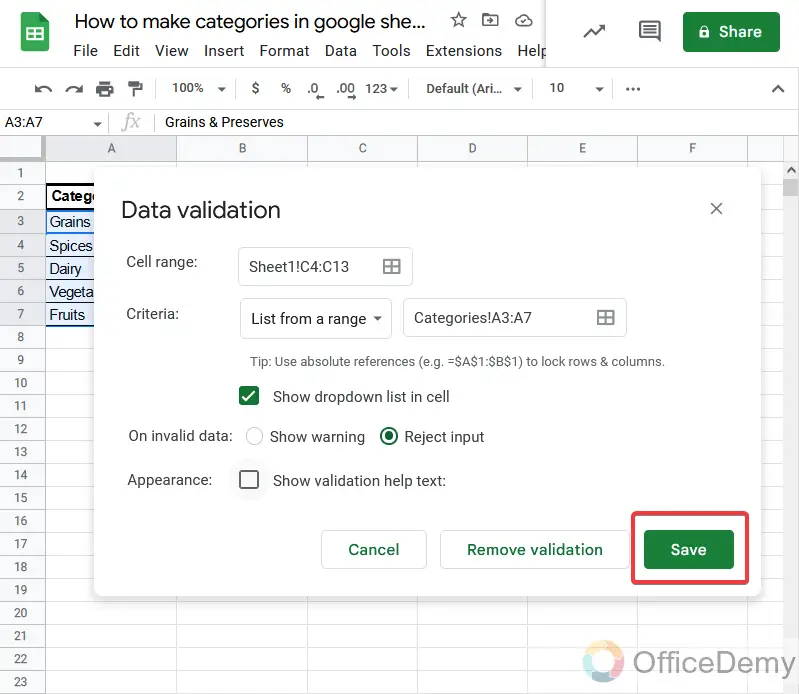
When you click on Data validation a new pop-up window will appear in front of you.
Step 8
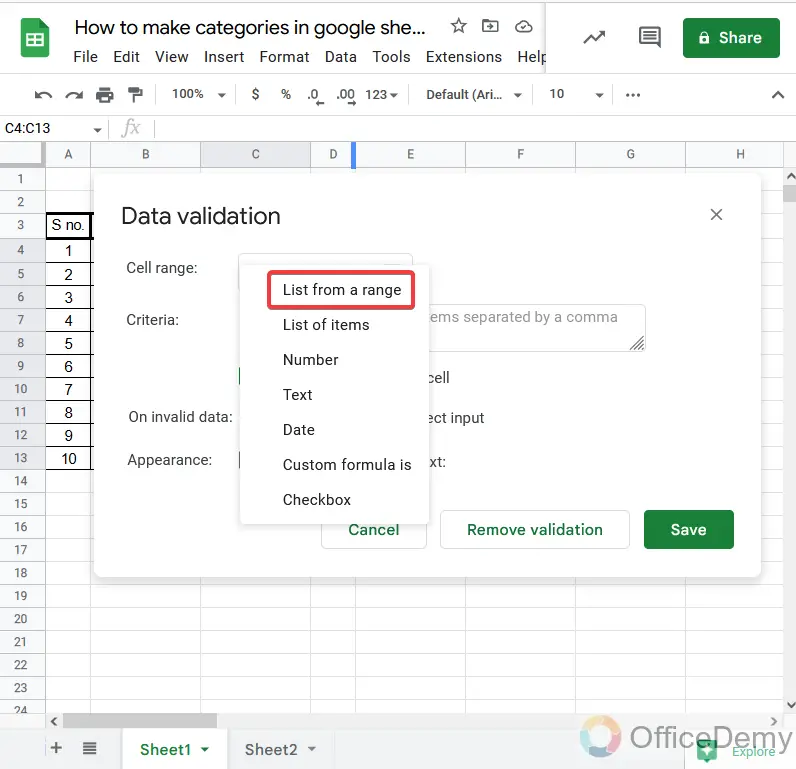
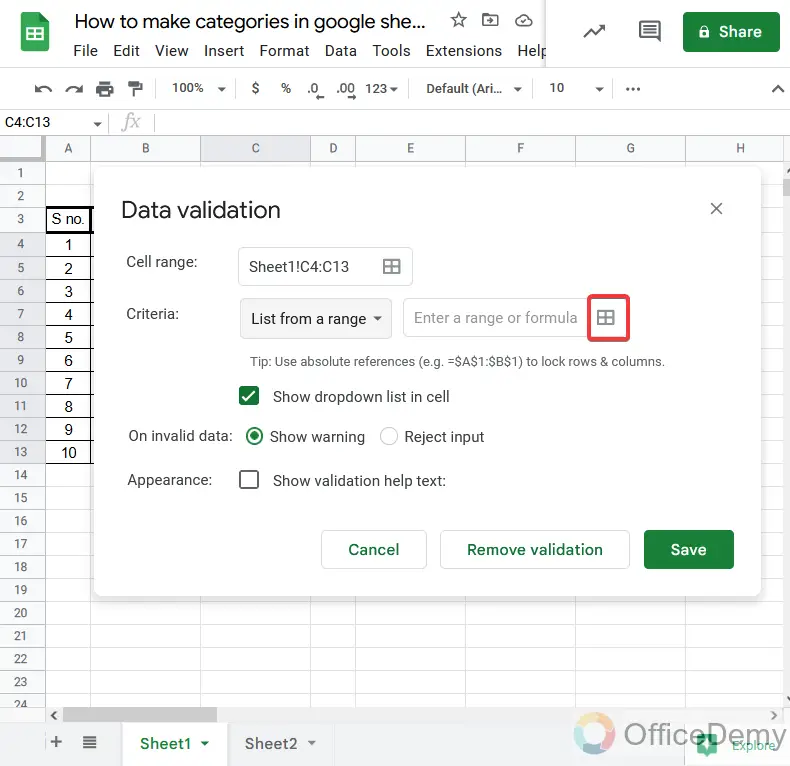
As you have a separate column of specified all categories, so you can select the criteria “List from the range“. Then you can give the range.
Note: If you have not written your criteria separately then you can choose “List of items” as well and then can write all the criteria in the dialogue box. But for an errorless procedure, I would recommend you to follow the above method as I followed.
Step 9
Then select the option shown in the picture below to select the range for criteria.
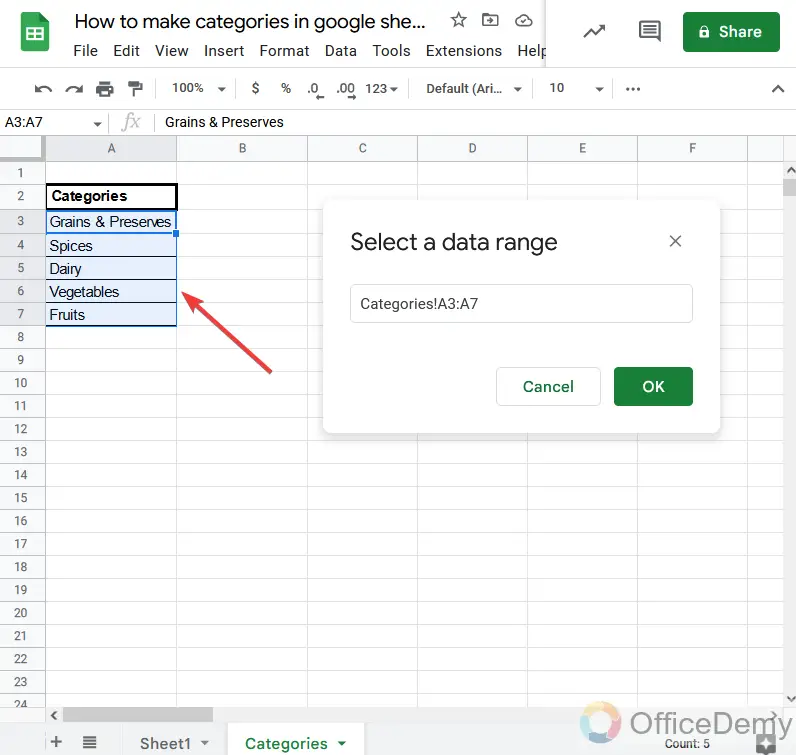
Step 10
A dialogue box will ask you to give the range, go to the other sheet where you wrote the categories for your data, and select the range, it will automatically be inserted in the dialogue box.
Step 11
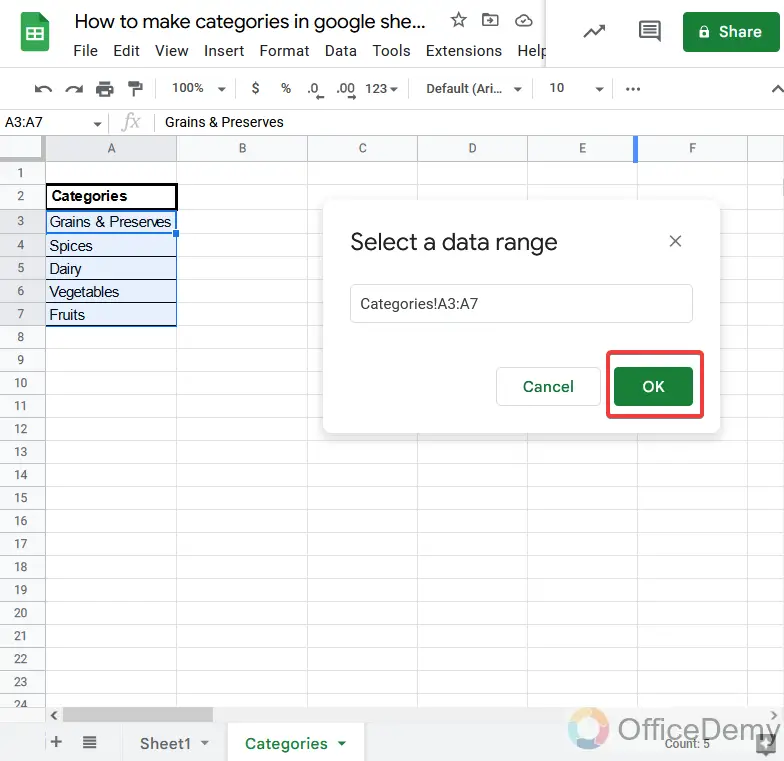
As you can see in the picture, when your criteria have been inserted, just click on the “OK” button.
Step 12
There are some more conditions in data validation, check the show drop-down list in the cell and select reject the input.
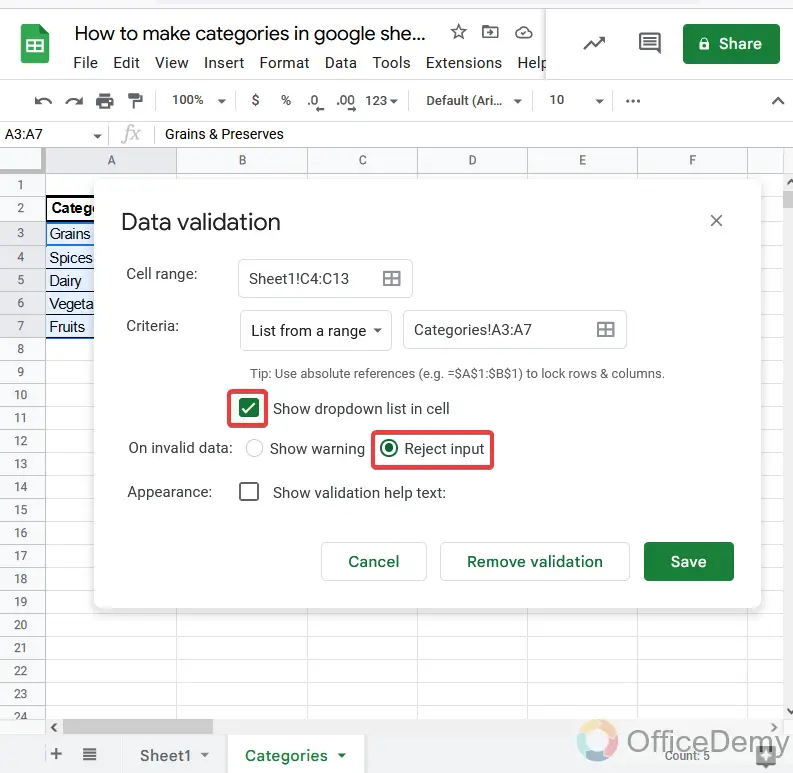
Step 13
You are almost done; Now click on the “Save” button.
Step 14
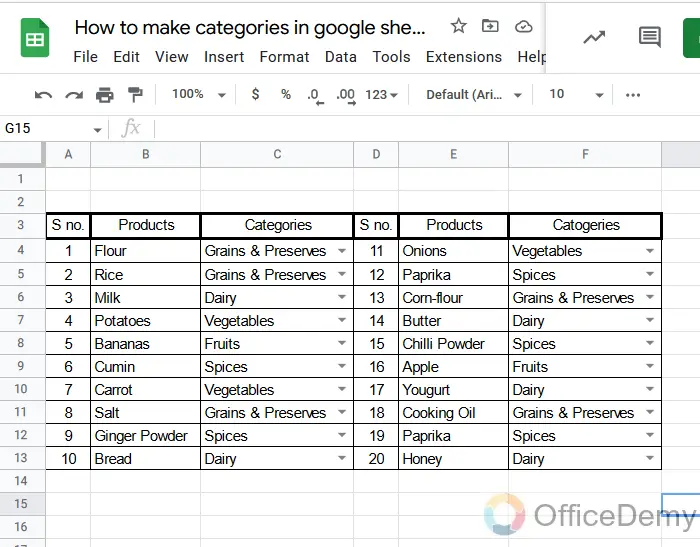
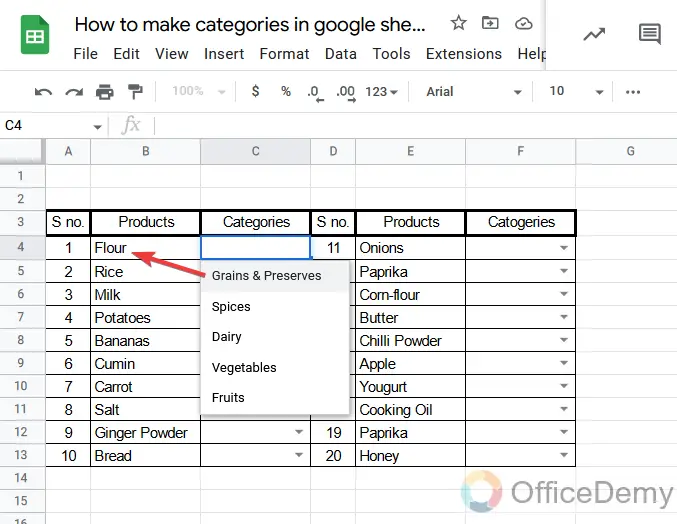
When you select the cell to categorize data, you can see below in the figure, a small arrow will appear in the cells. Where you can select the category of item that relates to the product.
Step 15
When you click on that arrow, all categories will appear in front of you, where you can select the category according to the item.
Step 16
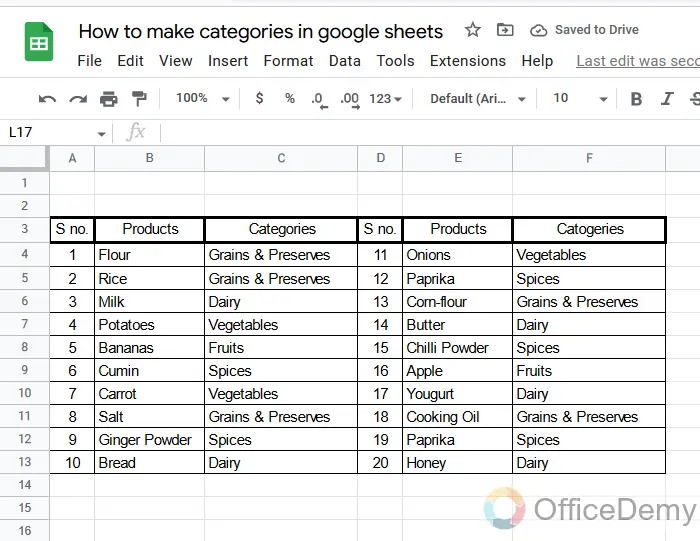
As you can see, I have categorized all the items according to their type.
This example was helpful for a superstore or a general store and a grocery store. But it is not restricted to here, you may have your data as well to make categories. If you are a student and you are working on a math assignment you can categorize your math exercise according to their difficulty level (Easy, medium, hard) to do later as you prioritize. You can also use the above tutorial in your to-do list to categorize the task which has been done which is pending which is in process. Similarly, there are so many criteria you can use the above method as you need if you have understood the logic of this article.
Frequently Asked Questions
Q: What are the benefits of making categories in Google Sheets?
A: Making categories in Google Sheets helps to categorize structured data, but it is especially important for getting the most out of unstructured data. Data categorization also helps identify duplicate copies of data. Eliminating redundant data contributes to the efficient use of storage and maximizes data security measures. You can also sort your data according to categories once you make a categorization.
Q: How can we sort categories in Google Sheets?
A: Once you have made categories in Google Sheets then you can sort them by using the filter function in Google Sheets. These are the following steps to sort the categories by using a filter,
Step 1
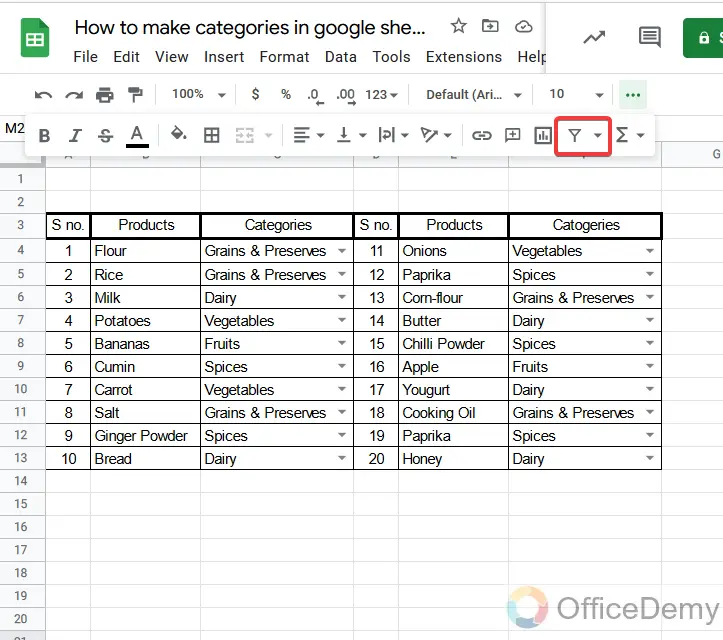
There is already categorized data in the Google Sheets screen as you can see, then simply click on the filter present at the end of the toolbar just before the function button.
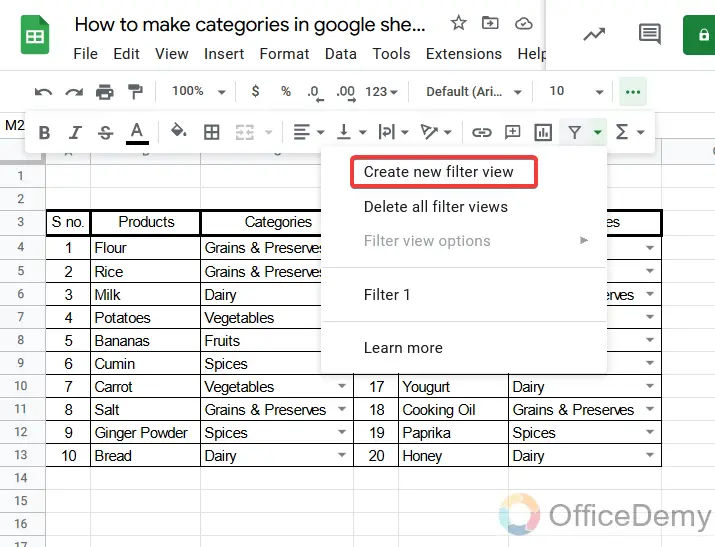
Step 2
It will ask for “create new filter view”, click on it to view the filter option in your data.
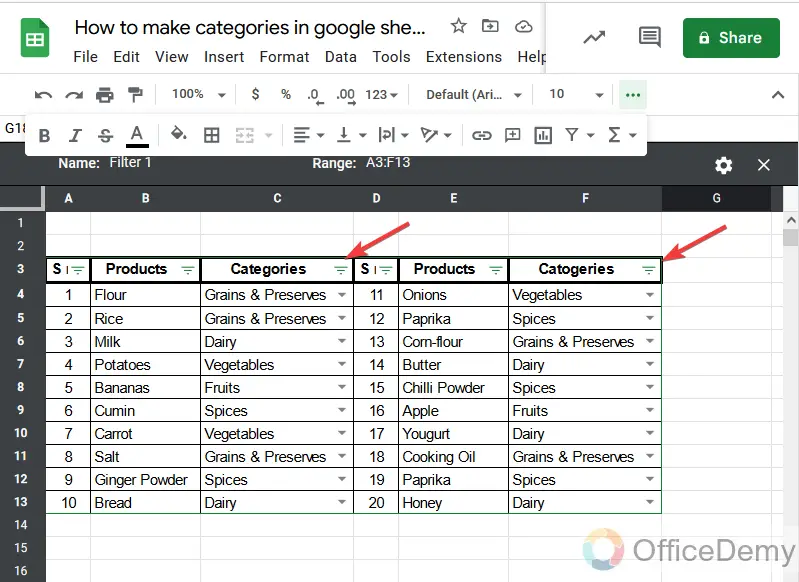
Step 3
As you can see in the following picture, a filter button has appeared in the table along the header.
Step 4
When you click on this filter button, a drop-down menu will open where you will find enclosed filter options and you will also see all specified categories with a check mark.
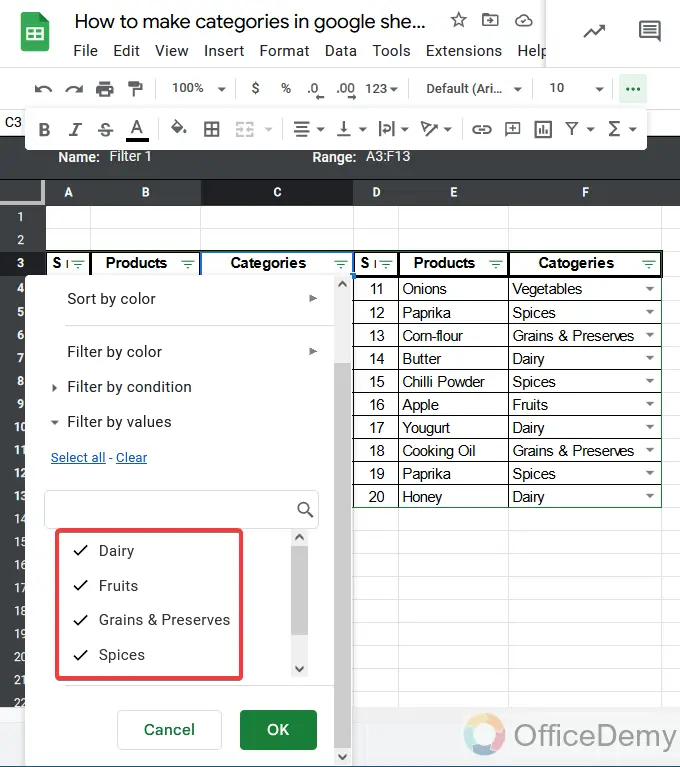
Step 5
You can sort the data which you are looking for, for example, if you are looking for just “Grains & preserves” then check only grains and preserves and remove all other checks.
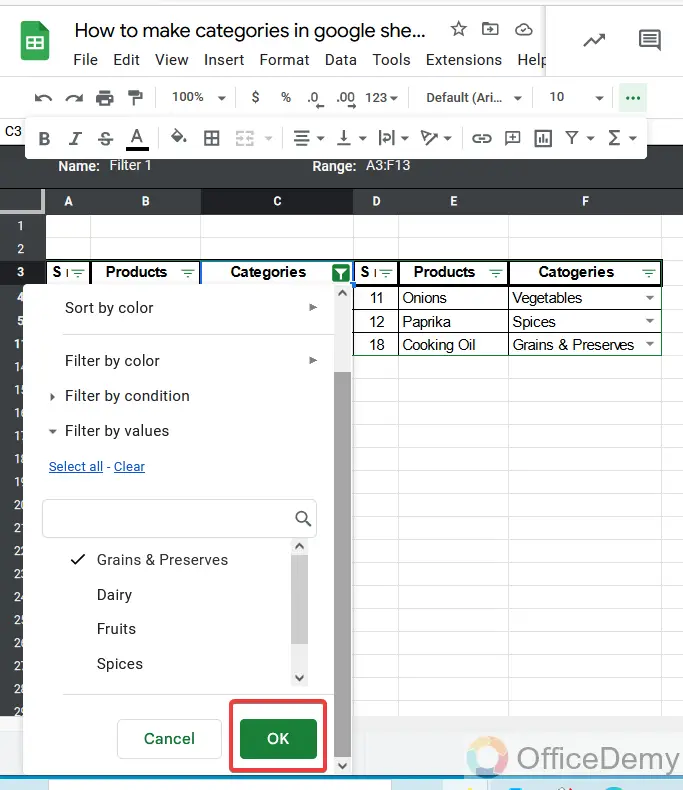
Step 6
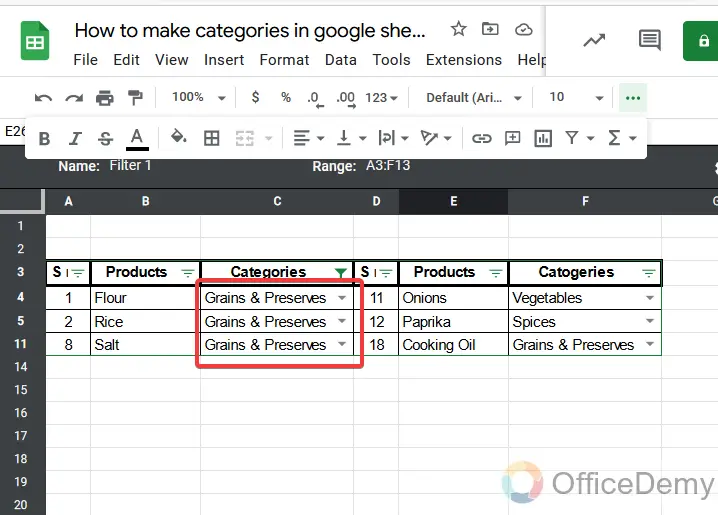
As you may see from the result, all ingredients have vanished just “Grains & Preserves” are shown.
In that way, you can sort your categories in Google Sheets as you want to look into them.
Q: How can we remove categories in Google Sheets?
A: As you inserted data validation, in the same way, you can remove it as well. Here is a short tutorial on removing categories in Google Sheets.
Step 1
First, select the cells where you have mad categories or data validation.
Step 2
Then go to the “Data” tab in the menu bar, and a drop-down menu will open where you will find the “Data validation” option. Click it to open.
Step 3
When you click on data validation a pop-up dialogue box will appear where you applied data validation. Here you will find the “Remove validation” button as well. Click on it to remove categories in Google Sheets.
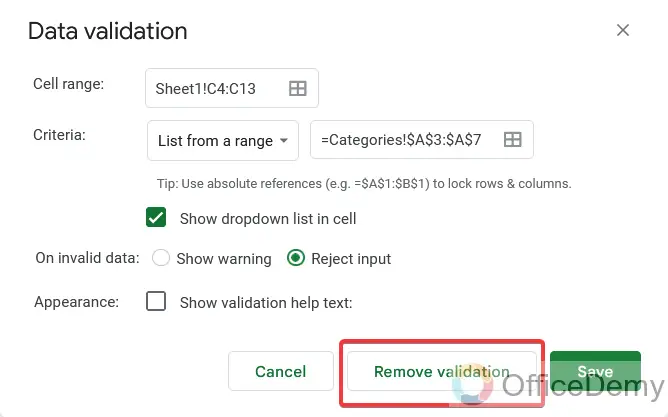
Step 4
As you can see the result choosing category option or a small arrow has been removed.
Conclusion
So that’s all about how to make categories in Google Sheets. I tried to teach you from the scratch with some sample data. Well, I am also a social worker and used to carry my task’s record manually and usually found many troubles. It wasn’t elegant and my handwriting wasn’t quite legible but I made do with what I had. Since those days, I’ve grown away from those methods and started using computer spreadsheets to do my recording and personally making categories in Google Sheets, I can create a very well-organized list of things I bought, fixed, and maintained.
Therefore, I wrote this article How to make categories in Google Sheets which helped me a lot in my routine tasks. Hope this will be very useful to you as well. Thank you, and keep learning with Office Demy.


