
To Take Notes on OneNote
Desktop App:
- Click “File” > “New” > Create sections.
- Inside each section, create pages for detailed notes.
- Type your notes directly onto the page.
- Use formatting options, and insert media and drawings.
- Utilize the search feature.
- Click “Share” to share your notes.
Mobile App:
- Open OneNote.
- Start a new page by tapping “+ Page“.
- Tap anywhere on the page to type your notes.
- Write or draw on the screen if desired.
Hello everyone. Welcome back to the OneNote learning series at Office Demy. Today, we will learn how to take notes on OneNote. A very simple yet useful topic to enhance your understanding of OneNote basic features. Microsoft created OneNote, a feature-rich digital notebook program that makes taking notes more effective. With its notebook-like UI, users can organize their content management by creating several sections and pages in each notebook.
It is an effective instrument for a range of purposes since users may easily type or write notes, include photographs, music, and video clips, and even draw. Its robust search feature also makes information easily accessible, which makes it a top option for professionals, students, and anybody else wishing to digitize their note-taking process. So, let’s dive deeper, and learn a very essential OneNote guide.
Importance of Taking Notes on OneNote
The OneNote, as its name suggests, is an App made for taking notes in one place. Notes are not only written words, but they can be in any form, format, structure, layout, or medium. We can use words, images, videos, PPTs, tables, graphs, emojis, GIFs and so many modern content types in OneNote to make our notebooks. Learning to take notes on OneNote is an essential skill that helps you get started and familiarize with the rich advanced features of this complete notetaking solution by Microsoft.
OneNote provides outstanding organizing features that let you classify and arrange your notes so that information can be quickly and effectively found. This guide will specifically teach you the ways of taking useful notes using the OneNote Desktop App, web app, and maybe the mobile app as well. So stay connected.
Step-by-Step Procedure of Taking Notes on OneNote
Let’s get into the step-by-step procedure of taking notes on OneNote’s different platforms. Starting with the desktop app first.
How to Take Notes on OneNote – Desktop App
Step 1
Open the OneNote application on your desktop device.
Step 2
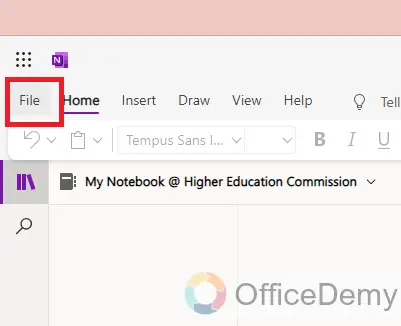
Click on the “File” menu, and then select “New” to create a new notebook.
Step 3
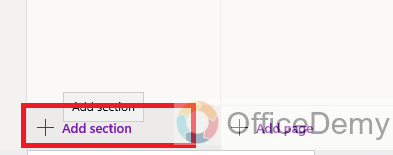
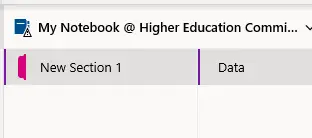
Within your notebook, you can create different sections for better organization. Just click the “+ Section” button at the bottom of the screen.
Step 4
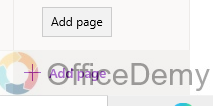
Inside each section, you can create pages for detailed notes. Click on “+ Page” on the right-hand side.
Step 5
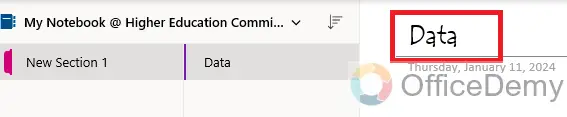
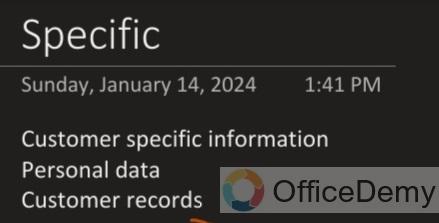
Give that section a title i.e. Data.
Step 6
You can now start typing your notes directly onto the page. Just click where you want to start typing.

Step 7
Utilize OneNote’s features to enhance your notes. This includes:
Formatting Text:
Use the toolbar to change font style, size, and color.

Inserting Media:
You can insert images, links, audio recordings, and even videos into your notes.

Drawing:
If you’re using a touch-enabled device, you can also draw or handwrite notes.

Step 8
OneNote automatically saves your notes and syncs them across devices if you’re logged into your Microsoft account.
Step 9
Use the search feature to quickly find specific information in your notes. Just type a keyword into the search bar.

Step 10
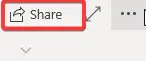
If you wish to share your notes, click on the “Share” button.
By following these steps, you can effectively use OneNote to take, organize, and manage your notes, enhancing both your productivity and learning experience.
How to Take Notes on OneNote – Mobile App
Step 1
On your mobile device, open the OneNote app.
Step 2
Select a notebook where you want to take notes.

Step 3
Select an existing section within the notebook. If you don’t have a section then create a new section.

Step 4
In the selected section, start a new page by tapping “+ Page” or the icon that represents adding a new page.

Step 5
Tap anywhere on the page to bring up the keyboard and start typing your notes.
Step 6
You can also write/draw on the screen.

Step 7
OneNote typically AutoSaves your notes.

Step 8
Once you’re done, you can navigate to another section or close the app.

Frequently Asked Questions
What is OneNote?
OneNote is a digital notebook part of the Microsoft Office suite, designed for note-taking, information gathering, and multi-user collaboration.
Can I access OneNote on different devices?
Yes, OneNote syncs across various devices, including Windows and Mac computers, smartphones, and tablets, allowing access to your notes anytime, anywhere.
How do I organize my notes in OneNote?
Organize your notes by creating separate notebooks for different subjects or projects. Within each notebook, create sections for specific topics, and within each section, create pages for detailed notes.
Can I share my OneNote notes with others?
Yes, OneNote allows you to share your notebooks. You can grant others viewing or editing permissions, making it a great tool for collaborative work.
Is it possible to integrate multimedia into my notes?
Absolutely. You can enhance your notes by adding images, audio clips, videos, links, and even handwritten notes if your device supports pen input.
Does OneNote have a search function?
Yes, OneNote comes with a powerful search function that lets you search across all your notes, helping you quickly find the information you need.
Conclusion
Wrapping up how to Take notes in OneNote. Microsoft OneNote is an extremely feature-rich digital notebook that is easy to use and highly flexible for effective note-taking and information organization. Thanks to its organizational, multimedia integration, and social features, it’s a great tool for professionals, students, and anybody else trying to improve their note-taking procedures. So that’s all from this guide, I hope you find this article helpful, thanks and keep learning with Office Demy.

