
To Categorize Emails in Outlook
- Open Outlook.
- Access your mailbox.
- Select the desired emails.
- Click the “Categorize” button.
- Assign categories or create new ones.
- Utilize sorting and filtering options to enhance your email productivity.
Hi everyone. Hope you are doing well, Welcome to this comprehensive article on how to categorize emails in Outlook. Managing a busy inbox can be overwhelming, but with Outlook’s powerful categorization feature, you can bring order and efficiency to your email management. Categorizing emails allows you to visually organize your inbox, prioritize important messages, and streamline your workflow.
In this guide, I will walk you through step-by-step instructions on how to categorize emails in Outlook, empowering you to take control of your inbox and enhance your productivity. Whether you are a professional handling multiple projects or an individual looking to stay organized, mastering the art of email categorization in Outlook is a valuable skill that will transform your email management experience. Let’s dive in and unlock the benefits of categorizing emails in Outlook.
When you need to Categorize Emails in Outlook?
Let’s discover the immense benefits of learning how to categorize emails in Outlook. By acquiring this essential skill, you unlock a world of enhanced productivity, streamlined workflow, and effective communication.
With the ability to prioritize tasks, create organized email structures, foster collaboration, and exhibit professionalism, you gain a competitive edge in managing your inbox. Seamlessly navigate through your emails, effortlessly locate important messages, and maintain a sense of control over your digital communication. Harness the power of email categorization in Outlook and revolutionize the way you conquer your email management challenges.
How to Categorize Emails in Outlook?
So, this is more likely a method to use properly to achieve results, it depends on how precisely and effectively you can use the categories feature in Outlook, in the below step-by-step guide I will show you some good steps that you should take to make this feature useful for you.
In this section, we will learn how to categorize emails in Outlook properly using the full features of the Categorize options in the Outlook App. So, follow the steps below, and let’s make this feature useful and helpful for us.
Step 1
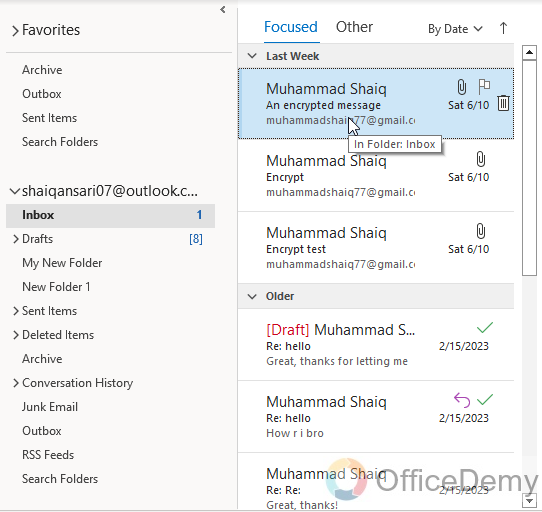
Open Outlook and navigate to your mailbox.
Step 2
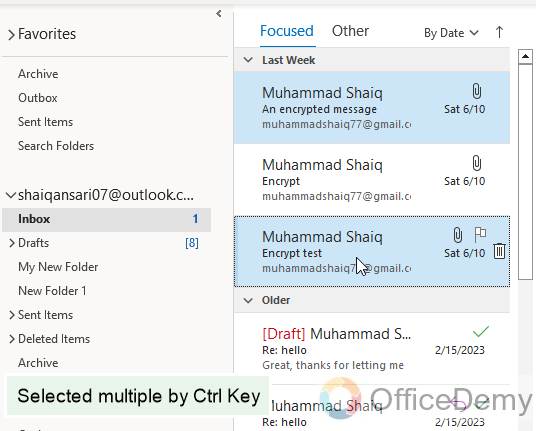
Select the email or emails that you want to categorize. You can do this by clicking on the checkbox beside each email or by holding down the Ctrl key and clicking on multiple emails.
Step 3
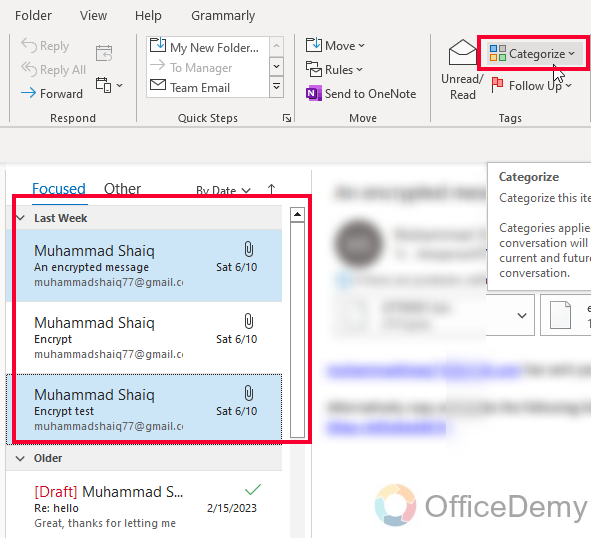
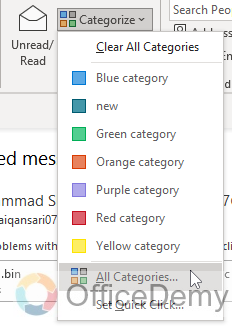
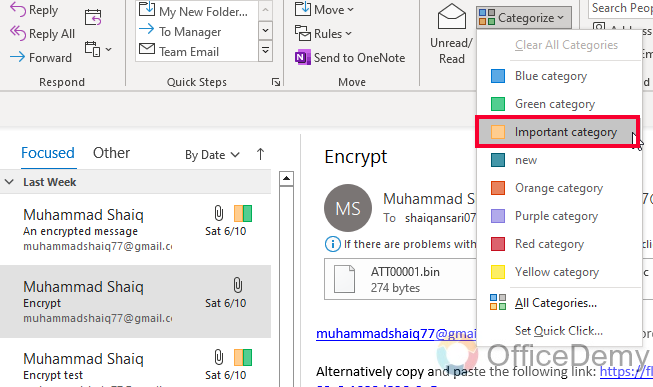
Once you have selected the emails, locate the “Categorize” button on the toolbar. It usually appears as a colored square or a box with a down arrow next to it. Click on it.
Note: If you are using a company email message, then the categories may not be shown
Step 4
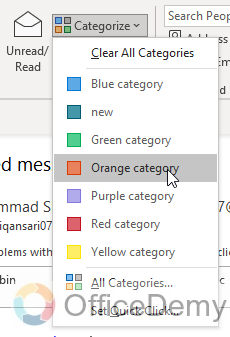
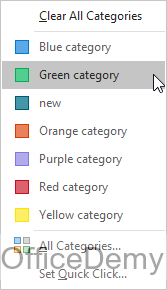
A drop-down menu will appear, displaying different color categories. Choose the desired category by clicking on its name.
Step 5
If you want to create a new category, select “All Categories” at the bottom of the drop-down menu.
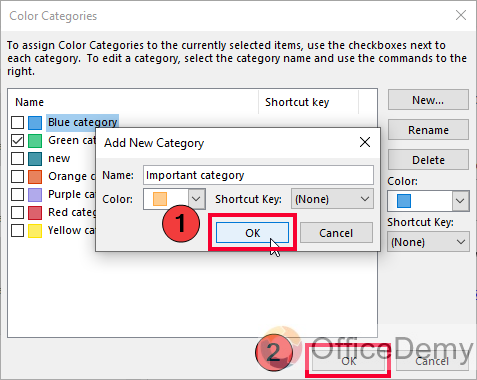
Step 6
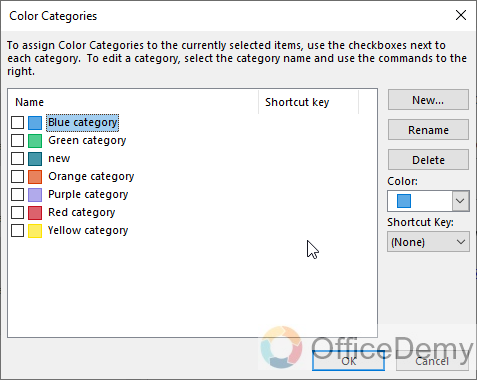
It will open a new dialog box, listing all your pre-sets colors.
Step 7
If you selected an existing category, the email(s) will be instantly categorized with that color.

Step 8
In the “Color Categories” dialog box, click on the “New” button to set a new category.
Step 9
Enter a name for the new category in the “Name” field.
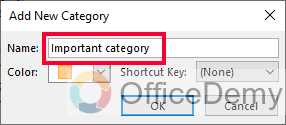
Step 10
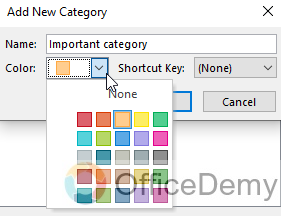
Choose a color for the category by clicking on the color picker box and selecting a color.
Step 11
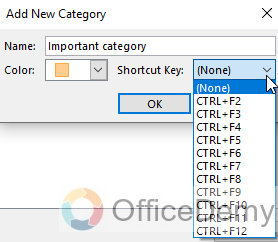
Optionally, you can set the keyboard shortcut for this category.
Step 12
Click “OK” to save the new category.
Step 13
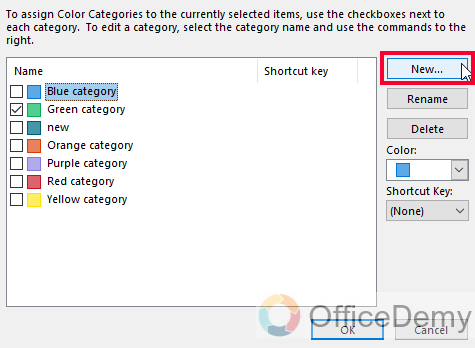
The new category will now be available in the “Categorize” drop-down menu, and you can assign it to your selected email(s) by choosing it from the list.
Step 14
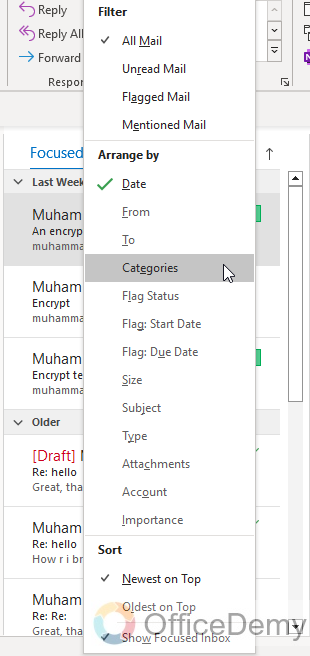
To view categorized emails, you can use the “Sort” or “Filter” options in Outlook. For example, you can click on the column header “Categories” to sort emails by category or use the “Filter Email” feature to display only emails with a specific category.
Benefits of Using Categorize Feature
There are many benefits of using categorize feature in Outlook. Below is a comprehensive list for you.
Customizable Labels: Outlook allows you to create and customize your own category labels. You can assign unique names and colors to match your preferred organizational system, making it easier to identify and sort emails.
Multiple Categories per Email: You can assign multiple categories to a single email, allowing for more nuanced organization. For example, you can assign categories like “Important,” “Urgent,” and “Project A” to a single email to capture different aspects of its significance.
Quick Categorization: Outlook offers shortcuts for quickly categorizing emails. You can right-click on an email and choose a pre-defined category from the context menu or use keyboard shortcuts to assign categories swiftly.
Categorizing Existing Emails: Outlook enables you to categorize existing emails in your inbox retroactively. By selecting multiple emails and applying a category, you can efficiently organize your existing email collection.
Filtering and Sorting: Categories in Outlook provide powerful filtering and sorting options. You can sort emails by category, making it easier to view and work with specific groups of emails. Additionally, you can use filters to display only emails with specific categories, helping you focus on projects or tasks.
Sync Across Devices: Categories in Outlook sync across different devices, allowing you to access and manage your categorized emails seamlessly. Whether you’re using Outlook on your computer, smartphone, or tablet, your category assignments will remain consistent.
Category Search: Outlook provides a category-based search function, enabling you to locate emails belonging to specific categories quickly. By using the search bar and specifying the category name, you can narrow down your search results and retrieve relevant emails efficiently.
By utilizing categories in Outlook, you can gain better control over your email organization, improve productivity, and swiftly locate important messages. Explore the flexibility and functionality of categories in Outlook to optimize your email management and streamline your workflow.
Things To Remember
- Customize category labels in Outlook to match your organizational system.
- Assign multiple categories to emails for the nuanced organization.
- Use shortcuts for quick categorization in Outlook.
- Retroactively categorize existing emails in your inbox.
- Take advantage of filtering and sorting options based on categories.
- Sync categories across devices for consistent email organization.
- Utilize category-based search to quickly locate emails in Outlook.
Frequently Asked Questions
How to create a new category in Outlook?
To create a new category in Outlook, go to the home tab, click on Categorize, and select “All Categories” Then, click on “New” and enter a name for your category. You can also choose a color to represent the category. Click “OK” to save the new category.
Can I Use the Same Methods to Categorize Emails in Outlook to Mark an Email as Urgent?
Categorizing emails in Outlook can provide a convenient way to organize your inbox. However, when it comes to identifying urgent emails, it’s advisable to use different methods. While categorization may help with labeling and prioritizing, marking an email as urgent involves applying a specific flag or setting that alerts the recipient to its immediate importance.
How to assign a category to an email in Outlook?
To assign a category to an email in Outlook, select the email, go to the home tab, click on Categorize, and choose the desired category from the list. Alternatively, right-click on the email, select “Categorize,” and choose the category. The email will be labeled with the assigned category.
How to filter emails by category in Outlook?
To filter emails by category in Outlook, click on the Filter Email button in the Ribbon. Then, choose “Categories” and select the desired category from the list. Outlook will display only the emails belonging to the selected category, helping you focus on specific groups of emails.
Can I change the color of a category in Outlook?
Yes, you can change the color of a category in Outlook. Right-click on an email that has the desired category, choose “Categorize,” and select “Set Quick Click.” From there, you can choose a different color for the category or even assign a keyboard shortcut for quick categorization.
Conclusion
That’s all about how to categorize Emails in Outlook using the Outlook Desktop app, if you use the web app, and want to use this feature, then you can comment below I will be back with another complete guide for the web interface. Thanks for reading our guide. Keep learning with Office Demy.


