
To Create a New Profile in Outlook
- Go to “File“.
- Click “Account Settings” > “Manage Profiles” > “Show Profiles” > “Add a new Profile“.
Welcome back everyone, in this article, we will learn how to create a new profile in Outlook. As we know, Microsoft Outlook usually faces a huge burden due to consistently sending and receiving emails while it also loads with contacts and calendar services. Sometimes, your Outlook gets stuck due to heavy traffic or troubleshooting reasons. In this scenario what are you going to do? Uninstalling and reinstalling may cause loss of your data.
Therefore, we have the following best option to create a new individual profile on Outlook. Yes! Outlook features their users to create a new profile for them.
In this article, we will give you complete guidance on how to create a new profile in Outlook. So, let’s learn how to create a new profile in Outlook.
When to Create a New Profile in Outlook?
You may need to create new Outlook profiles to troubleshoot issues with your mailbox and might create a new profile when you’re upgrading to Outlook from an older version. Creating a new profile can save you from uninstalling and reinstalling your application.
Not only that, but you can also create a new profile when there are multiple users on one device. You can create your profile for yourself which will keep you private while email handling.
How to Create a New Profile in Outlook
Creating a new profile in Outlook can be a little tricky when you are having difficulties in account setup for your Outlook. If you are good at Outlook configuration, then you can easily create a new profile for your Outlook with the help of the following steps. So, let’s start the step-by-step procedure of how to create a new profile in Outlook.
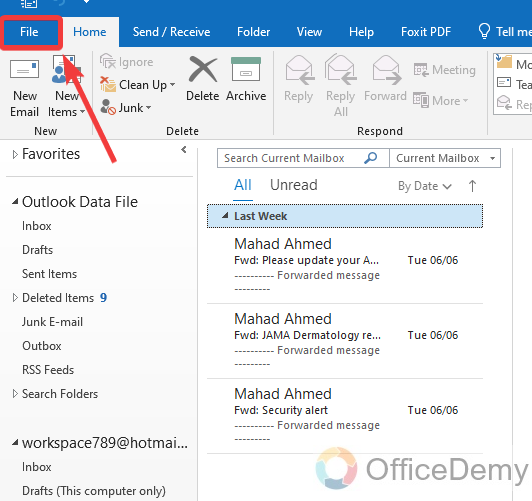
Step 1
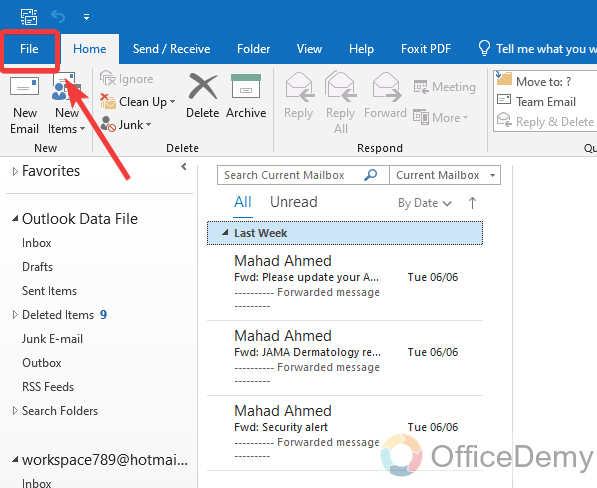
To create a new profile in Microsoft Outlook, click on the “File” tab of the menu bar, which is located at the left top corner of the window as directed in the following picture.
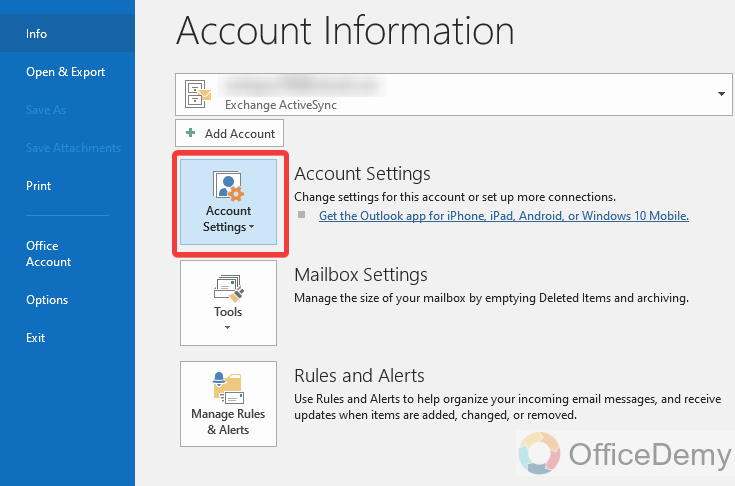
Step 2
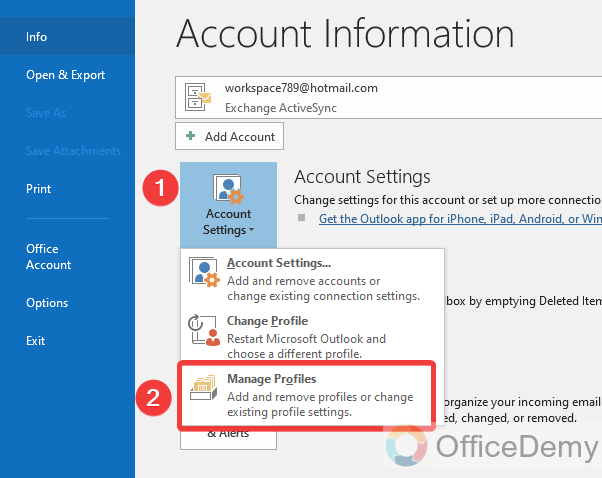
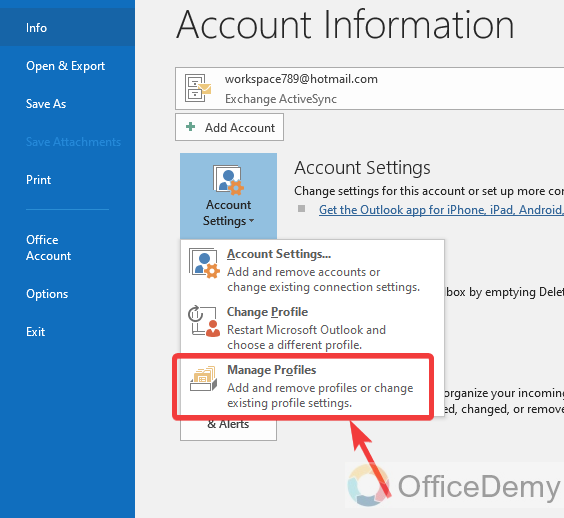
When you click on the “File” tab of the menu bar, the following window will appear in front of you where you will see an “Account settings” tab as highlighted below.
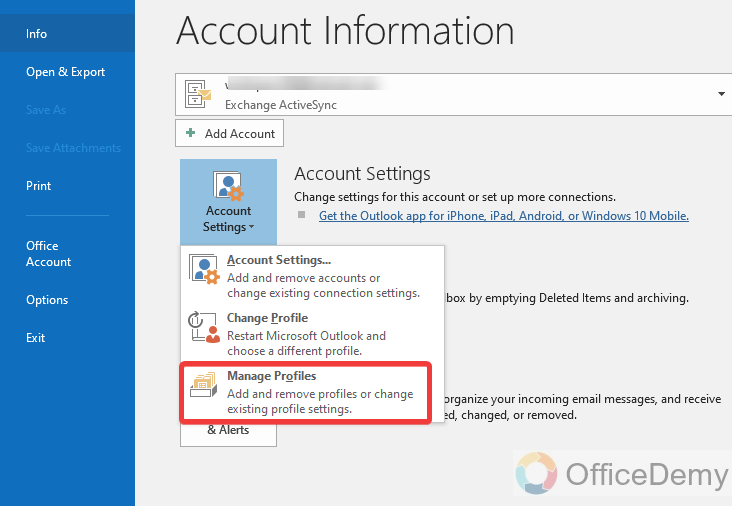
Step 3
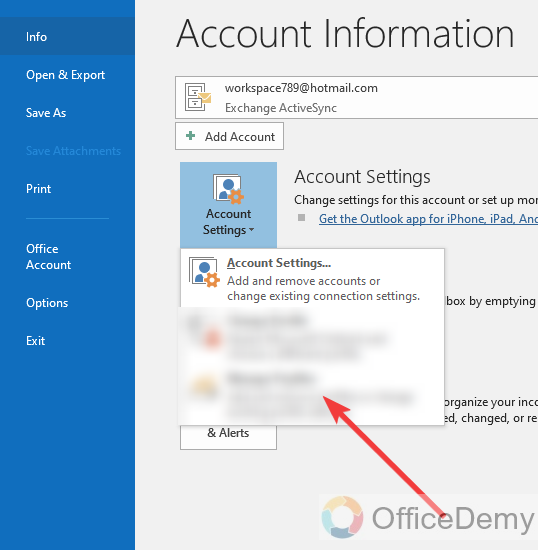
Click on this “Account settings” tab, when you click on this “Account settings” button, a drop-down menu will drag down where you will see the “Manage Profiles” option. Click on this “Manage Profiles“.
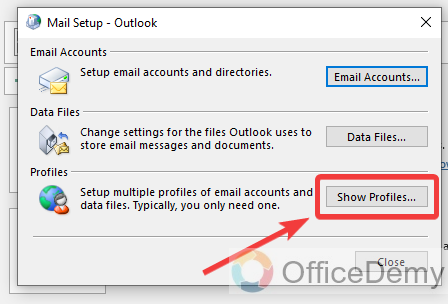
Step 4
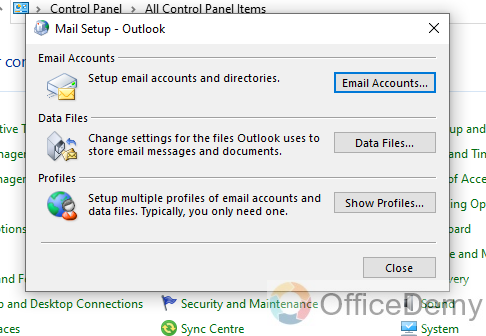
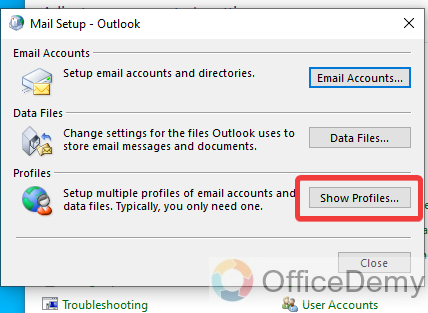
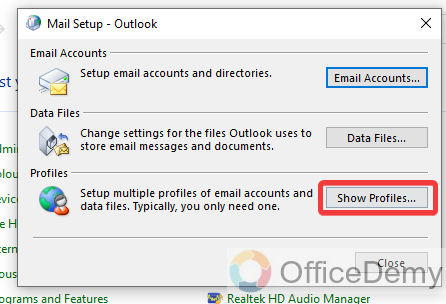
A new separate window will open when you click on the “Manage Profiles” option. On this window, you will see a “Show Profiles” button in the Profiles section. Click on this “Show Profiles” button.
Step 5
This “Show Profiles” button will give you a dialogue box where you can see all your Outlook profiles. As we need to create a new profile, here we will click on the “Add” button to create a new profile in our Outlook.

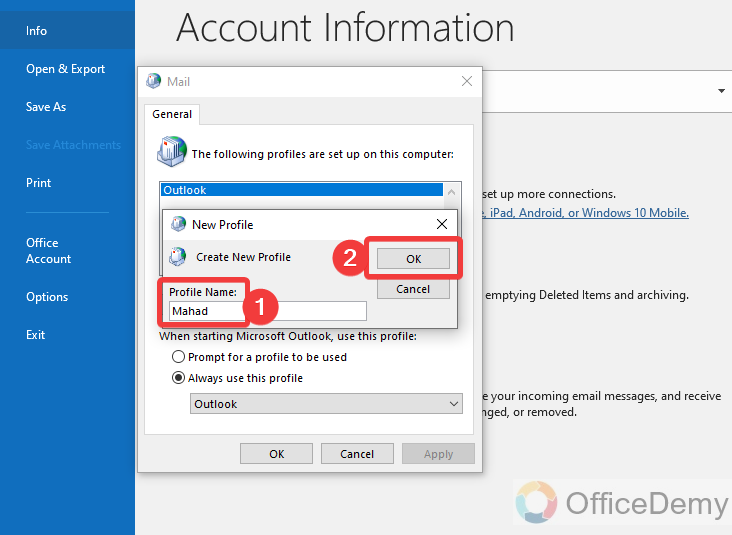
Step 6
This “Add” button will promptly ask you to give the name to your new Outlook profile. As you can see in the following picture, write the name of your new profile in the Profile name dialogue box then click on the “OK” button.
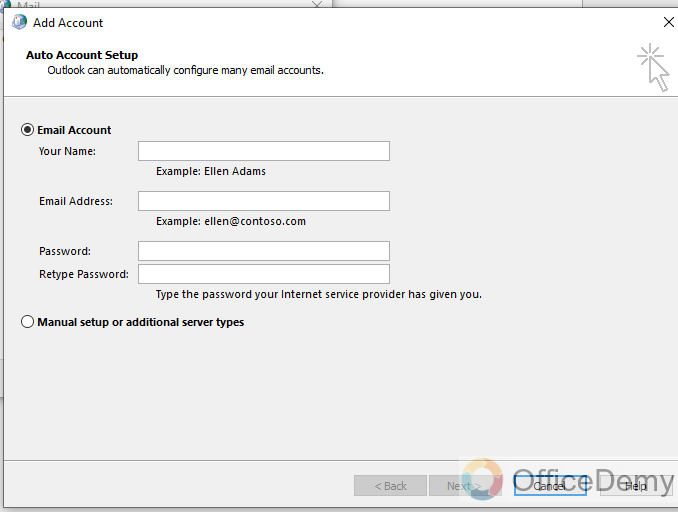
Step 7
As you click on the “OK” button, you will be directed toward the Outlook account setup window where you will have to configure your Outlook with a new account. Fill in the following field required for Outlook configuration then click on the “Next” button.
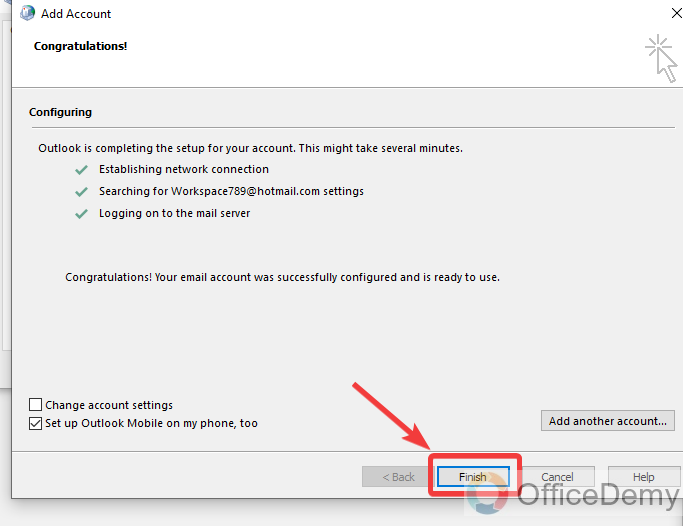
Step 8
When you click on the next button, Outlook will configure your account setup while it will take a few minutes to establish a network connection search for account settings, and log into the server. Once all these are done as follows then click on the “Finish” button to finish the procedure.
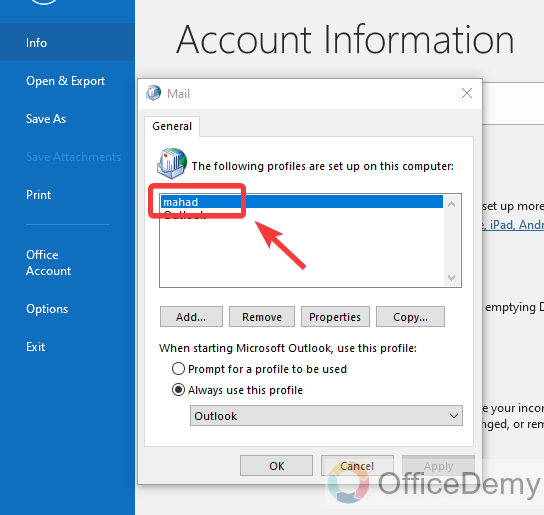
Step 9
You are almost done with creating your Outlook profile as you can see in the following dialogue box, your new profile has been added to your Outlook.
Frequently Asked Questions
Should I Add a From Field in Outlook When Creating a New Profile?
When creating a new profile on Outlook, considering adding from field in outlook can be valuable. This feature allows you to specify the sending email address, useful for multiple email accounts. It ensures messages are sent with the desired identity, enhancing professionalism and organization.
Q: Why am I not able to see the “Manage Profiles” option in Outlook?
A: Sometimes it happens that you are unable to see the “Manage Profiles” option in your Outlook account settings. It usually happens with Outlook’s non-exchange accounts and sometimes IMAP and POP3 configurations. If it is so, don’t worry I have another option for you to open the Outlook profiles window with the help of the following steps.
Step 1
For example, when you open the “Accounts settings” option and see that there are not any manage profile options in your Outlook.
Step 2
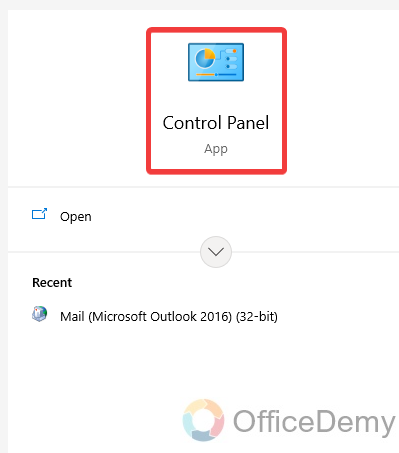
Go into the start menu and search for “Control Panel“. Once you find it, click on it to open it.
Step 3
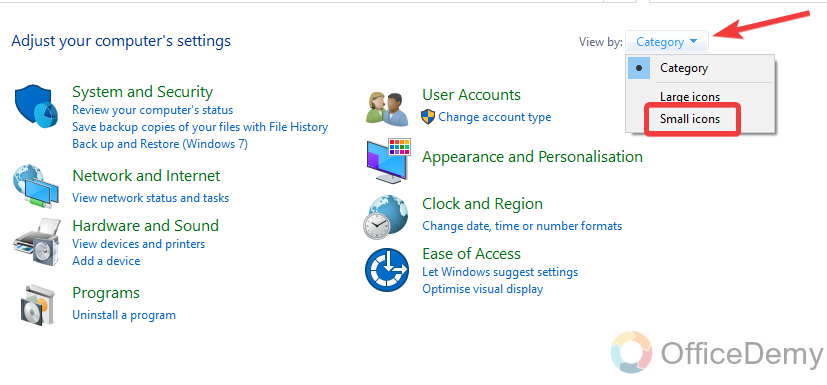
You would not find your option in the large category options of the control panel therefore switch the preference of icons from large to small with the help of the following highlighted option.
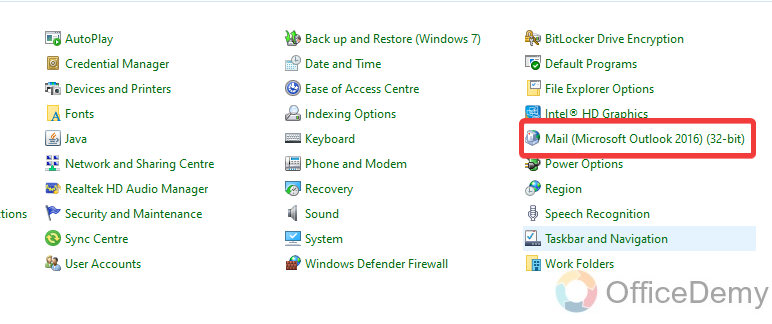
Step 4
Now you can see in the following picture you may have so many detailed options in your control panel. In these options find the “Mail” option as highlighted in the following screenshot. Click on it to open it.
Step 5
When you click on this “Mail” option, the Outlook profiles window will be in front of you as can be seen in the following picture from where you can easily manage your Outlook profiles.
Q: How to switch multiple profiles in Outlook?
A: As we are talking about creating a new profile in Outlook, that means you are going to use multiple profiles in your Outlook. But do you know how you will switch these multiple profiles automatically or manually? Read the following steps through which you will learn how to switch multiple profiles in your Outlook.
Step 1
Firstly, to open “Manage Profile” settings go into the “File” tab of the menu bar as highlighted at the left top corner of the window in the following screenshot.
Step 2
In this file tab menu, you will find the “Accounts Settings” option also containing the “Manage profiles” option in it. Click on this “Account Settings” option and then click on the “Manage Profile” option from the drop-down menu.
Step 3
A new dialogue box will appear in front of you where you will find the “Show Profiles” button. Click on this button to open the profiles settings dialogue box.
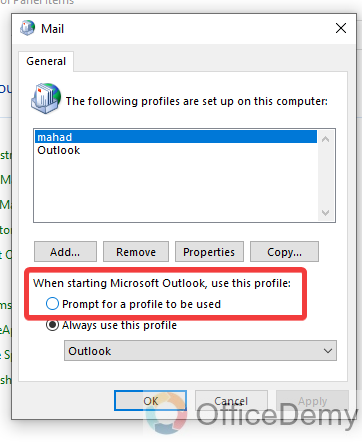
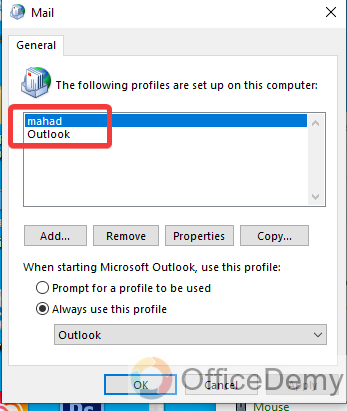
Step 4
The following dialogue box will be in front of you where you can see all your Outlook profiles. If you see just below the add and remove buttons you will see an option “Prompt for a profile to be used“. If you select this option, it will promptly ask you to open the Outlook profile which you want to use.
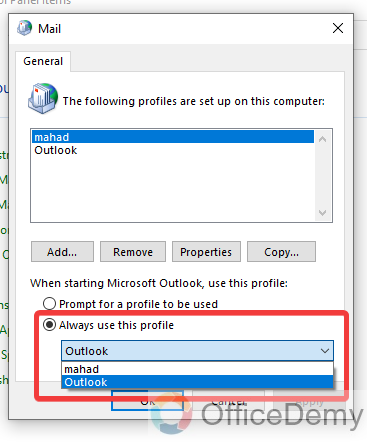
Step 5
In the next section if you see there is an option “Always use this profile” through which you can select any one profile which will always launch automatically when you open Microsoft Outlook. If you are selecting this option, then also select the profile which you want to fix to always use from the following drop-listed menu.
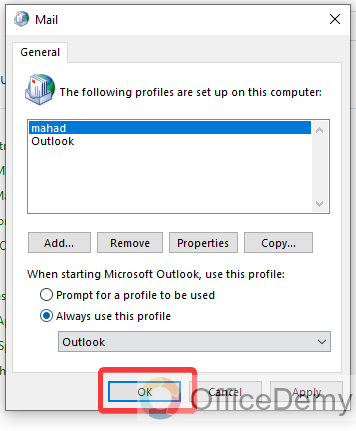
Step 6
Once you have done with any of the options then click on the “OK” button to save these changes to your Outlook.
Q: How to remove an Outlook profile?
A: Yet! We have learned how to create a new Outlook profile but if you already have multiple profiles in your Outlook and you want to remove any of them then what will you do to remove i? Nothing to do, just read the following steps that will teach you how to remove an Outlook profile.
Step 1
Go into Outlook’s “Accounts Settings” option where you will find the “Manage Profile” option as shown in the following picture.
Step 2
When you click on the “Manage Profiles” option, the following dialogue box will click on the “Show Profiles” button.
Step 3
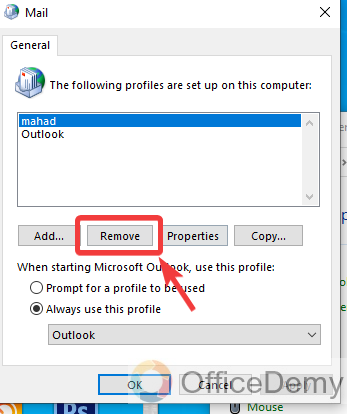
A new dialogue box will appear in front of you where you can see all your Outlook profiles as shown in the following example. Select the profile that you want to remove.
Step 4
Once you have selected the profile that you want to delete then click on the “Remove” button.
Step 5
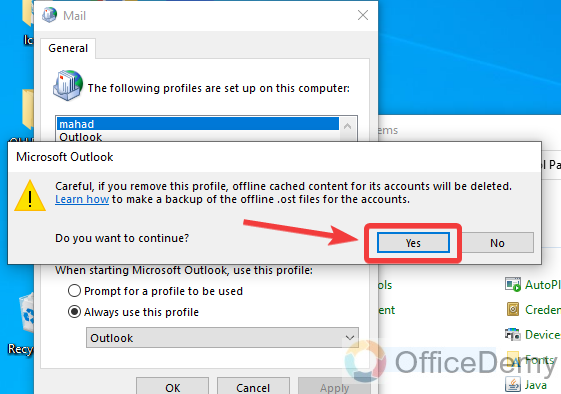
It will promptly ask you to confirm and delete your Outlook profile, click on the “Yes” button. Your Outlook profile will be removed.
Conclusion
Have you learned how to create a new profile in Outlook? if you are having problems while account configuration then we have a separate tutorial on how to configure your Outlook. Hope you get your solution. Good luck!


