
To Create a Distribution List in Outlook
- In the Outlook desktop app, go to “People“.
- Click “New Contact Group“.
- Name the list.
- Click “Add Members“.
- Add contacts > Save.
OR
- In the Outlook desktop app, under “Home,” select “New Contact Group“.
- Name the list > “Select Members” > Add contacts > Save.
OR
- In the Outlook web version, go to “People“.
- Click “New contact list“.
- Name the list > Add contacts > Save.
Hello everyone. In this article, we will be learning how to create distribution list in Outlook. Microsoft Outlook provides a powerful feature called “Distribution Lists” that simplifies the process of sending emails to multiple recipients simultaneously. Whether you’re using the Outlook app on your mobile device or accessing it through the web version, learning how to create distribution list in Outlook can save you time and effort when sending group emails.
In this article, we will guide you through the step-by-step process of creating a distribution list in both the Outlook app and the web version. By mastering this skill, you can enhance your email productivity, organize your contacts effectively, and effortlessly send messages to specific groups of recipients.
Importance of using Distribution List in Outlook
Creating a distribution list in Outlook offers valuable advantages for efficient email management. One key benefit is time savings. By selecting a pre-defined distribution list, you can effortlessly send group emails without manually entering multiple email addresses. This saves time and ensures accurate messaging.
Also, distribution lists enhance organization. Categorize contacts based on criteria like departments or teams, enabling targeted communication. Selecting the appropriate distribution list streamlines the process, ensuring relevant individuals receive the message promptly.
Mastering distribution lists promotes efficiency and productivity. Pre-defined lists simplify selecting recipients, reducing errors, and omitting important individuals. Distributing information, updates, or announcements to designated groups becomes effortless, fostering effective collaboration.
How to Create Distribution List in Outlook?
So here, we have three primary methods to create distribution list in Outlook, the first two methods will be used for the Outlook desktop App, and the third method can be used when you are on the web version. So, let’s jump to the methods quickly and learn how to create distribution list in Outlook
Create Distribution List in Outlook – Desktop App [Method 1]
In this method, we will learn how to create distribution list in Outlook when you are using the Outlook desktop app version, this method also works similarly if you are using a mobile app.
Step 1
Open the Outlook app on your device.
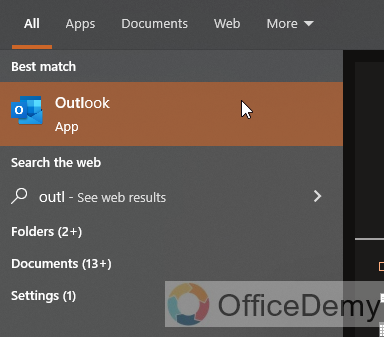
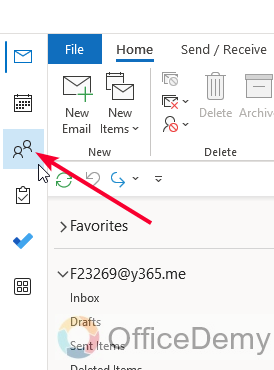
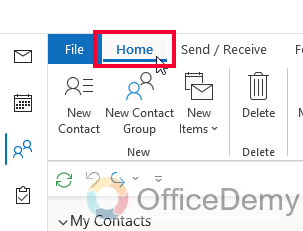
Step 2
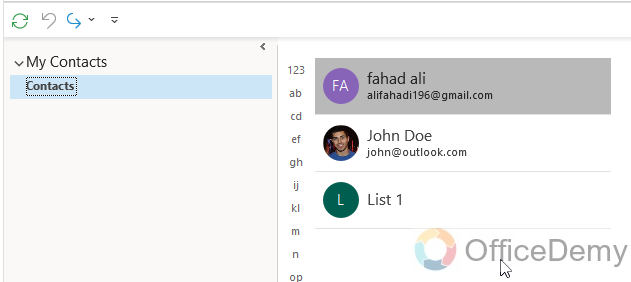
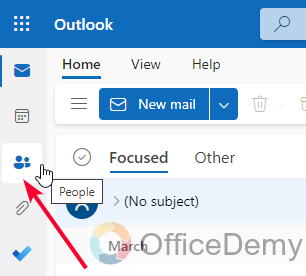
Go to the “People” or “Contacts” section.
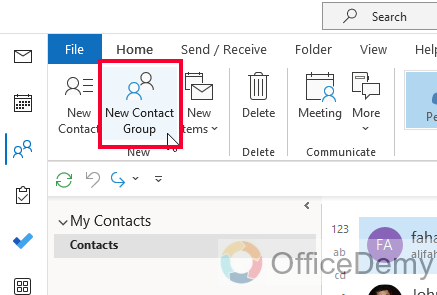
Step 3
Select “New Contact Group” or “New Distribution List.”
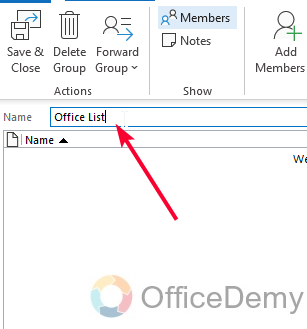
Step 4
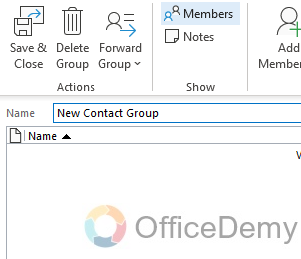
Enter a name for the distribution list.
Step 5
Click on “Add Members” to add contacts from your address book.
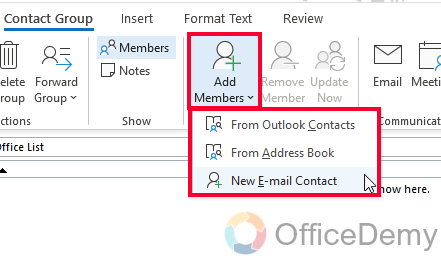
Step 6
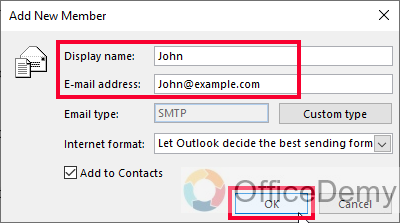
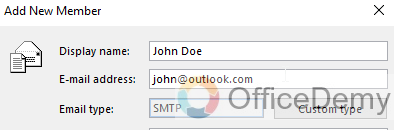
Add the details of the person you want to add like the Display name and email address.
Step 7
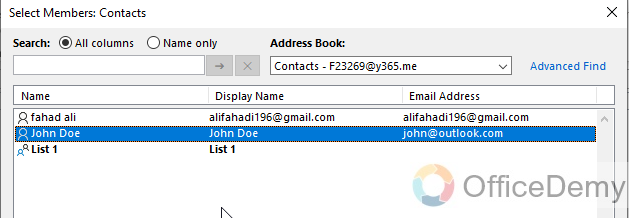
Or, if you add from the contacts, then choose the desired contacts from the list
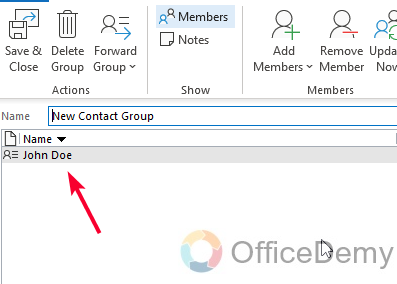
Step 8
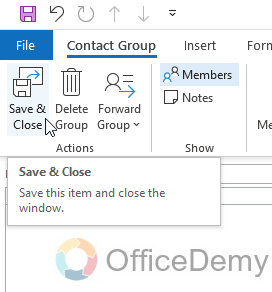
Save the distribution list, and you are done.
This is how to create distribution list in Outlook using the Desktop app method 1.
Create Distribution List in Outlook – Desktop App [Method 2]
In this section, we will learn any other alternative method to create distribution list in Outlook. This is an alternative method, but you can definitely use this if you are not comfortable with the first method, or if somehow the first method is not available to you.
Step 1
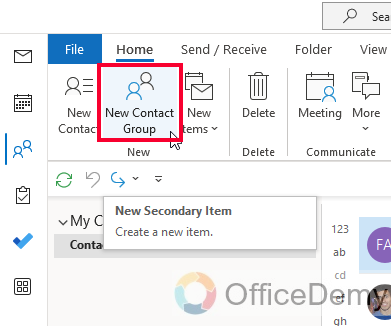
Open Outlook on your computer, and go to the “Home” tab.
Step 2
You will get the contact or people list
Step 3
Choose “New Contact Group” or “New Distribution List” from the options.
Step 4
Enter a name for the distribution list.
Step 5
Click on “Select Members” to add contacts from your address book or with their email address.
Step 6
Choose the desired contact, and your contact is added.
Save the distribution list, and you are done.
Create Distribution List in Outlook – Web Version
In this section, we will learn how to create distribution list in Outlook using the web version of Outlook.
Step 1
Open Outlook in your web browser and sign in.
Step 2
Go to the “People” or “Contacts” section.
Step 3
Click on the dropdown menu of the “New Contact” button, and select “New contact list”
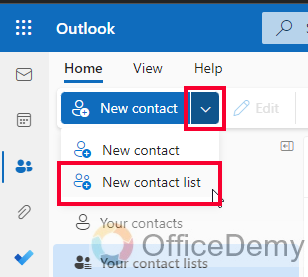
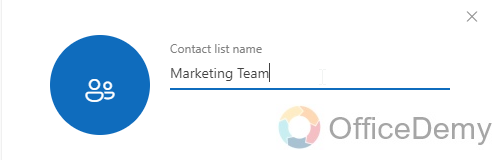
Step 4
Enter a name for the distribution list.
Step 5
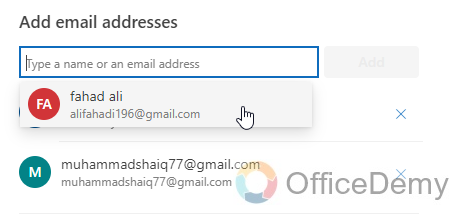
Click on the search box below “Add email addresses” to add contacts from your address book.
Step 6
You can also write a description for your distribution list so you can identify it later.
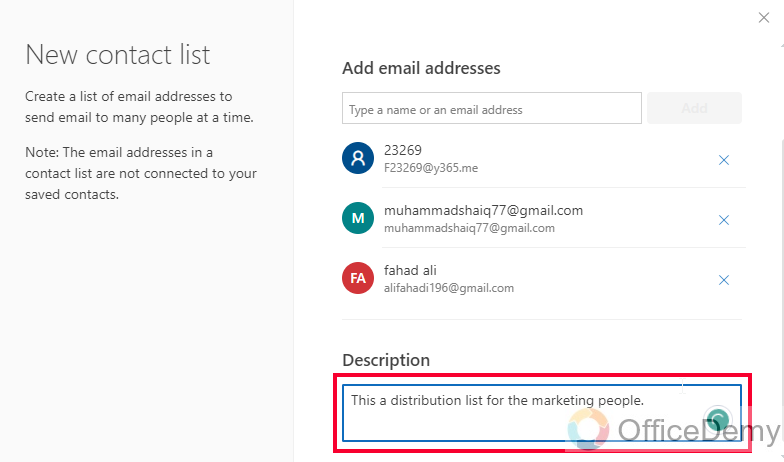
Step 7
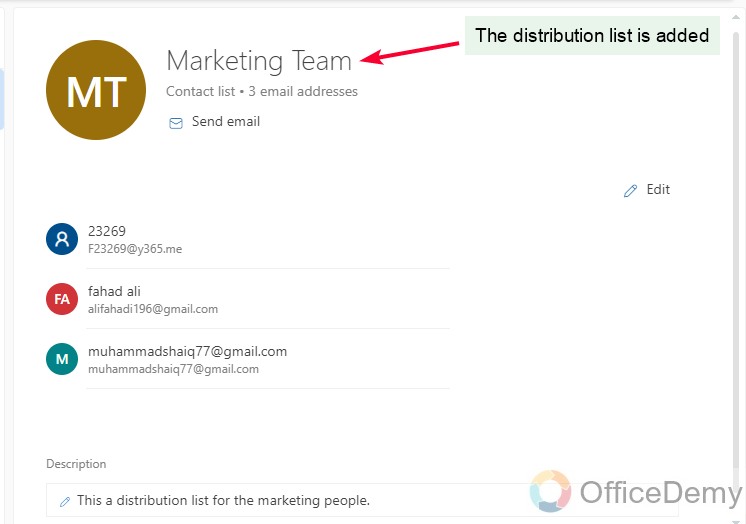
After selecting the contacts and click the “Create” button on the bottom right side.

Step 8
Your distribution list is created, and you can access it inside the contact window.
Things To Remember
- Distribution lists save time by allowing you to send emails to multiple recipients at once.
- Create distribution lists based on criteria like departments or teams for targeted communication.
- Double-check the list of members to ensure accuracy before sending emails.
- Regularly update and maintain your distribution lists as contacts change.
- Distribution lists can be used across different versions of Outlook for consistent communication.
- Avoid overloading distribution lists with too many members to ensure effective email delivery.
- Remember to save and name your distribution lists for easy reference in the future.
- Distribution lists can be shared with others to facilitate collaborative emailing.
- Test your distribution list by sending a sample email to ensure proper functionality.
- Update distribution lists promptly when contact information or group memberships change.
Frequently Asked Questions
Can I Receive Read Receipts for Emails Sent to a Distribution List in Outlook?
Yes, it is possible to enable read receipts in outlook for emails sent to a distribution list. This feature allows you to track if recipients have opened your email. By enabling read receipts in Outlook, you can gain valuable insights into the engagement and responsiveness of your distribution list members.
Q: How to add or remove contacts from an existing distribution list?
A: Yes, you can edit your distribution list by adding or removing contacts as needed. Open the list and use the “Add Members” or “Remove Members” option to make changes.
Q: How to use distribution lists created in the Outlook app on the web version?
A: Yes, distribution lists created in the Outlook app can be accessed and used in the web version. They sync across different platforms.
Q: Can I import contacts from other sources into a distribution list?
A: Surely, you can import contacts from various sources, such as a CSV file or another Outlook contact list, into a distribution list. Use the import option available in the distribution list creation process.
Q: Can I share my distribution list with others?
A: Of course, you can share your distribution list with others by exporting and sending the list file or granting permission for others to access and use the list.
Q: Can I send an email to a distribution list from an external email client?
A: Yes, very easily, you can send emails to a distribution list from external email clients. The distribution list email address functions like a regular email address.
Q: Can I include distribution lists within distribution lists?
A: Yes, you can include one distribution list within another. This allows for nested groups and can help organize contacts based on multiple criteria.
Q: Can I customize the display name of a distribution list?
A: Yes definitely, you can edit the display name of a distribution list to make it more descriptive or easily recognizable. Simply modify the list’s properties or settings.
Q: Can I delete a distribution list without affecting the contacts within it?
A: Yes, deleting a distribution list does not remove individual contacts from your address book. It only removes the list itself.
Q: Can I send an email to a distribution list without revealing individual recipients’ addresses?
A: Yes, when you send an email to a distribution list, the recipients’ addresses are hidden, protecting their privacy.
Q: Can I use a distribution list for scheduling meetings or appointments?
A: Yes, you can add a distribution list as an attendee when scheduling meetings or appointments, simplifying the process of inviting multiple people at once.
Conclusion
Learning how to create distribution lists in Outlook is very easy but a very widespread topic, it has so many aspects, and people especially beginners have so many questions about it. I tried to cover everything in the FAQs section. Thanks, and keep learning with Office Demy.


