
To Create Quick Parts in Outlook
- Compose a “New Email“.
- Select “Text“.
- Go to “Insert” > “Text” > Quickparts.
Today, we will learn how to Create quick parts in Outlook. Microsoft Outlook provides so many ways of automating email responses like templates, signatures, Autotext, and automatic replies. But my favorite is Quick Parts.
Quick parts in Outlook are the combination of text and figures that is reusable in other mail, you can access the building blocks at any time, and they are saved in the form of a template in the Outlook gallery and located in the Insert tab of the menu bar.
In this tutorial, we will teach you how to create Quick Parts in Outlook. Let’s move toward the next section without wasting time.
Why use Create Quick Parts in Outlook?
Quick Parts is a time-saving way to easily build an email response. With the help of this feature of Outlook, you can respond to requests for information, links to resources, or other frequently used email content.
If you have sent the same message again and again via email, then also you can create a Quick Part for yourself and can send an email instantly in Outlook. Hope you find how important it is to create Quick Parts in Outlook.
How to Create Quick Parts in Outlook?
Creating Quick Parts in Outlook is not a difficult task, it’s just like doing an email to someone. As you compose an email and send it, similarly, to create a Quick Part you will just need to create an email template and save it as Quick Part in your Outlook. Don’t worry, with the help of the following steps you will easily get how to create Quick Parts in Outlook.
Step 1
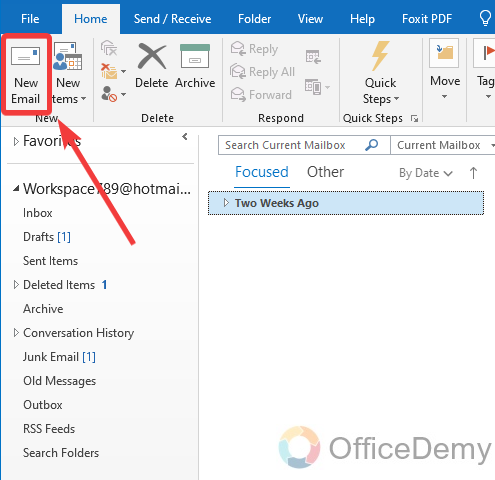
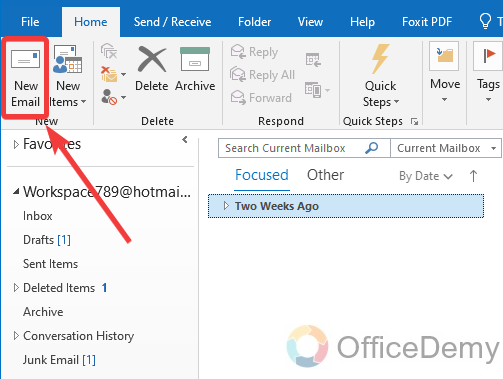
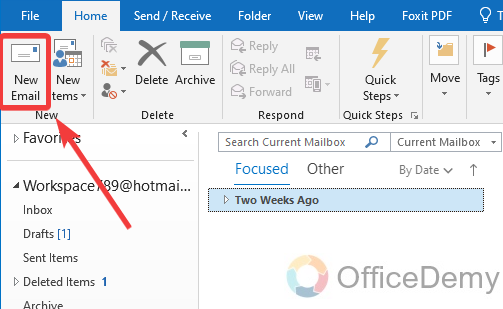
To create quick parts in Outlook, first, you will have to compose a new email in Outlook. To compose a new email, you will have to click on the “New Email” button located at the left top corner of the window.
Step 2
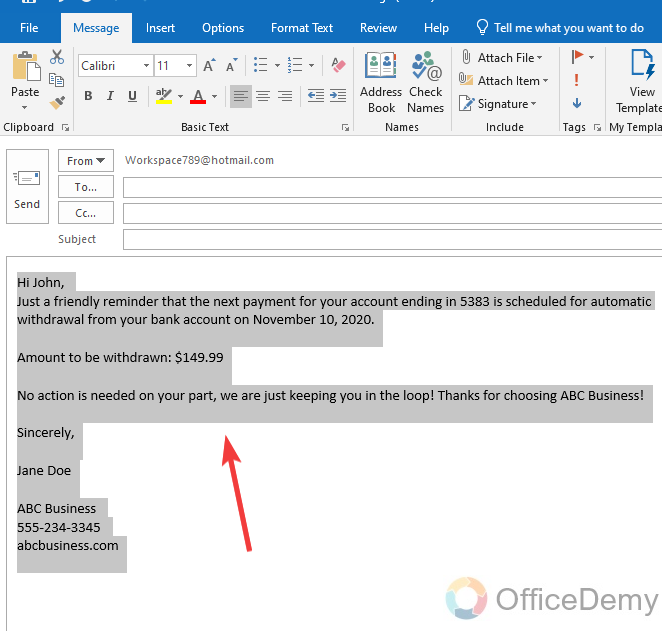
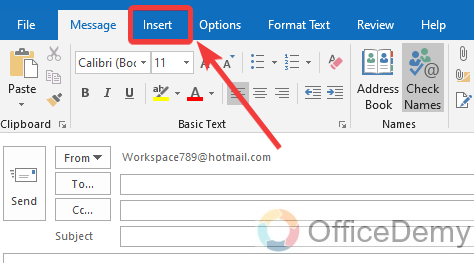
When you click on the “New Email” button, a new separate window will open where you can compose your email. To create quick parts, first, prepare the material that you want to include in your quick parts. Once you have inserted the text or attachment then select all over the text entire the email as I have selected in the following example.
Step 3
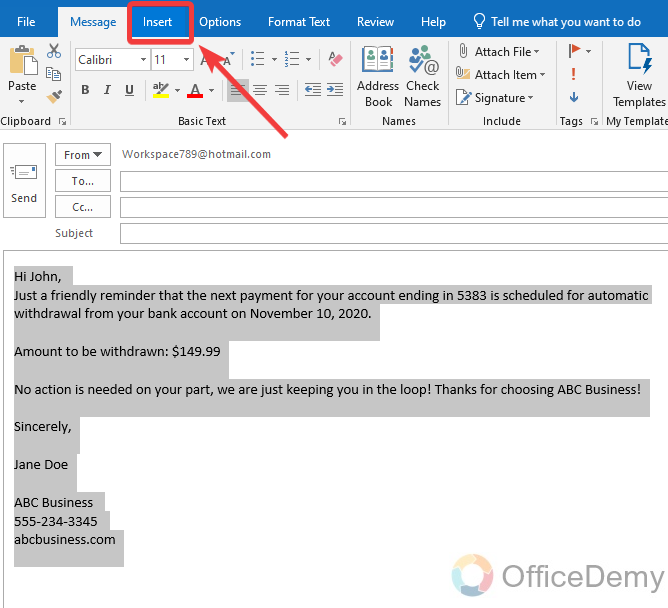
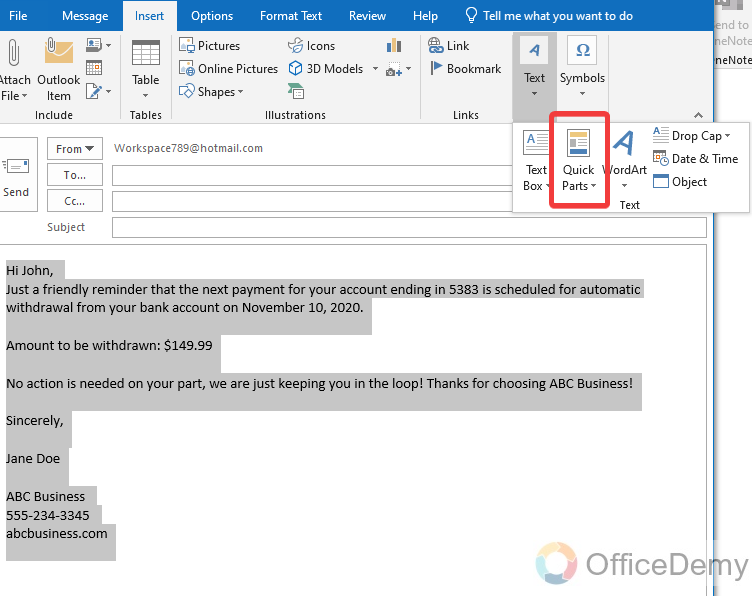
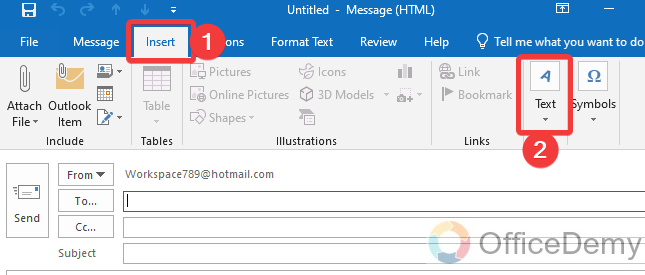
After selecting the text, go into the “Insert” tab of the menu bar as highlighted in the following picture.
Step 4
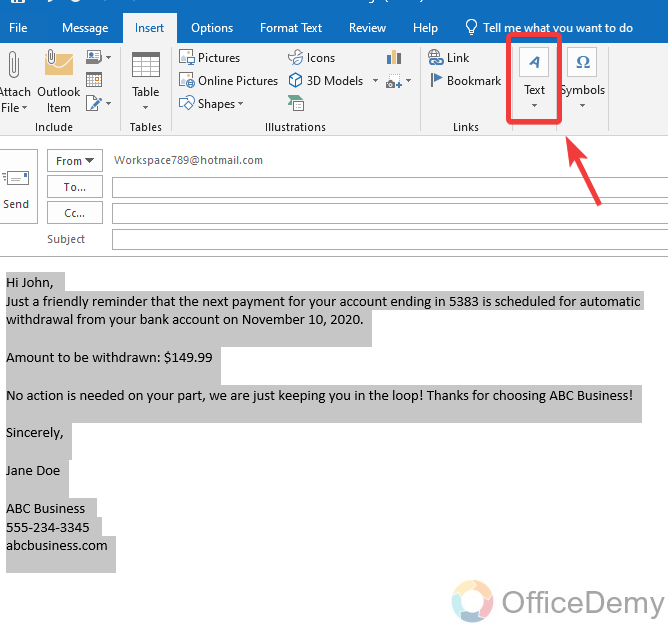
In this “Insert” tab, you will see an option at the end of the ribbon namely “Text“. Click on it to expand it for more options.
Step 5
When you click on this “Text” option, a drop-down menu will open where you will see the “Quick Parts” option as can be seen in the following screenshot. Click on it to save your quick parts.
Step 6
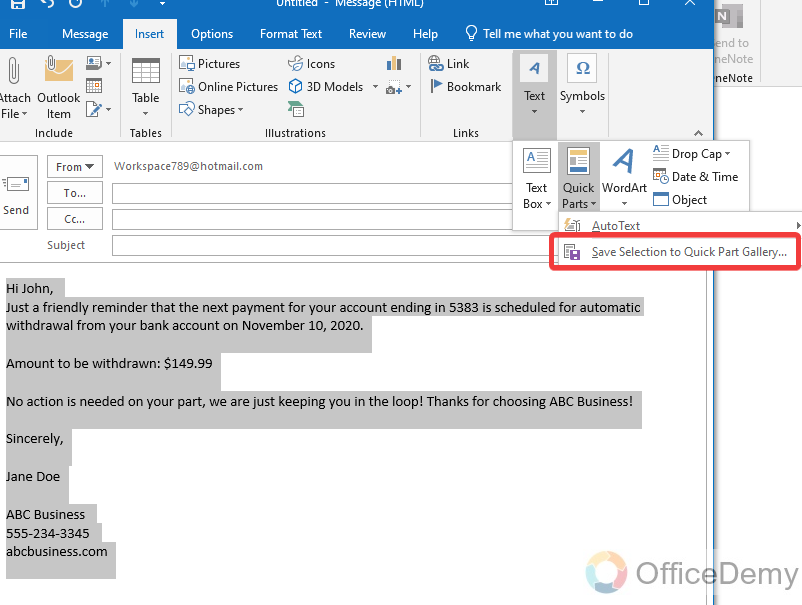
When you click on this “Quick Parts” option, you will see here a couple of options including “Auto text” and “Save selection for quick parts“. To save your “Quick Parts” click on the second option as highlighted.
Step 7
A new dialogue box will open in front of you where you will have to save some requirements to create your quick parts. In this required field, first, you will have to give a name to your quick parts, then select the gallery that you want to save your text as a quick part or auto text. Then select the category and so on.

Step 8
After selecting the category, you will see a description box as shown in the following picture, write the description for your quick parts in the following description dialogue box.

Step 9
Don’t change the rest of the options, they remain the same by default. Just click on the “OK” button to save your “Quick parts“.

In this way, your quick will be created.
Frequently Asked Questions
Q: Is it Possible to Recover a Draft that has been Created as a Quick Part in Outlook?
A: Yes, it is possible to recover a draft that has been created as a Quick Part in Outlook. By following a few simple steps, such as accessing the Drafts folder, right-clicking on it, and selecting Recover Deleted Items, users can retrieve their deleted drafts. Restoring deleted drafts can help save valuable time and prevent important information from being lost permanently.
Q: How to insert Quick Parts in Outlook?
A: Once you have created your Quick Parts in your Outlook then inserting it to your email is very easy. The Quick Parts option displays your recent Quick Parts template at your through which you can add your quick parts to your email with just one click. Let me show practically with the help of the following examples how to insert Quick Parts in Outlook.
Step 1
Quick Parts are added in emails to quickly add useful information to your email. To insert Quick Parts, first, compose an email by clicking on the “New email” button at the left top corner of the window in the home tab.
Step 2
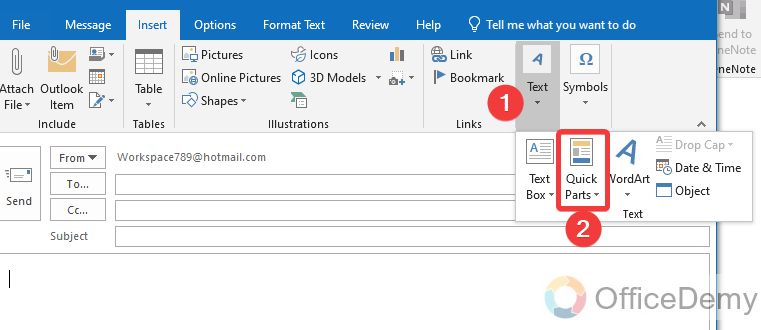
This “New Email” button will give you a new window where you will be able to compose your email. On this window, go into the “Insert” tab of the menu bar as highlighted below.
Step 3
In this “Insert” tab, you will find the “Text” option, then a drop-down menu will open by clicking on this “Text” option. In this drop-down menu, you will find the “Quick Parts” option. Click on it to insert Quick Parts.
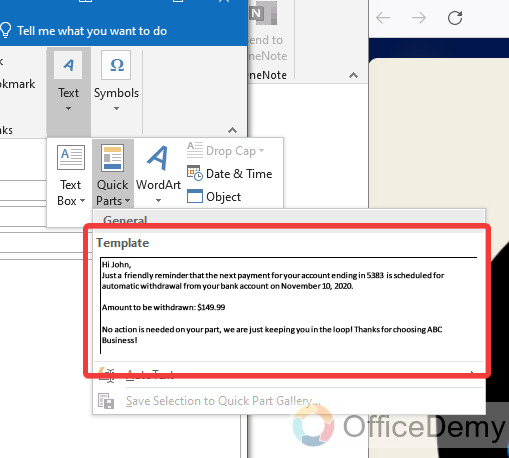
Step 4
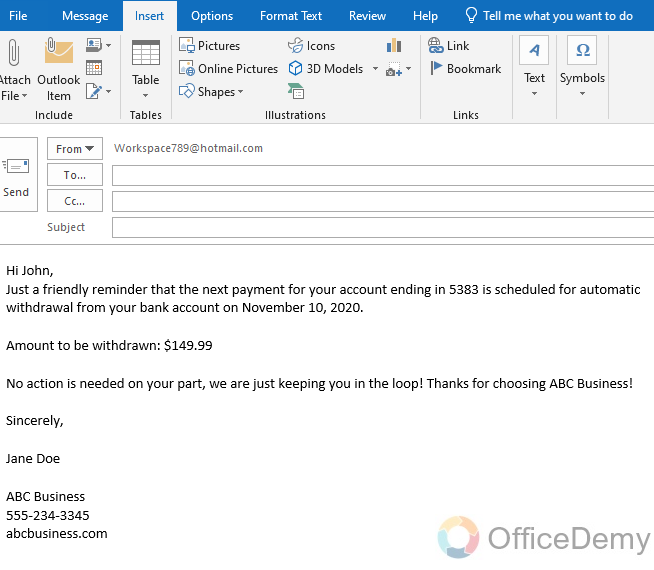
When you click on the “Quick Parts” option, a drop-down panel will drag down where you will see your saved quick parts in front of you as highlighted in the following picture. To insert these quick parts just click once on it to insert.
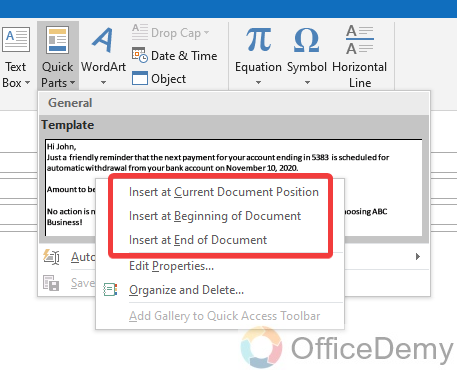
Step 5
If you press the right click of the mouse on this quick parts template, you may find some more additional options which would be helpful to you while inserting quick parts. Actually, these options include the options for the position of your quick parts where you want to place its current location, the beginning of the document, and the end of the document.
Step 6
In this way, you can insert your quick parts instantly into the email. You can also go for more according to your criteria as discussed above.
Q: How to delete quick parts in Outlook?
A: Quick Parts can be an effective tool for quickly formatting emails in Outlook, but if you have saved so many of them it can become a burden. Fortunately, deleting Quick Parts is a straightforward process. In just a few simple steps, you can easily delete Quick Parts you no longer need. With the right knowledge and tools, keeping your emails organized and efficient has never been easier. So, don’t wait any longer, get started right now and free up your Outlook inbox with the following guide.
Step 1
To delete your quick parts, you will have to access the quick parts option which you can access through the new email window. To open a new email window, click on the “New Email” button as highlighted in the following picture.
Step 2
On this new email window go into the “Insert” tab of the menu bar where you will find a “Text” option. Click on this “Text” option button to find the Quick Parts option.
Step 3
When you click on the “Text” option you will see your “Quick Parts” option and if you click on this Quick Parts option, you will also see your all recently created Quick Parts as can be seen in the following screenshot.

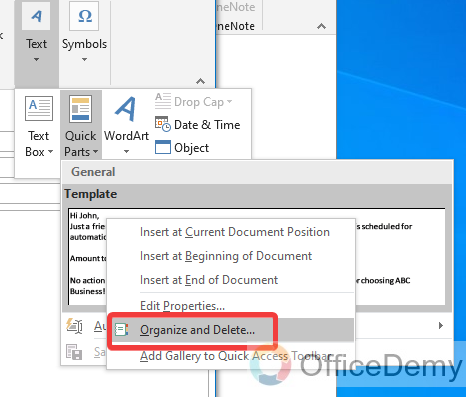
Step 4
To delete this Quick Parts, press the right click of the mouse on and, a drop-down menu will open where you will see an “Organize and Delete” option. Click on it to open it.
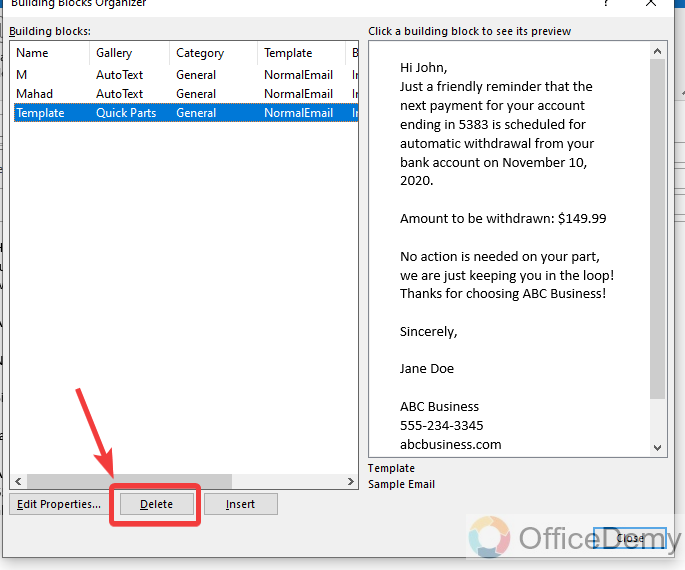
Step 5
Clicking on the “Organize and Delete” option will give you a new window where you will find your Quick Parts detail in the following dialogue box. First, select the Quick Parts that you want to remove from the list then click on the “Delete” button as directed in the following picture.
Step 6
Your Quick Parts have been deleted, after deleting the window just click on the close button to close the window.

Q: How to edit a Quick Part in Outlook?
A: Unfortunately, you cannot modify the text or image in the previously saved Quick Part although you can edit the properties of your quick parts. To Edit Quick Parts, insert the Quick Part, make changes then save it again separately. In this way, you can modify or edit your Quick Parts.
Conclusion
That’s all from how to create quick parts in Outlook. I wish it were easier to share Quick Parts among the different Office applications, especially for Outlook. With the above article on how to create Quick Parts in Outlook, you can efficiently create emails as well. Hope it will be helpful to you.


