
To Do Spell Check in Outlook
- Go to “New email“.
- Choose the “Review tab” from the main menu.
- Select “Spelling & Grammar“, and start doing spell check.
Hi, today we will learn about spell checker, I will show you how it works, and where is spell check in Outlook. Basic features of Outlook include the email service, flagging, and color coding, along with preview pane options. But this was not the end.
More functional tools can be found in Outlook such as Spelling and Grammar check. Yes! Microsoft Outlook has also built-in spelling and grammar check options in it. Most people are unable to find it because the spelling and grammar check option in Outlook is found in the composing email window.
If you want to know where the spell check is in Outlook jump to the second next section of step by step procedure of where the spell check is in Outlook.
What is Spell Check in Outlook?
A spell check in Outlook or any software is a program that is designed to locate misspelled words in your writing. In Outlook we do write or compose emails therefore spell check is used to correct mis-spelled emails.
The spell checker determines the correctness of the spelling of a given word based on the language set being used.
Why do we need to Locate Spell Check in Outlook?
Most people are dependent on spell-checker programs because their spelling and grammar skills are not strong enough. If you are one of them then without a Spell check program it could be very difficult to deal with any software. It is not so easy in Outlook.
You can learn with the following tutorial where spell check in Outlook can prevent you from misspelled errors in your words.
Where is Spell Check in Outlook?
Do you use Microsoft Outlook? And finding a spell-check option in Outlook. Don’t we are here to help you in finding the Spell check option in Outlook with the help of the following screenshots.
Step 1
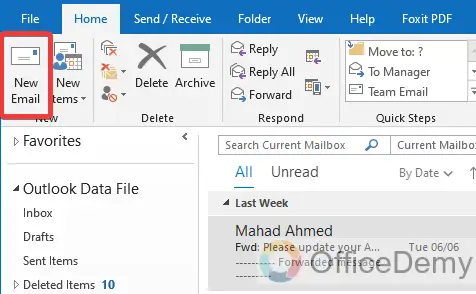
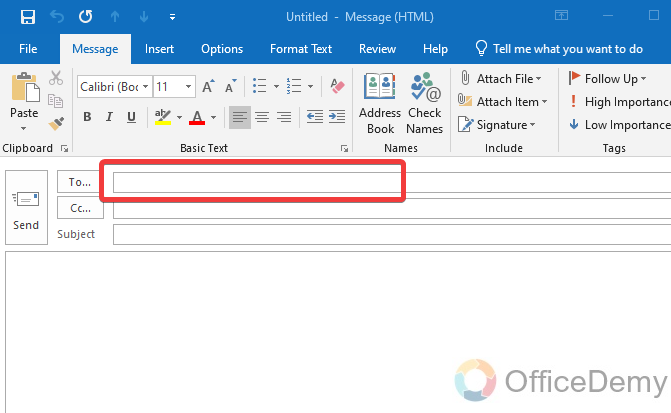
First, compose a new email by clicking on the “New email” option at the right top corner of the window as highlighted below.
Step 2
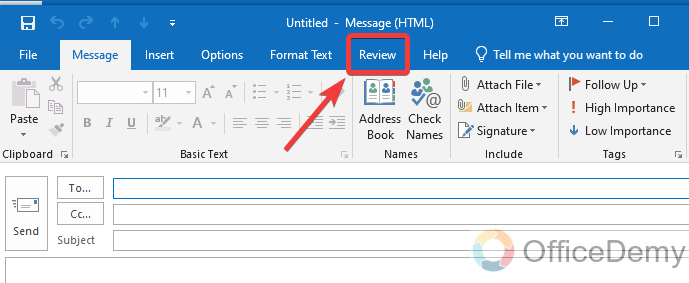
When you click on “New email” a new window will open to compose email. On this window go into the “Review” tab of the menu bar.
Step 3
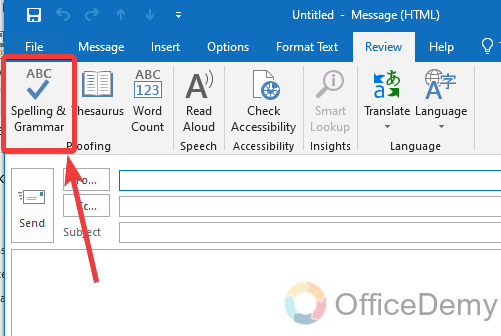
As you click on the Review tab, you will see the “Spelling & Grammar” check button, it’s the first in the Review tab ribbon as can be seen in the following picture.
How to Do Spell Check in Outlook
In the above section, we have learned where is spell check in Outlook, but do you know? How to Spell check in Outlook? If your answer is ‘No’ then continue reading this article because, in just the next section, we are going to learn how to apply spell check in Outlook.
Step 1
Go into the “New Email” option at the top right corner of the window to compose an email.
Step 2
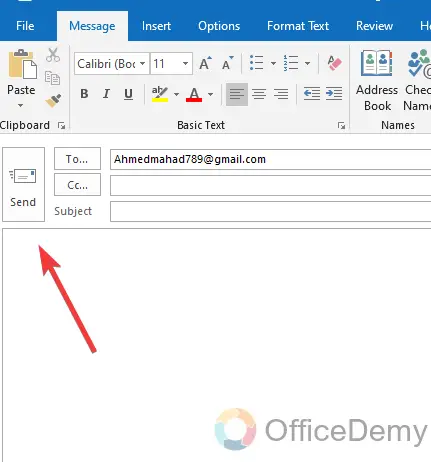
A new separate window will open when you click on this “New Email” button to compose an email. Here the first thing you will be asked for is a person to who you want to send an email, write the email of the person in the following highlighted dialogue box of “To“.
Step 3
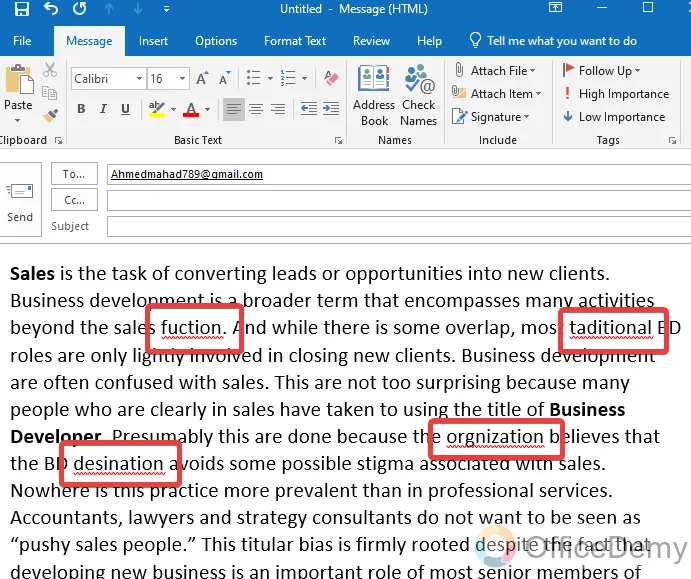
After submitting the receiver info then write the text in the description box below in which you can write anything, message, quotation, query, alert, acknowledgment, request, information, notice, etc.
Step 4
Have you written your message? If so, then look at your para, some indicators indicate spelling mistakes and grammar mistakes, as the red line indicates spelling mistakes and the blue line indicates grammar mistakes. Similarly, in the following paragraph, you can see these spelling mistakes.
Step 5
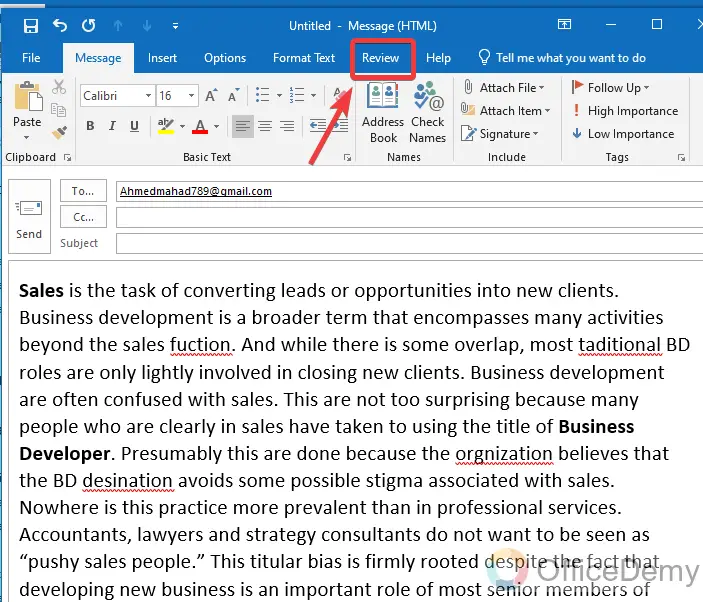
Click on the “Review” tab from the menu bar of Outlook to find the spelling and grammar check option.
Step 6
When you open the review tab, you will find the “Spelling and Grammar” check option. Clicking on this “Spelling and grammar” check option will give you a small new pop-up window where you will be able to locate all your grammar mistakes and can also correct them.
Let me show you one by one all those options.
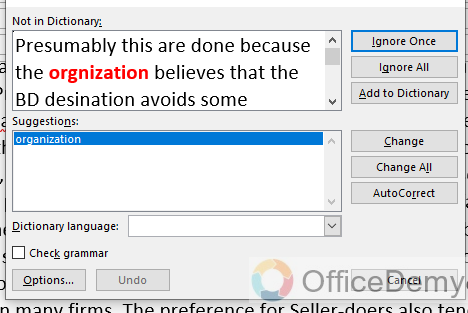
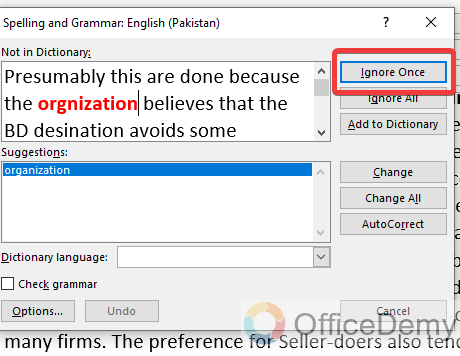
Step 7
The first option on this window, you will find “Ignore Once“.
- This option is used for ignoring the mistake. Let’s suppose the word you have used is not in the Outlook dictionary and indicating it wrong, but your word is still correct then you can use this button to ignore the mistake.
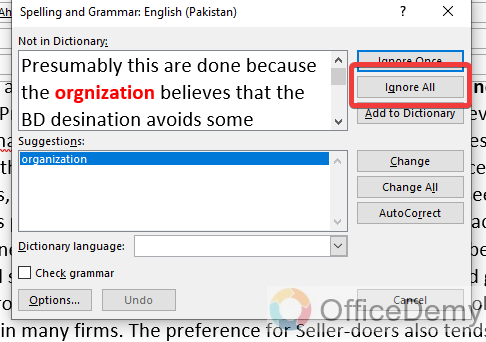
- The second option on this window is found “Ignore all” through which you can ignore more than one mistake. If your paragraph has more similar mistakes which you want to ignore simultaneously, you can do it by “Ignore all” option.
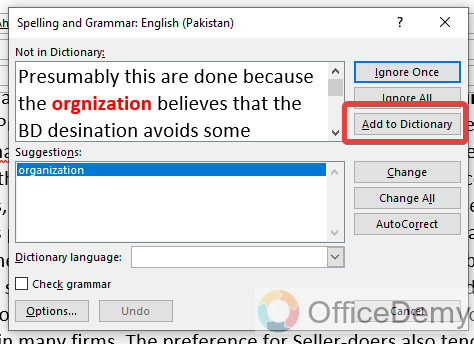
- The third option on this window, you will see “Add to dictionary“. Microsoft Outlook indicates a mistake when the word is not present in its dictionary, so if have such type of word add it to Outlook’s dictionary by this option instead of ignoring it again and again.
- Now rest are the options for correcting spelling and grammar mistakes. If you have committed a mistake while writing and agreed to Outlook suggestions, then click on the “Change” button to correct the word.
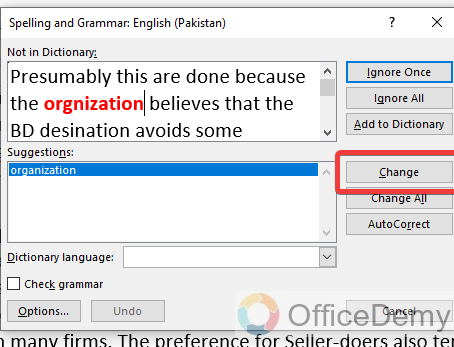
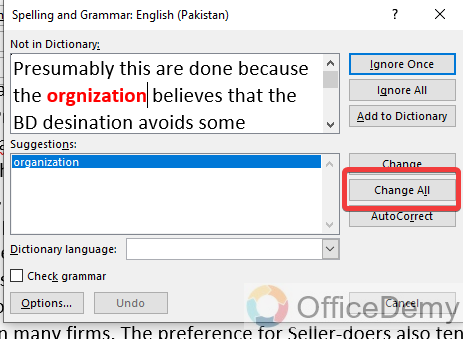
- In the second option, there is s “Change all” option that can be used to correct all mistakes in your email.
- Finally, the last option is “Autocorrect“. If you are sick of correcting these mistakes by spelling and grammar checks then you can also use the autocorrect option which will automatically correct your all committed mistakes.
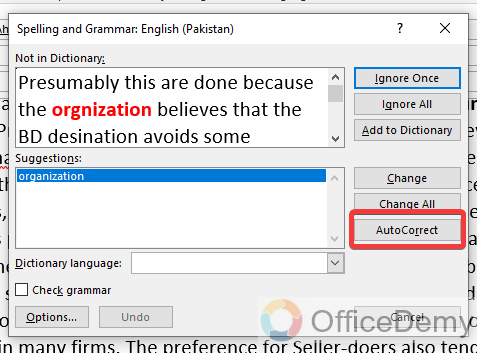
Note: This autocorrect option can also change those words which are already correct but not present in Google Dictionary.
Step 8
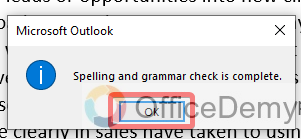
This was at all from the spelling and grammar check option, once you are done with spelling and grammar check in Outlook, a pop message will prompt in front of you. Click on just “OK” button to close the window.
Frequently Asked Questions
Does Changing the Language in Outlook Affect the Spell Check Function?
Switching language in outlook may impact the spell check function. When you change the language settings, Outlook adapts the dictionary accordingly. So, if you switch to a different language, the spell check may not work correctly, as it relies on the corresponding language dictionary. To ensure accurate spell checking, choose the appropriate language in Outlook settings.
How to enable auto spell check in Outlook?
Email is a vast service of communication, dealing with hundreds of emails a day, meanwhile remembering to check spelling and grammar checks is almost impossible. But if you are using Microsoft Outlook service then you can have an option of auto-checking spelling and grammar mistakes before you send the email. Yes! With the help of the following steps, we will tell you how to enable auto spell check in Outlook which will automatically check the spelling mistakes before you send the email.
Step 1
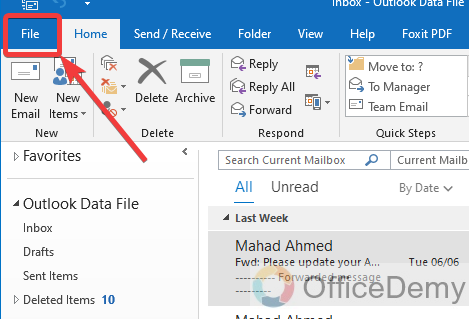
Go into the “File” tab of the menu bar located at the right top corner of the window as highlighted below.
Step 2
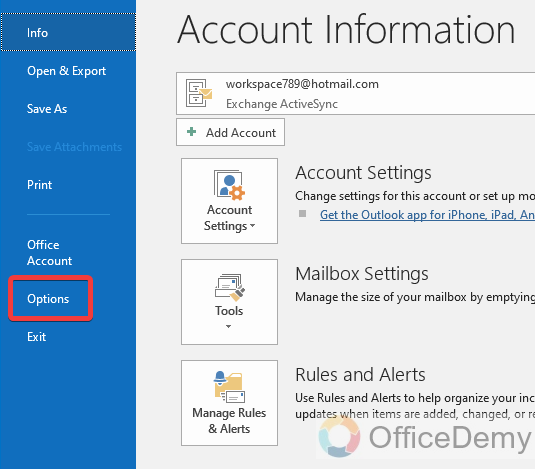
When you click on the File tab, a new window will slide right where you will see the “Options” tab in the blue right panel. Click on it to open it.
Step 3
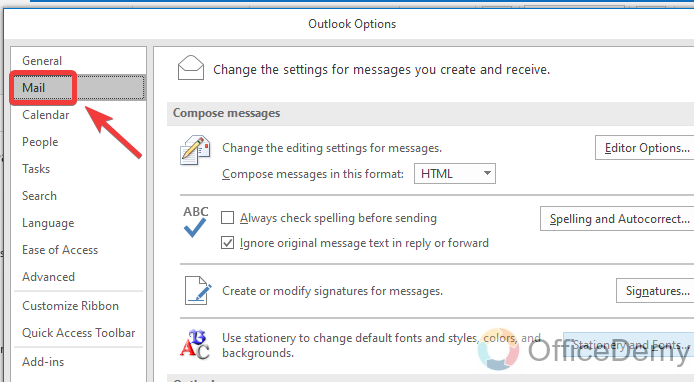
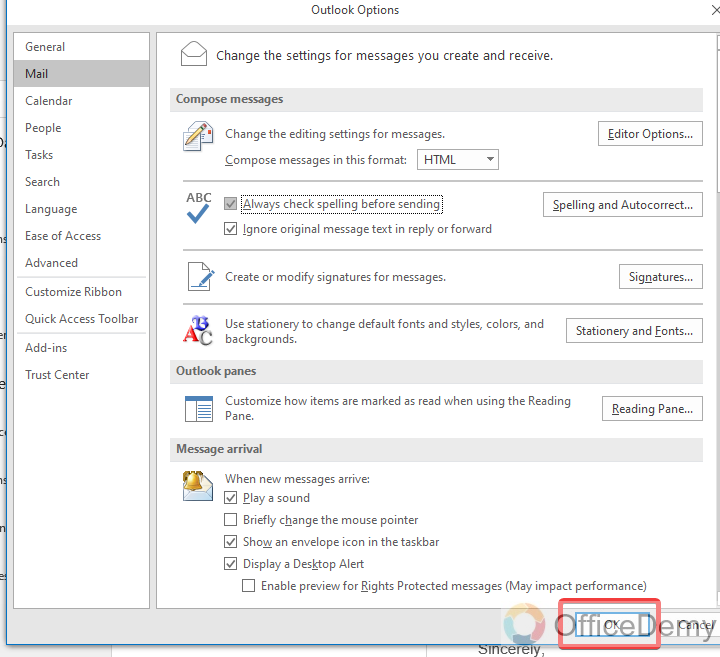
Clicking on the “Options” tab will give you a small new window with all detailed options regards Outlook. On this window, at the right, you will see the main menus listing. Select the “Mail” option at the number second.
Step 4
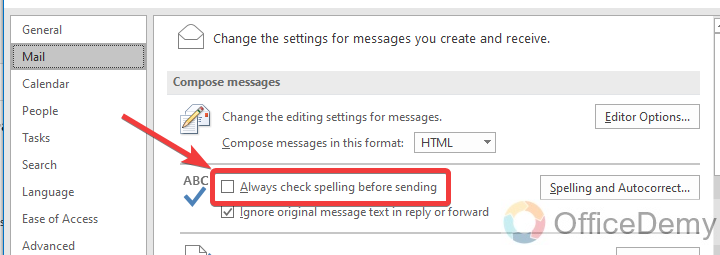
In this “Mail” tab, you will find an unchecked option “Always check spelling before sending email“. Checked this option to enable auto spell check in Outlook.
Step 5
After enabling auto spell check in Outlook then click on the “OK” button to save these changes.
How to enable autocorrect in Outlook?
Spell check in Outlook while email can be a good decision, it can also consume much of your precious time. While autocorrect can save users time by quickly fixing common misspellings. It can also improve communication by catching errors that could change the meaning of what someone is trying to say. So, if you want to apply “Autocorrect” to your Outlook then follow the following guidance with the help that you can easily apply Autocorrect to your emails in Outlook.
Step 1
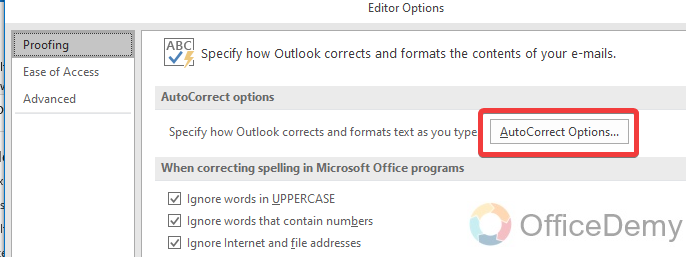
To enable autocorrect, you will have to go into the “Options” tab from the File menu of Outlook. Go into the “Mail” from the main menu where you will find the “Spelling and autocorrect” button as highlighted below. Click on it to open.

Step 2
When you open “Spelling and autocorrect“, here you will get your “Autocorrect” option through which you can enable “Autocorrect” in Outlook.
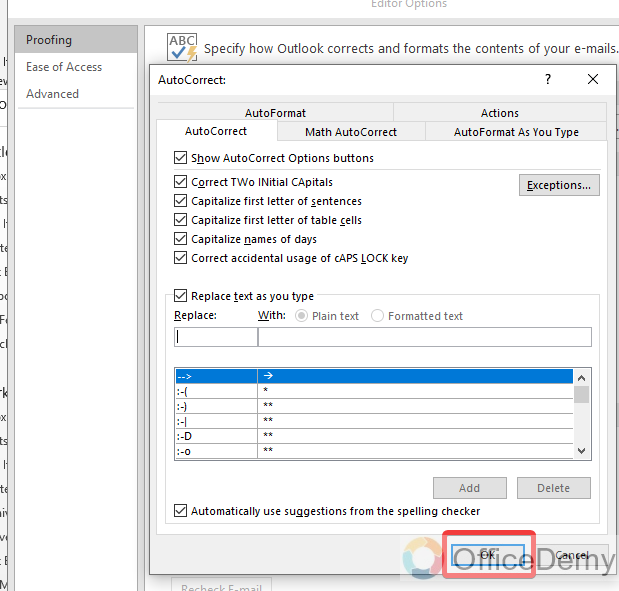
Step 3
When you click the “Autocorrect” options, a new dialogue box will open containing some conditions and criteria which you can set according to your preference then just click on the “OK” button.
Conclusion
The article on where is spell check in Outlook must help you in finding spelling and grammar checks in Outlook and will help you to apply spelling and grammar checks in Outlook. Thanks, and keep learning with Office Demy.


