
To Draw on Google Slides
- Open your presentation.
- Click “Insert” > “Line” > “Scribble“.
- Draw with your mouse and change colors/thickness.
OR
- Install Annotate extension.
- Activate it in your presentation.
- Draw with a pen or highlighter and save annotations.
OR
- Create or open a drawing.
- Insert it into slides via URL or download/upload.
- Adjust the drawing’s format in slides.
In this article, we will lean about 3 ways to draw on google slides with step by step process.
Google Slides have tons of great options for creating your presentation and, best of all, lots of templates are available for you. You can also use the drawing options for creating your own version of a successful business presentation and spread the word about your offer even further.
Having a Google Slides presentation to share your drawings is great. With a projector, you can involve an entire audience and still have access to all of your drawings. This is especially useful when you’re collaborating with people in the same room, but it’s a lot of fun when you’re the only one in the room, too! If you want to draw on the slides using different pens or brushes and not just insert previous drawings, there are a few ways to do it, so let’s take a look.
Check our article on how to insert a gif in google slide.
How to Put a GIF in Google Slides (3 Methods)
You wouldn’t need to add an image to everything you plan to explain in your presentation, although this might be a simple thing to do. It’s possible you will have to draw a picture of your own. We’ll show you three ways to draw on Google Slides. These are,
- Using scribble tool
- Using Annotate extension
- Using google drawing
What is a Scribble Tool and its Usage
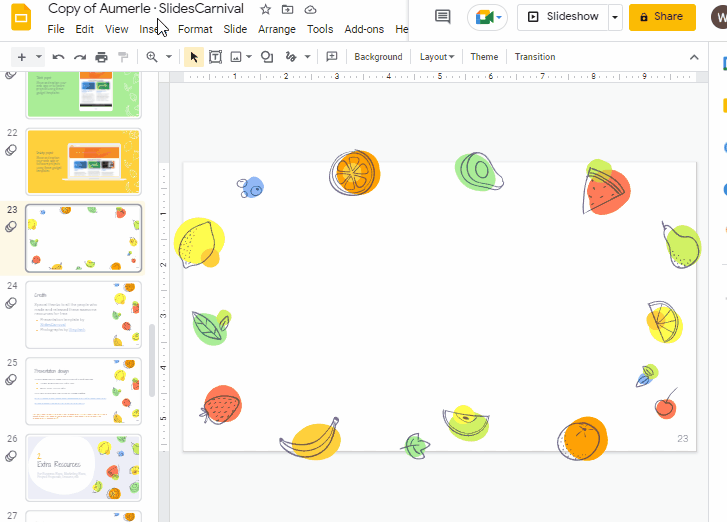
The Scribble tool on Google Slides lets users draw freehand shapes and lines. Users simply sketch out a shape with the mouse, release the mouse, and Google Slides magically turns that shape into a new, more attractive one. This tool is fun and easy to use.
Scribble is an effective tool during a presentation for the reason that it allows you to highlight particular points. It can greatly enhance your typical listeners and create an involved crowd. Because of this tool, it is ideally suited for both school university presentations and business presentations.
How to Draw on Google Slides using Scribble Tool
If you have trouble using the drawing tools in Google Slides, consider using scribble mode instead.
Follow these steps to learn how you can use scribble tool on google slide,
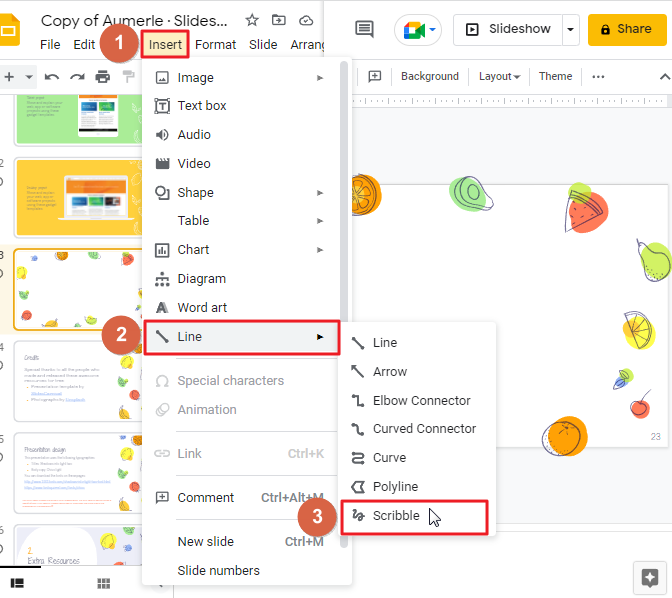
Step 1: Open the google slide presentation and select the exact slide on which you would like to insert a drawing.
Step 2: Click on Insert which is located at the top of your screen in the menu bar. A drop-down menu will appear. click on line > click on scribble.
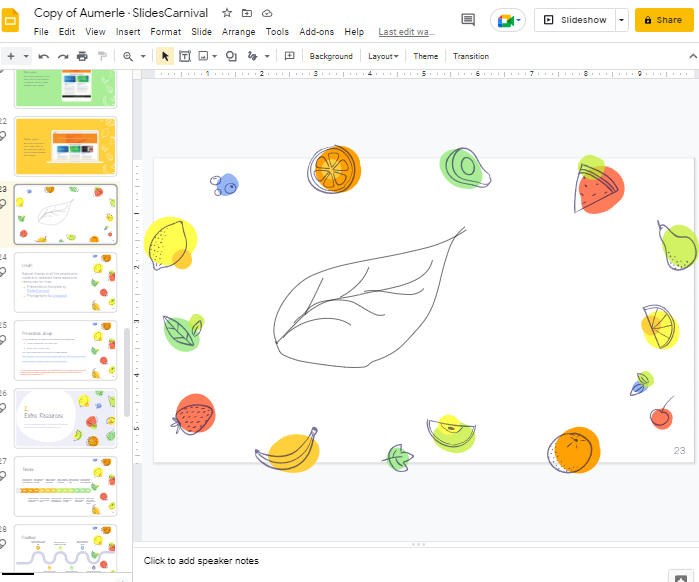
Step 3: The scribble icon that appears after you click in the Line drop-down menu allows you to add lines and sketch objects to your document. When you click the Scribble icon, your cursor will turn into a plus symbol. To use the tool, place your mouse pointer where you want to start drawing and hold down the left-click button. Then move your mouse around to create a line or anything you want. Once you have created the drawing, release the left-click button.
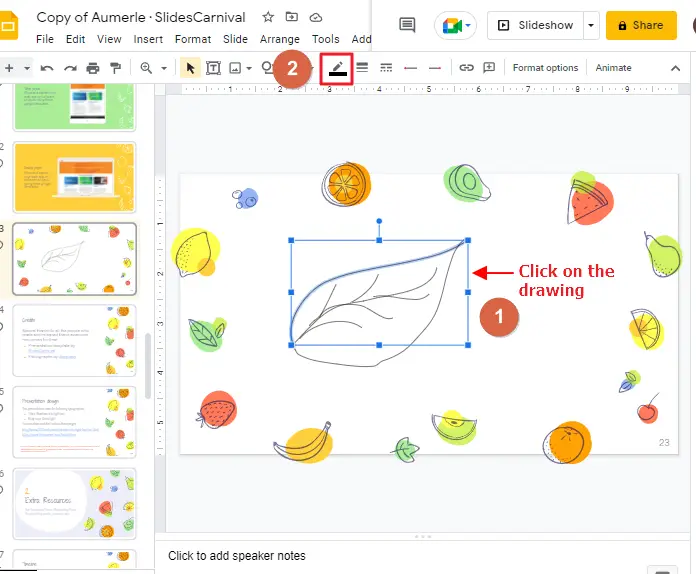
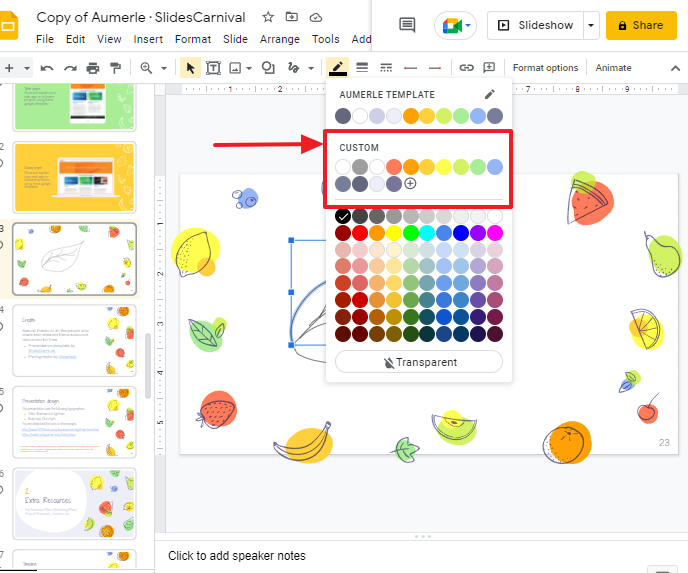
Step 4: For a different look, choose a different color for your drawing. Just click on the drawing and go to the Line Color on the toolbar.
You can choose any color you want.
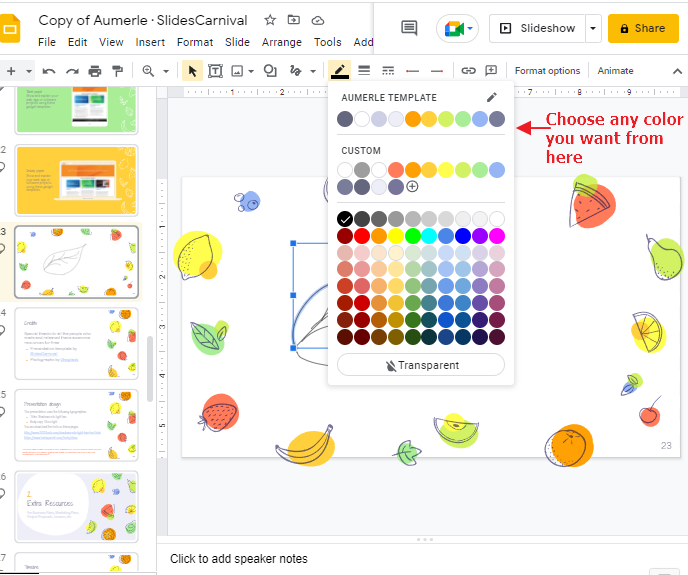
If none of the given choices please you, click on Custom, where a drop-down menu will appear showing some additional options.
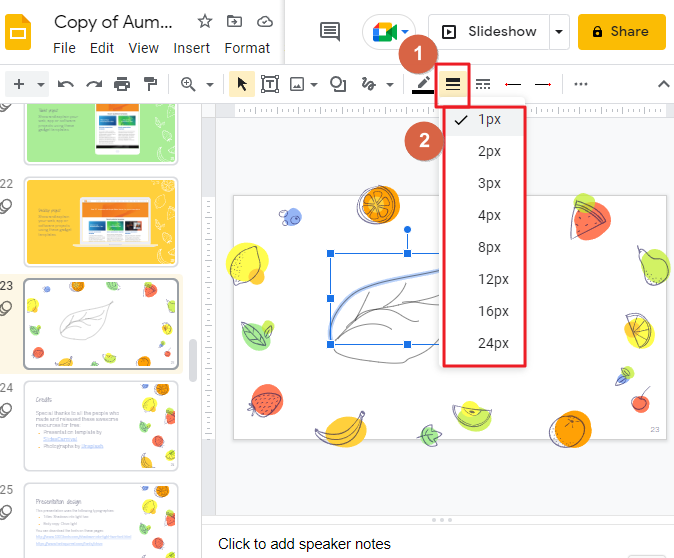
Step 5: If you want to adjust the thickness of your drawing in google slides, you can do so by following a few steps. Select your drawing first. Then click on the Line Weight icon in the menu bar. In the menu that opens, choose a weight measurement. In our example, we chose 1px for the width of all lines in our drawing.
That’s it. You are done.
Tutorial: Draw on Google Slides using Scribble Tool
What is Annotate extension?
The Annotate extension helps you make presentations easier to follow by letting you add drawings and comments directly to Google Slides.
How to Draw on Google Slides using Annotate Extension
Teachers frequently ask me to share how to draw directly on Google Slides to enliven their Google Slides lessons. I will demonstrate how to do it here!
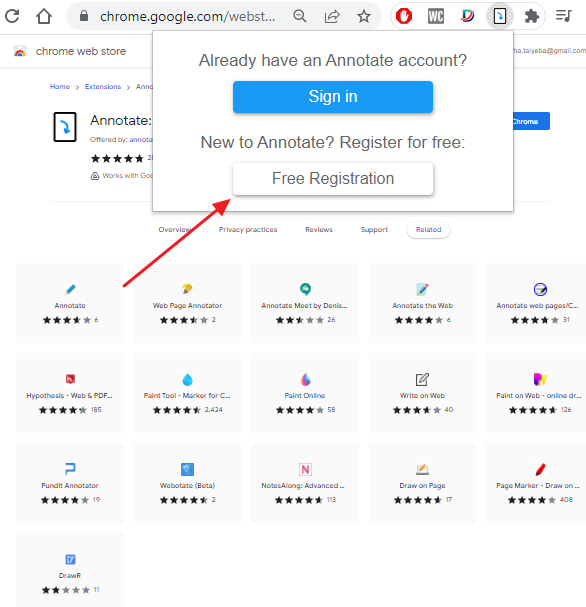
Step 1: First, go to the Google Chrome Web Store to obtain Download and install the Annotate extension. Whenever you install this extension, be sure to pin it to your Chrome web browser for easy access.

Step 2: If you’re hoping to use the extension, you’ll first need to make an account. Click on the link for extensions in your browser that is displayed as Free Registration, and then register.

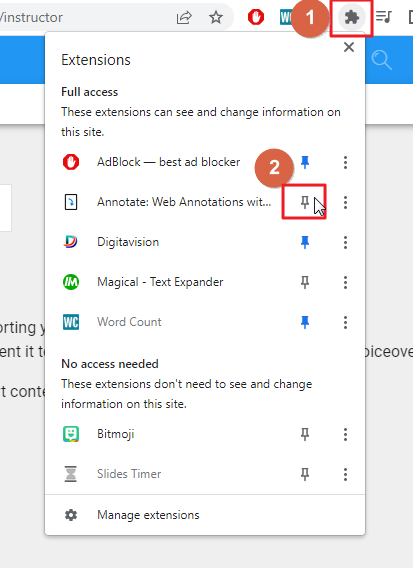
Step 3: To pin the annotate extension on Chrome, click the puzzle piece-shaped button at the top of your browser, select Pin option which is just close to the Annotate extension.
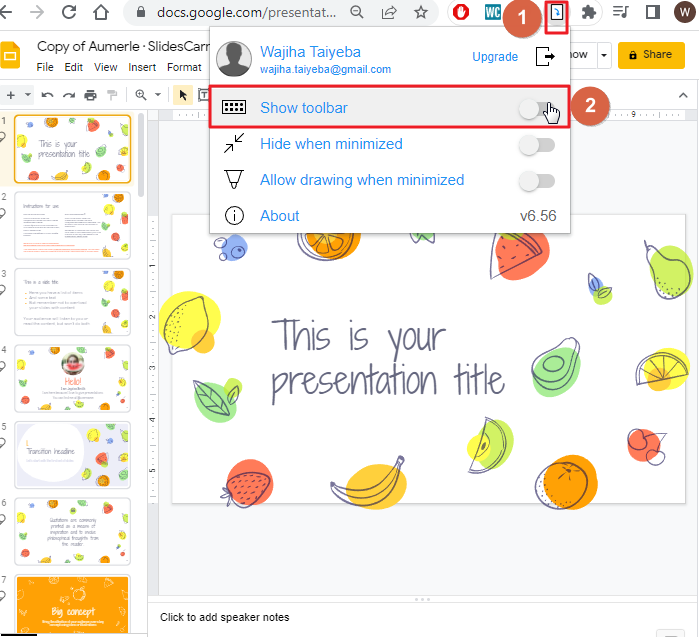
Step 4: Find the Annotate button in your Google Slides tab, then click the Show toolbar button (Activate Show toolbar).
Step 5: You can use the pen tool in Annotate to draw on your Google Slides with a pen. Alternatively, you can choose the Highlighter button to draw on your slides with a highlighter.
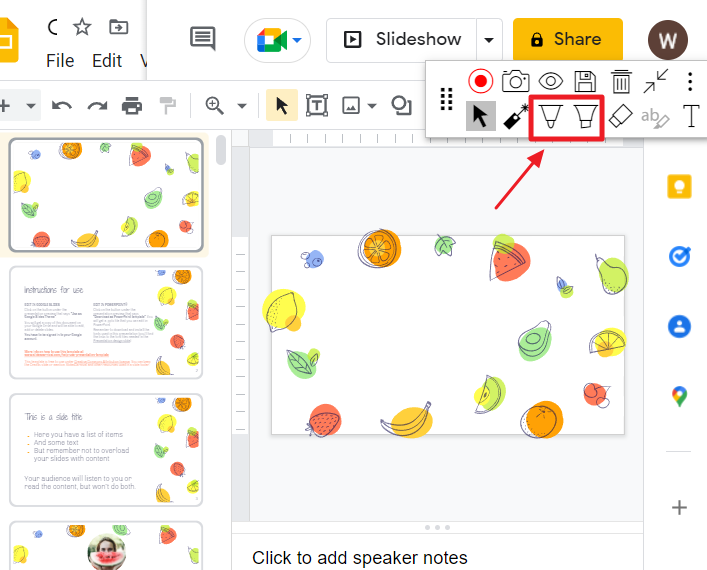
Step 6: You can use the annotate tool to create anything you want on your slides. There are several colors available for your use, making drawing on presentations much easier and more interesting for viewers.

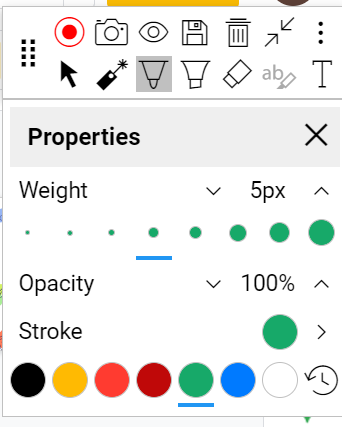
The pen has one more feature that is you can change the thickness of lines by clicking on setting.
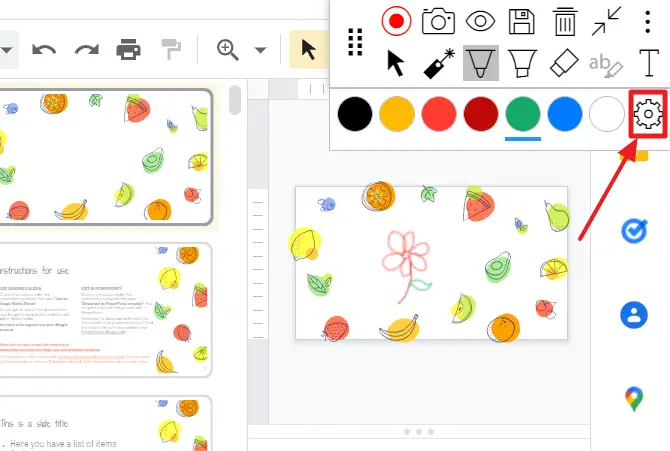
Clicking on settings will open more options. Example below,
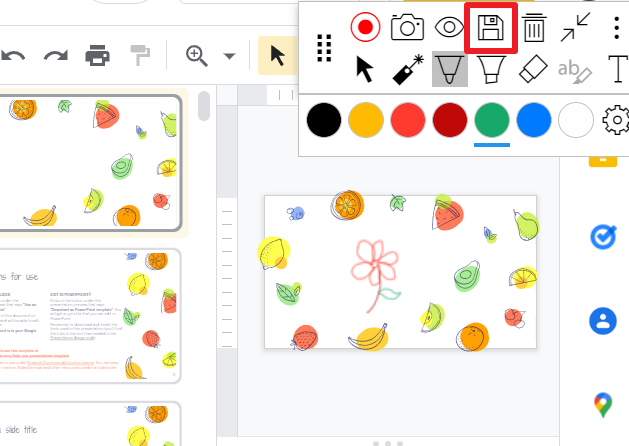
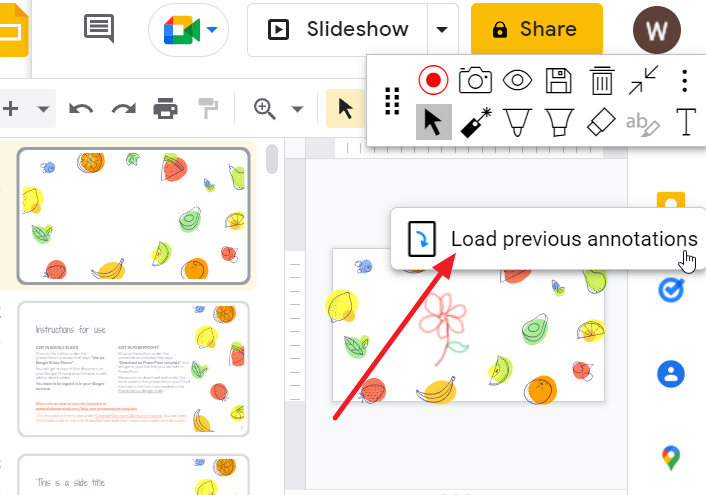
Step 7: To save your Google Slides drawing, use the Annotate toolbar to click Save annotations; the button is at the top of the toolbar and is shaped like a floppy disk.
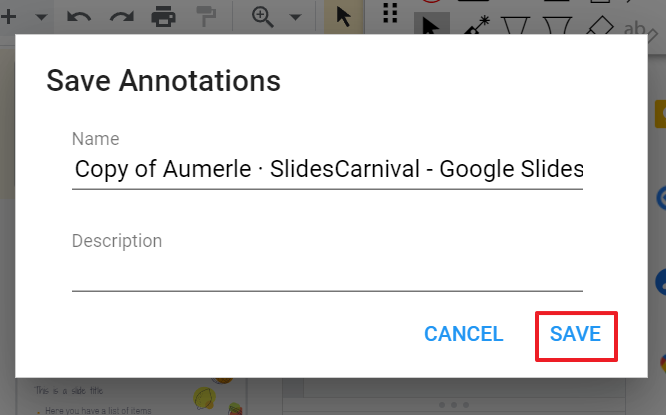
Step 8: As soon as you click on save annotations, a new window will open. Click on save.
Your annotations will be stored in your Annotate account after you save them. If you go outside your Google Slides and reenter it, all your work will disappear. Of course, if you click the Load previous annotations button, it instantly brings up your drawings from before. The drawings will be inserted in your google slide presentation. These drawings will be displayed on the Google Slides presentation, which you will make. While your slideshow is playing, you will see a preview of those drawings in full.
How to Draw on Google Slides using Google Drawing
A great option is to use Google Drawings available in Google slides so that you can create your images and then insert it in your slide. This is one of the best practices to create a detailed drawing in google slides.
As of this moment, Google Slides does not have such an option as to be able to just insert a drawing. Therefore, you will have to do a few extra steps,
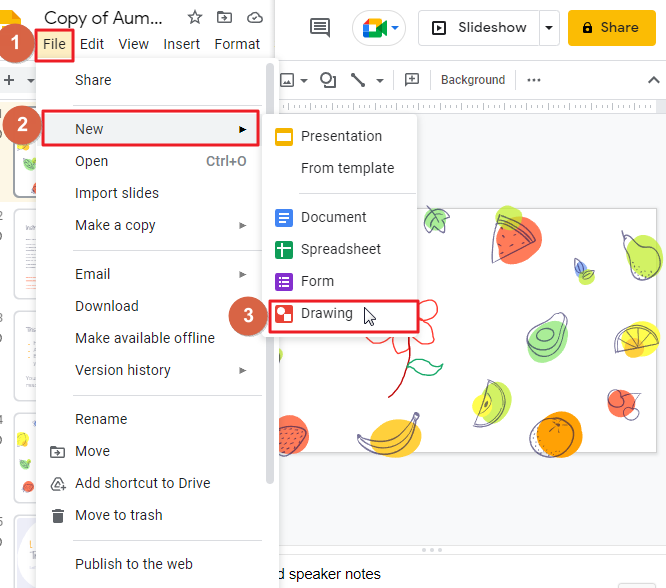
Step 1: To draw your picture, visit Google Drawings. Otherwise, click File > New > Drawing from the Google Slides menu to open Drawings in a new window.
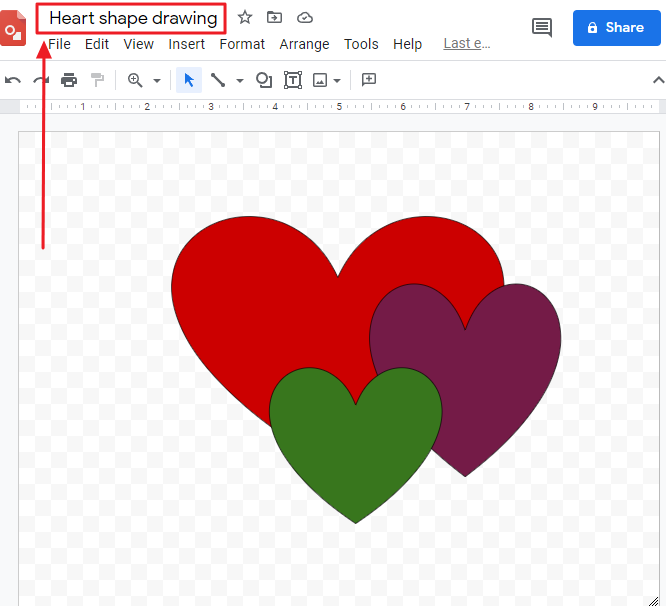
Step 2: Give your drawing a title in the top left, then format it using the toolbar.
There are two ways to involve the drawing in Google Slides, so you can select one of the strategies below
How to link and publish the drawings
One way to add a picture to a slide is to publish the drawing and copy the link, which allows others to view the image online. One benefit is that the image is updated if you subsequently alter it. To begin with, let’s learn to insert a Google Drawing into Google Slides step by step.
Step 1: To publish a drawing to the web, simply open the google drawing. Click File > choose Publish to the web.
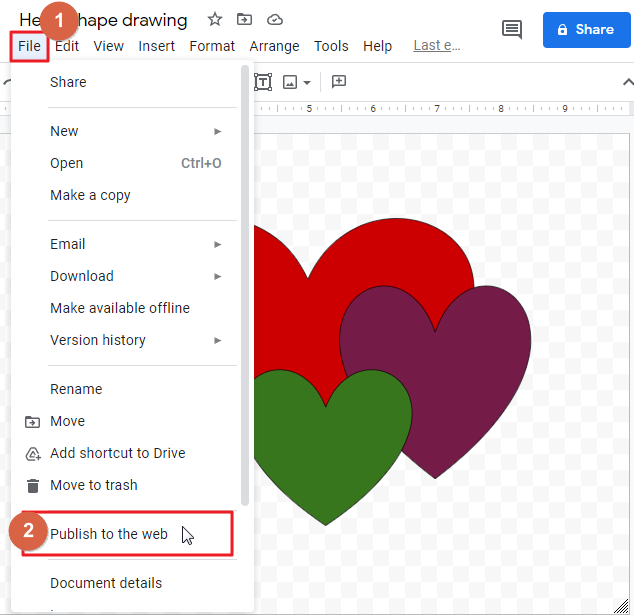
Step 2: By clicking on Publish to the web, a new dialogue box will open on your screen. There, you have to click on Link option. Then click on Publish.
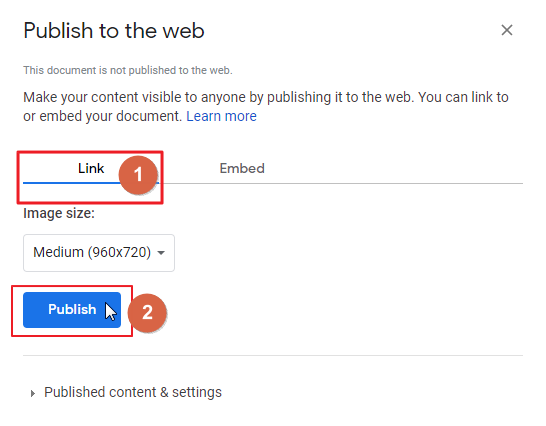
On the PC, click Control+C or for Mac click Command+C when the link is displayed.
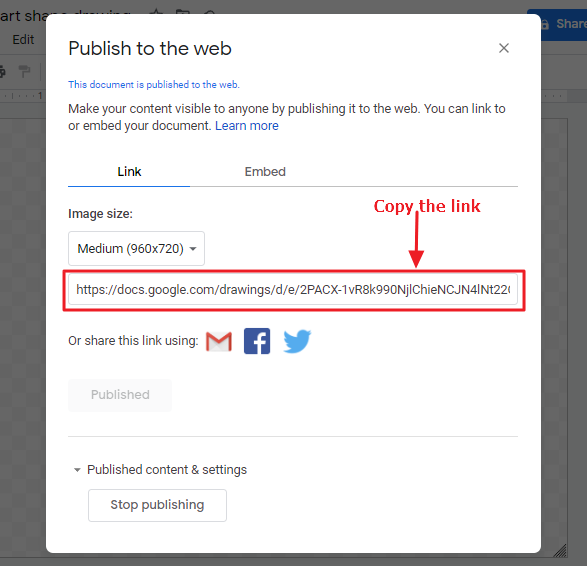
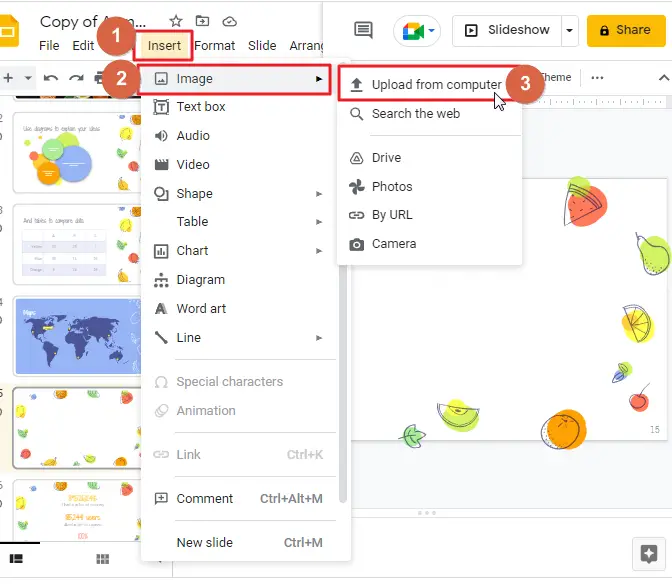
Step 3: Now open your google slide presentation on which you would like to insert the drawing. Click on Insert in the menu bar. A drop-down menu will appear. click on image > Click on by URL.
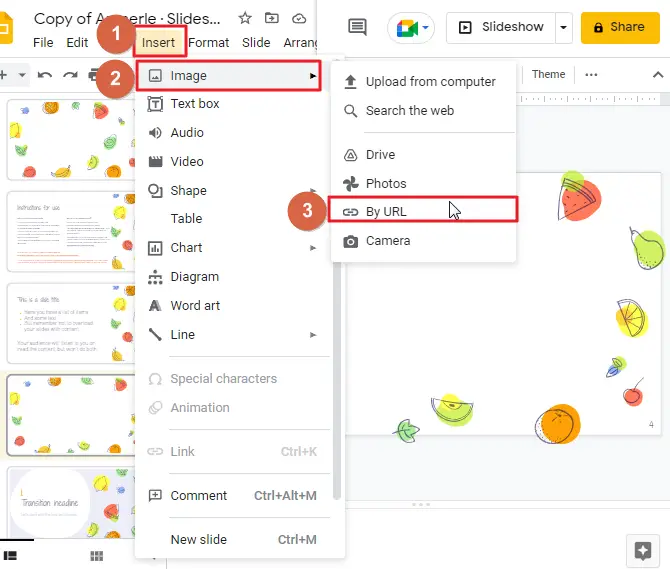
Step 4: A new dialogue box has appeared on your screen. Paste the link there.
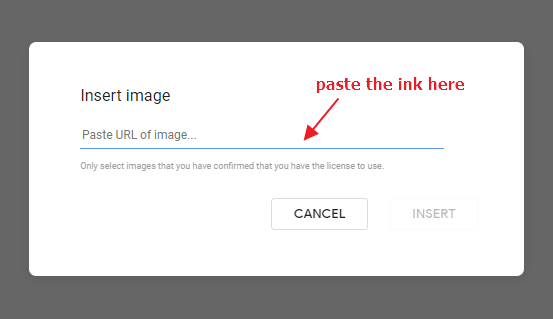
and click on INSERT.
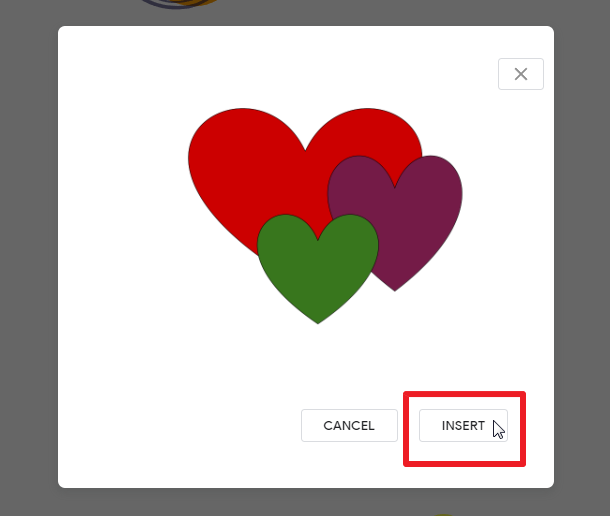
When you click on Insert, your image will be inserted into your slides.
Tutorial: How to link and publish the drawings
If you would like to resize, or change your inserted picture here, you can do so as needed. In case you wish to edit an image in Google Drawing, your changes won’t be reflected in the Slideshow. To update your image, copy and paste once again from the Google Drawing using the identical process.
Download the Drawing to the gallery and save it on Google Slides
To insert your Google Drawing to Google Slides, you should download the drawing first then upload it to your slide. We’ll describe how to insert a Google Drawing into Google Slides step by step.
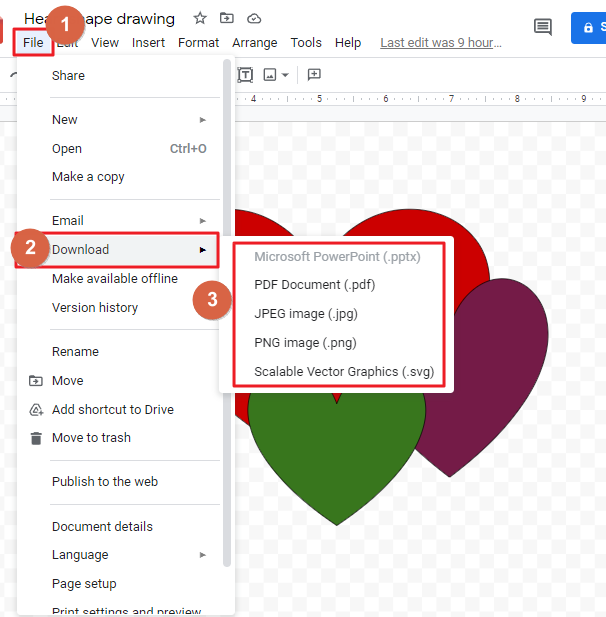
Step 1: When your google drawing is ready, click on File. A drop-down menu will appear. click on Download > Click on any image format you prefer.
Step 2: Now come back to your google slide presentation on which you want to insert a drawing. Click on Insert in the menu bar. A drop-down menu will appear. Click on image > click on Upload from Computer.
Find the downloaded image. Click Open.
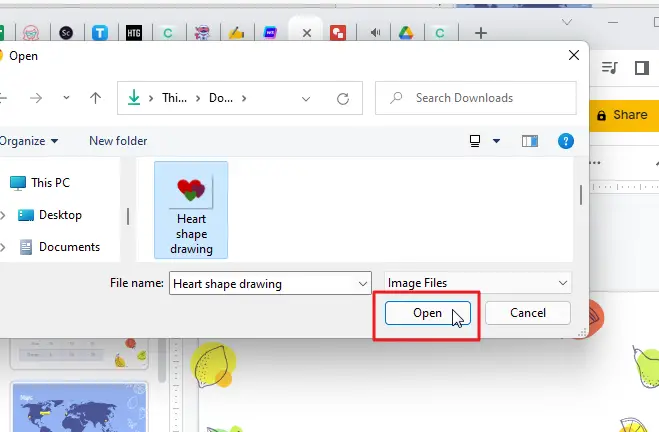
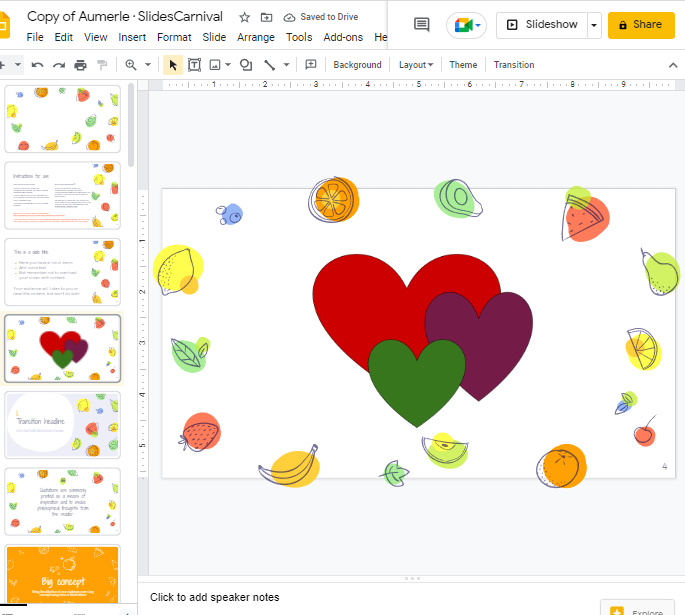
The image should appear in your slide.

Tutorial: Download the Drawing to the gallery and save it on Google Slides

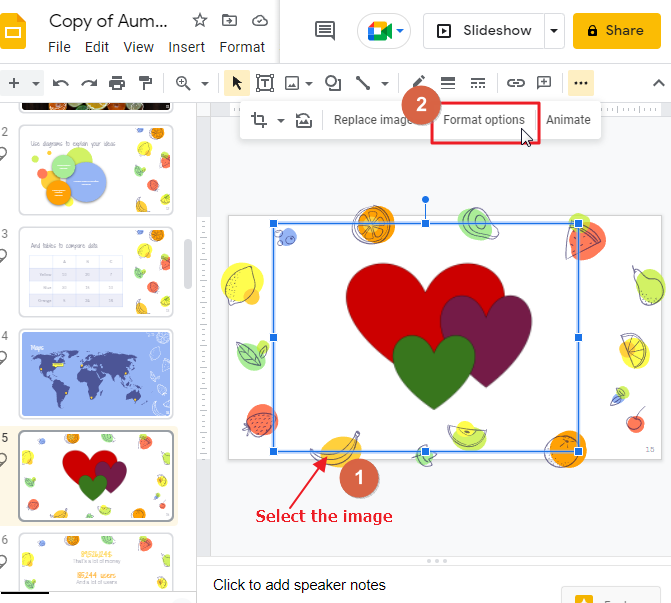
You can also format the inserted drawing in Google slides
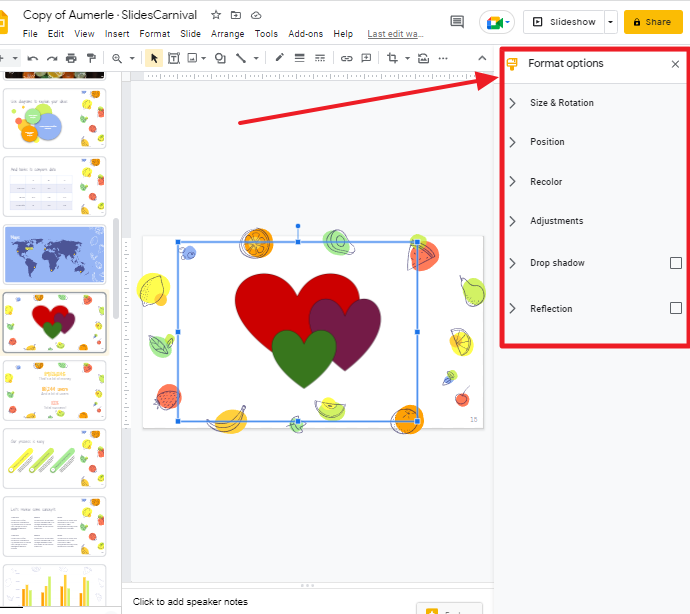
Once you’re finished inserting your drawing using one of the two menu choices, you can modify the position, size, or items, or add a shadow, reflection, or falling object. Select the drawing then click the button marked Formats in the menu bar.
Once the format option is open on the right side of your screen, you can choose options from there according to your preference.
That’s it. You are done.
Video Tutorial: How to Draw on Google Slides
Some FAQs to help you organize your work
I can use the Google Slides mobile app to draw freehand?
You cannot draw freehand on the Google Slides mobile app; however, you can continue your progress from mobile to the desktop version. If you open your presentation on Google Slides desktop, you may draw freehand.
Can I alter the dimensions of my illustration?
Google Slides allows the resizing of images. As the user drags the borders, the picture size is reduced or enlarged proportionally.
Can we copy-paste drawings in Slides?
Yes, you can copy drawings by selecting Edit and Copy, right-clicking on an empty space in a slide and selecting Paste. This is very useful when you have annotations that are used again and again.
Is there a drawing app on Google?
Yes! Google has released an app that lets you create diagrams, flowcharts, and other graphics online. It is available for both the desktop and as a web application, free of charge. It allows users to create and edit diagrams, graphics, and flowcharts while working with other users in real-time.
Is it possible to write on google slide?
A new capability has been added to Google Docs, Sheets, and Slides for Android and iOS mobile devices. Users can now draw and write notes on their files from a mobile device.
Conclusion
And that’s it! Drawing in Google Slides is a pretty simple process, and while it might not be as powerful as other drawing or illustration programs, it can still help you make your presentations look better and add to the quality of what you’re showing your audience. So now that you know how to draw in Google Slides, get out there and share your knowledge with the world!
We’ve come to the end of this article on how to draw on Google Slides, and I hope you enjoyed it! If you have any questions about how to draw on Google Slides, or about any other online tools, let us know in the comments below. And if you have any tips for using Google Slides that you’d like to share with our readers, we’d love to hear them!


