
To Put Tables Side by Side in Google Docs
- Insert a 2×1 table using “Insert” > “Table“.
- Click inside the left cell of the table.
- Insert your first table using “Insert” > “Table“.
- Create vertical space within the table.
- Click inside the right cell of the table.
- Insert your second table.
- Adjust the spacing between tables as needed.
- Select the helping table.
- Right-click and choose “Table properties“.
- In “Table properties” set the border color to white or the border width to 0pt.
In this article, we will learn how to put tables side by side in Google Docs. Firstly, it’s important to know that it’s not possible if you think you will do it by breaking your page into multiple columns, which only works for text, not for the elements like tables. So, are you tired of having to scroll back and forth to compare data in tables within your Google Docs document? With the simple steps outlined in this article, you will learn how to easily put tables side by side in Google Docs for a more streamlined and efficient comparison process. Let’s get started!
Importance of Putting Tables Side by Side in Google Docs
It’s important to keep your tables aligned to save time and effort. Arranging tables side by side in Google Docs is a useful skill for organizing and presenting information clearly and concisely. By placing tables side by side, you can easily compare data, making it easier for your audience to understand the information you’re presenting. This can be particularly useful when presenting data that has multiple tables, as it allows you to easily highlight relationships and patterns between the tables.
Additionally, having the ability to place tables side by side in Google Docs can help you save space in your document, allowing you to fit more information into a smaller area. This is especially useful when working with long or complex documents, as it can help you avoid cluttering the page with multiple tables, making it easier for your audience to focus on the information you’re presenting. So, these are some good reasons to learn how to put tables side by side in Google Docs.
How to Put Tables Side by Side in Google Docs?
We have a trick to put tables side by side in Google Docs. If you do it by splitting your page into columns, you will face a good amount of frustration and failures. So, it’s good to stop and give 5 minutes to this article, it will solve your problem in seconds. So let’s start learning how to put tables side by side in Google Docs.
Put Tables Side by Side in Google Docs – Using Helping Table
So, this is the only workaround I have got to found during my research to put tables side by side in Google Docs. I was also thinking that I can be done by breaking the page into two or three columns, but it does not work, because it is for text only. So, let’s see how this workaround works, and tell me in the comments if you like it.
So first, we need to open the Google Docs file.
Step 1
Open a Google Docs document in which you want to put tables side by side.
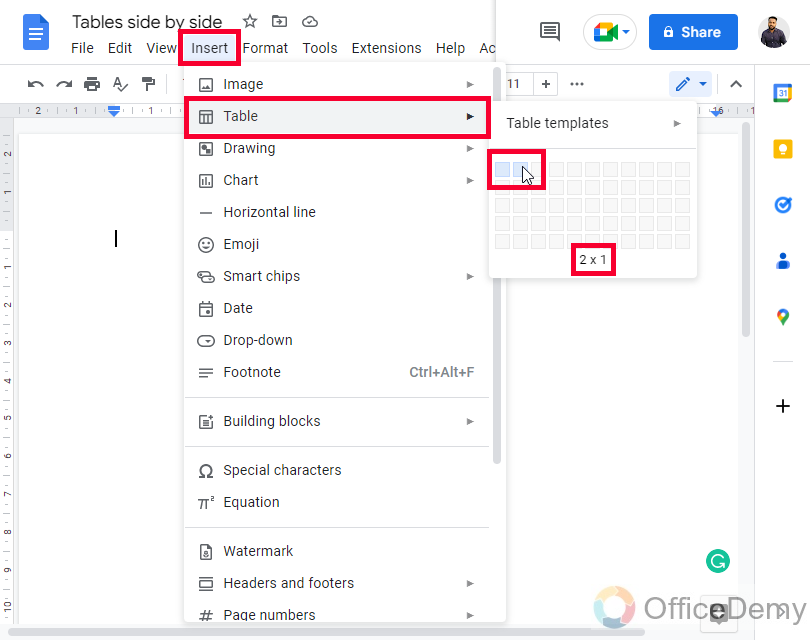
Step 2
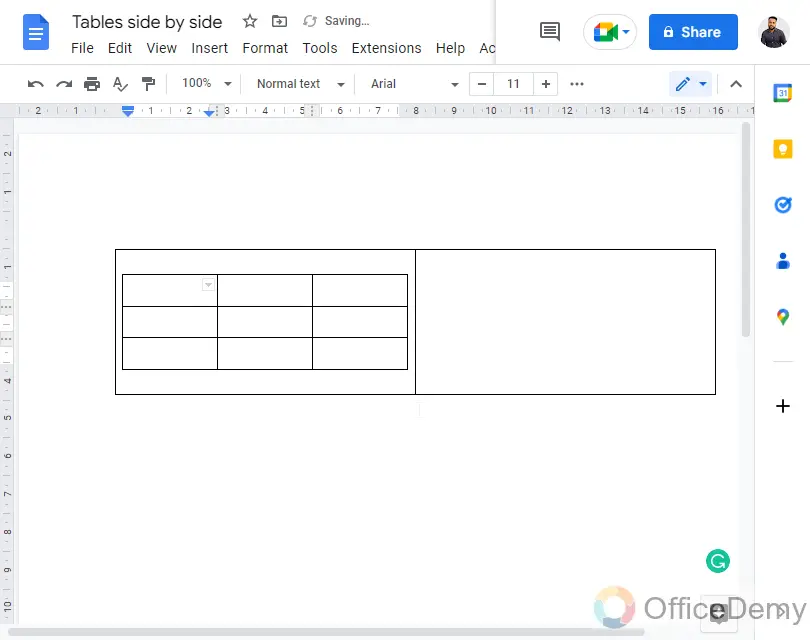
Go to Insert > Table and insert a 2×1 table just like you add in your normal practice.
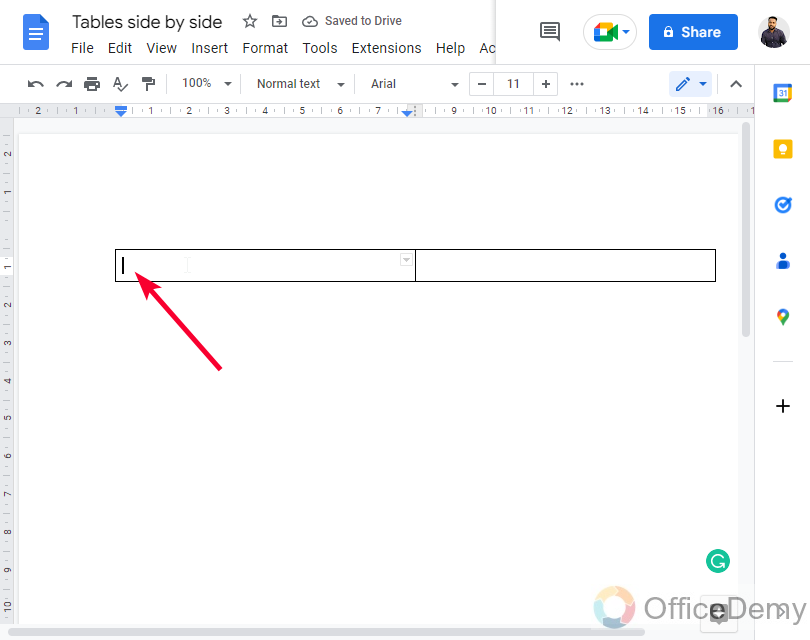
Step 3
Now place your cursor in the left side cell of the table
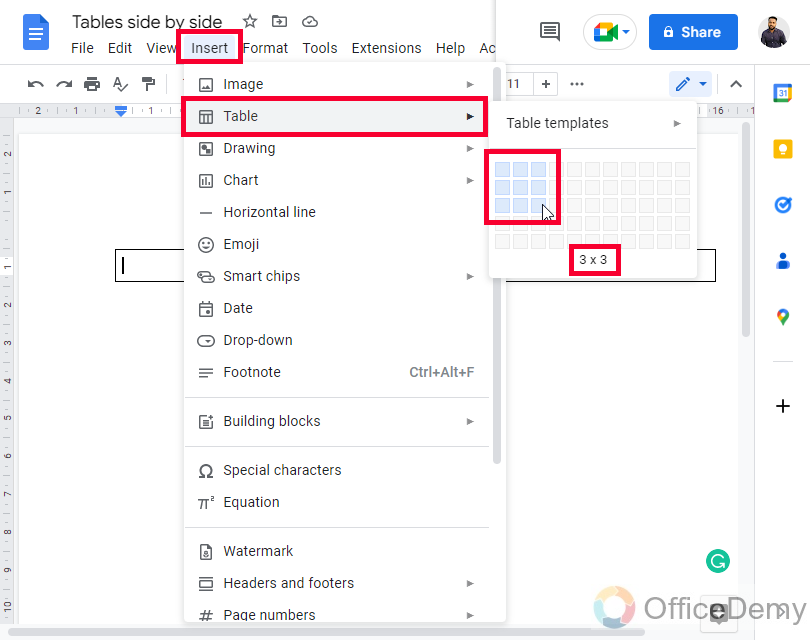
Step 4
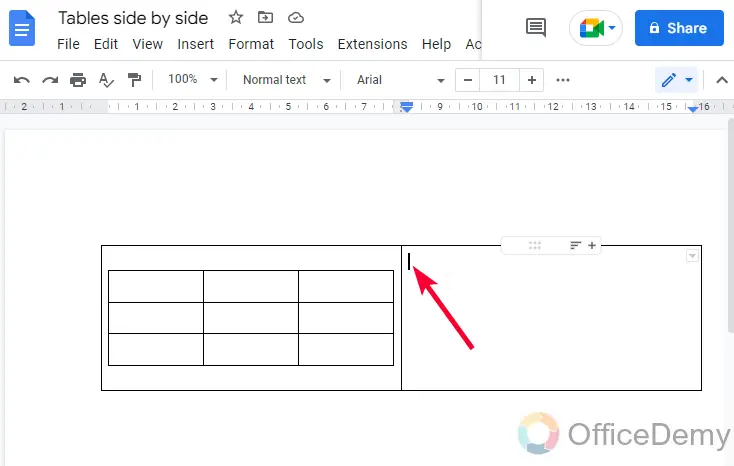
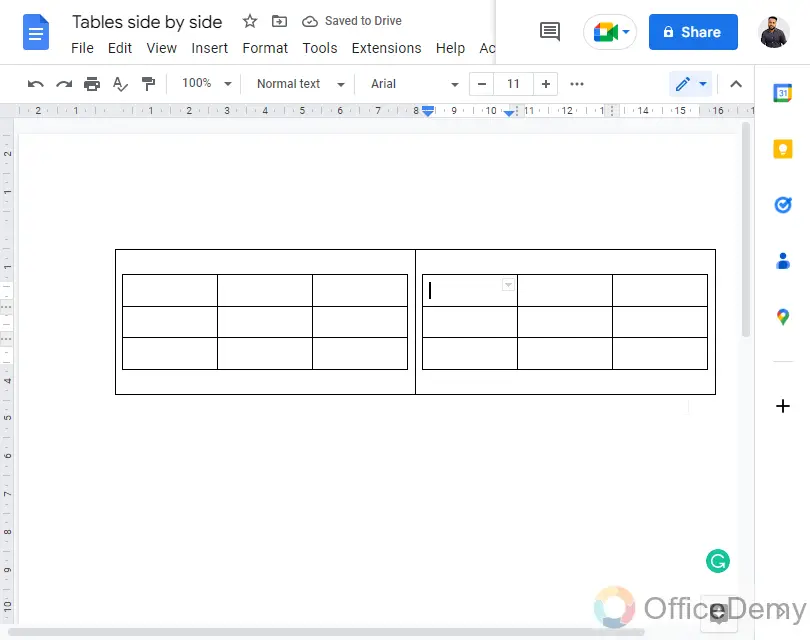
Go to Insert > Table > Insert any size of table you want to put side by side on a page.
Step 5
Now go to the next cell, and repeat step 4
Step 6
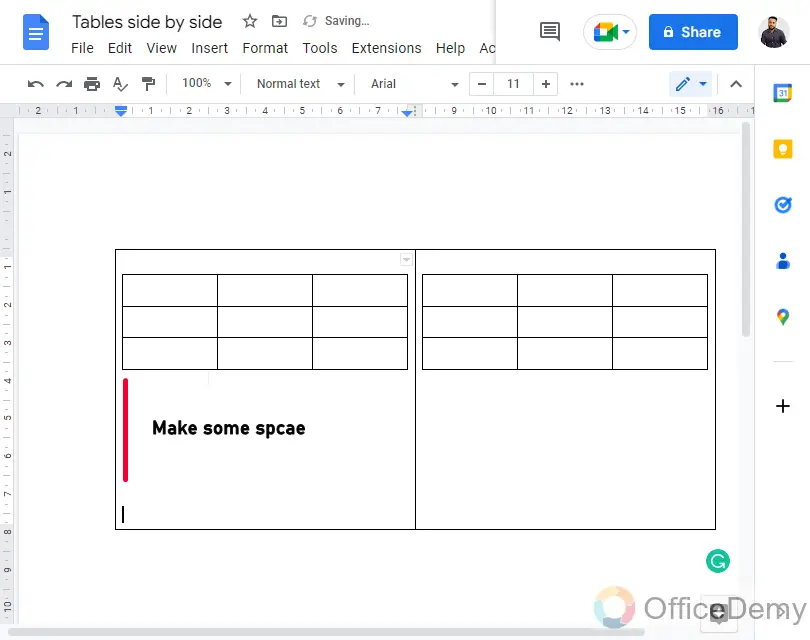
Come down to the inner table bodies and press Enter key a few times to make spacing down to your tables.
Step 7
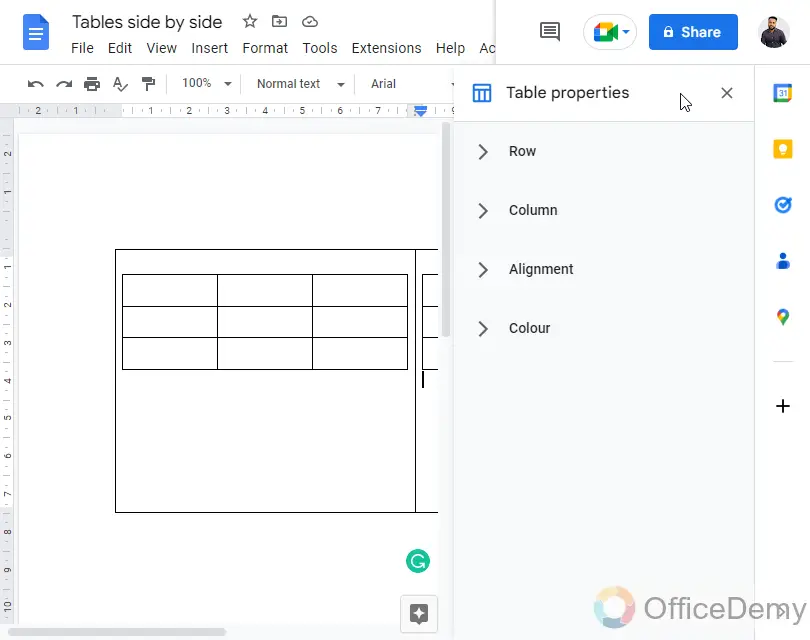
Now you only need to hide the outer table for that select the outer table, right-click on the table and go to Table properties from the context menu.

Step 8
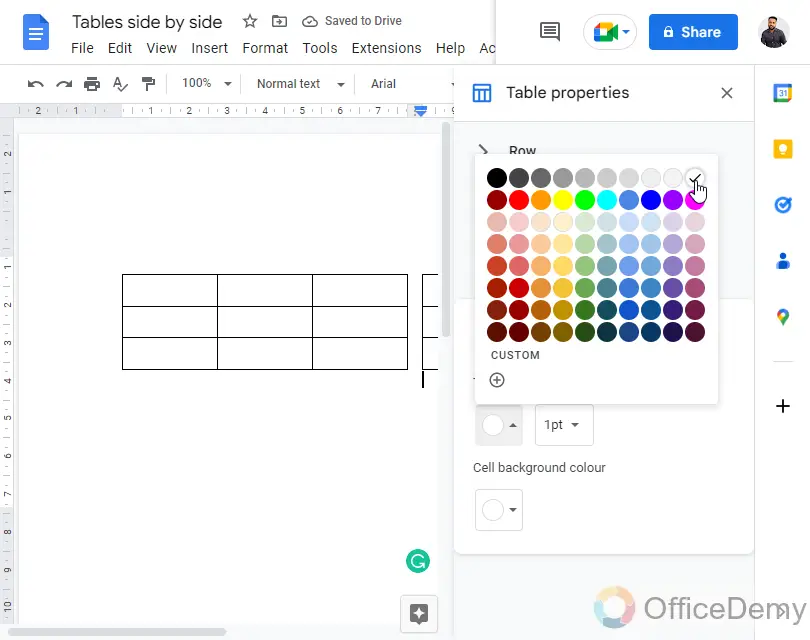
Now you have a sidebar, and various dropdown menus in it, go to the last “Color” dropdown
Step 9
From the color box there, pick the white color of the table border.
OR
Step 10
Next to it, there is a table border width option, click on it and select 0pt
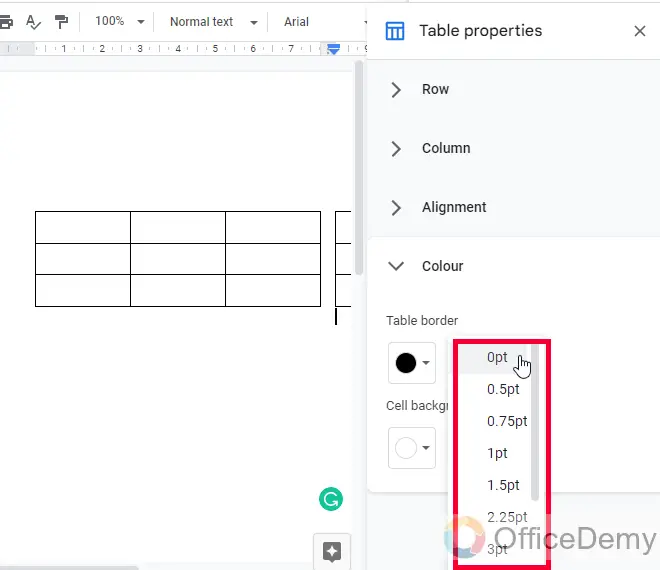
Anyone from Step 9 or Step 10 is enough to hide your outer table and make your inner tables look side by side on a page in Google Docs.
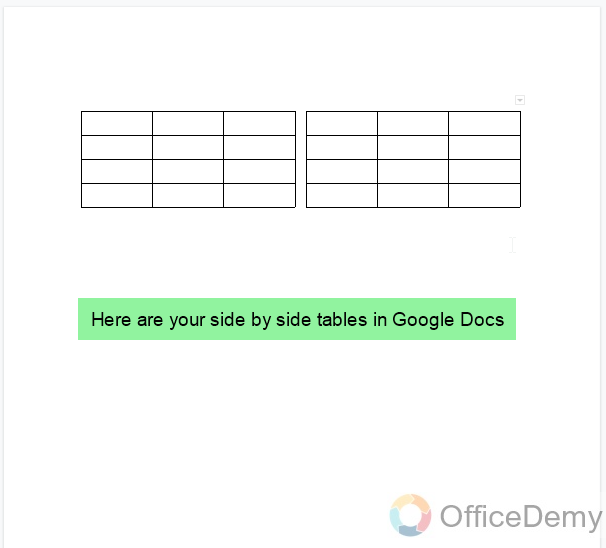
I hope you like this tutorial and you have learned how easily with a simple trick we can put tables side by side in Google Docs.
Frequently Asked Questions
What is the purpose of putting tables side by side in Google Docs?
The purpose is to compare and contrast data and to present information clearly and concisely.
Is it possible to put tables side by side in Google Docs?
Yes, it is possible to place tables side by side in Google Docs. You have seen the method above this is the only method to do it.
What are the benefits of putting tables side by side in Google Docs?
The benefits include the ability to easily compare and contrast data, saving space in the document, and making it easier to update and manage data, these tables can also be of different sizes.
How do I align tables side by side in Google Docs?
To align tables side by side, you can use the table alignment options in the Google Docs toolbar, or you can go to Table properties for each table and adjust the alignment from there.
Conclusion
That’s all from today’s guide, we learned how to put tables side by side in Google Docs. I hope you find this tutorial easy and useful. I will see you soon with another helpful guide. Till then take care and keep learning with Office Demy.


