
To Set Print Area in Google Sheets
- By default, Google Sheets automatically adjusts data to fit on a single page.
- This default setting is suitable for small datasets.
- Use the general shortcut (Ctrl+P) to print data.
OR
- When dealing with a dataset that exceeds nine columns, you can use the “Scale” option to set normal 100% scaling.
- Keep in mind that nine columns are typically the limit for A4-sized paper.
OR
- Use the selection method for smaller datasets to fit them perfectly on a page.
- Select the data you want to print and choose the “Print Selection” option in the print dialogue box.
In this article we will learn about how to set print area in Google Sheets specially if we have big datasets that needs to be printed.
Google sheets is a software of spreadsheet to make tables, bills, sheets, and other analyzing documents, it is not the same as other documents software that contains a single page instead of Google sheets consists of Spreadsheets that are not simple to print as in other documents. But not to worry Officedemy is here to solve your problem. In this article we will teach you how to print data in Google Sheets. We will also discuss the detailed setting of the print menu so that you will never be stuck in printing any kind of data on a sheet or any size of data you want to print on a single page with perfect fitting. So let’s start without wasting our precious time.
Why do we need to Set Print Area in Google Sheets
As we know Google sheets are spreadsheet software that consists of large numbers of boxes called cells that are ordered in rows and columns. Google sheets are typically used to organize data and perform financial analysis. It is used across all business functions and at companies from small to large. Google Sheets includes many functions, formulas, and shortcuts that can be used to enhance its functionality. That’s why it is extensively used for finance and accounting analysis in the form of tables sheets billing and others. When we create these documents it is often necessary to print them out for further manual paperwork that’s why we need to learn must that How to print data in Google sheets.
There is one more reason to learn How to print data in Google sheets as we discussed In Google Sheets there is such kind of data, Tables, sheets, reports, etc. which is mostly out of the size of A4 paper or another size of official papers so that we need to learn that How it to fit or adjust on the required page as the size of data. This is why this article is very helpful to you that How to print data in Google sheets.
How to Set Print Area in Google Sheets
Although printing data in Google sheets is quite common and very easy as in other software there you may have to face some conditional problems that we will discuss in detail. First, let’s see the simple and by default procedure of printing data in Google Sheets.
Step 1
First, take some samples of data like
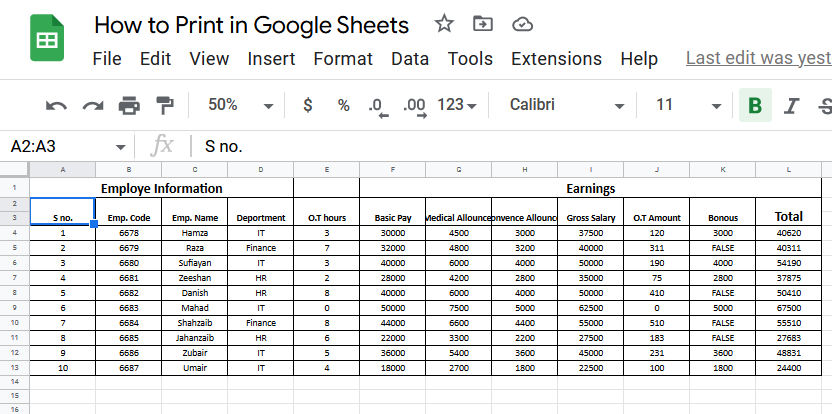
Step 2
Now simply press the general shortcut key for print Ctrl+P or you may hit the print button in the menu

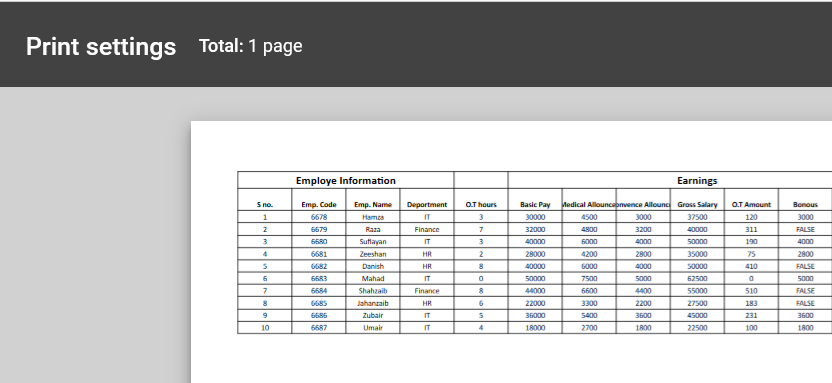
Step 3
Print view or a new window of the print option will appear in front of you

Step 4
Now you are almost done just press the next button and you will get your print.

Note: By default Google sheets fit your data on one page automatically and prints it on one single page it is good in some cases when you have low numbers of columns or tables it will automatically adjust in a specific area to print. But if you have a large number of columns and datasheet so it will become more congested while adjusting and become unreadable which is not suitable. But there is some customization that you can apply to print the data as you need.
Let’s take a deep discussion on all Printing options in Google Sheets.
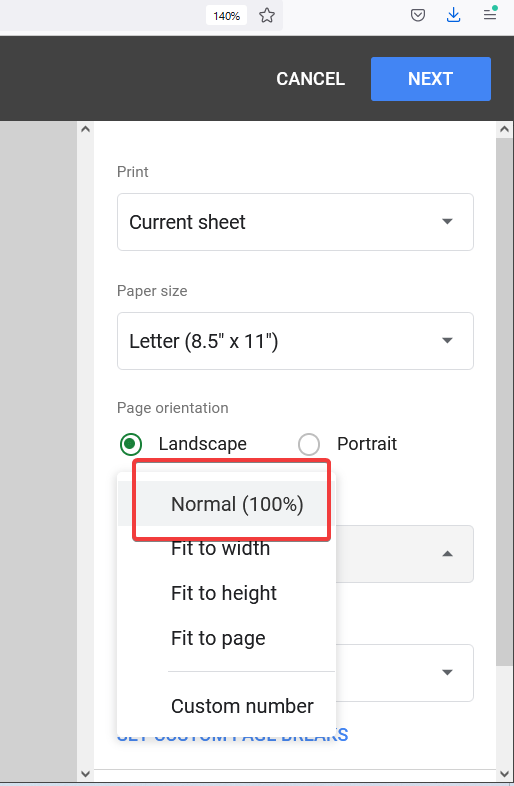
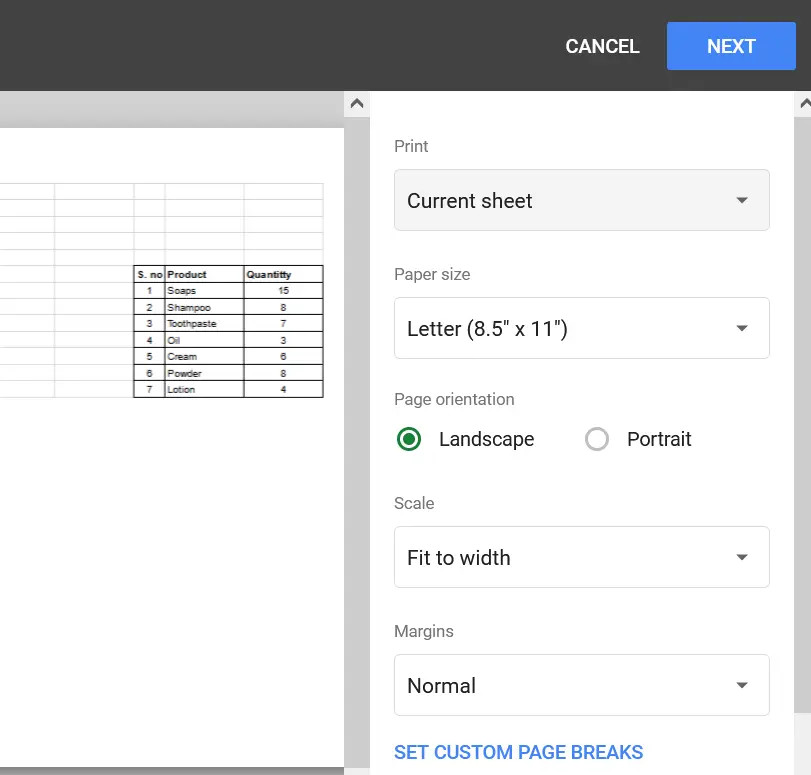
Set Print Area in Google Sheets – Print data on the Normal Scale
In Google sheets, we have rows and columns in which we are creating our file of tables, sheets reports, etc. Usually, this data is exceeded in the horizontal form, which means a large number of columns so when we print this data by default Google sheets adjust it on one page by compressing but there is an option of scaling in the Print dialogue box where you can adjust scaling on normal mode. By default, there is 9 column on one A4 page, so if you want to print data on a normal scale must keep in mind that your data is not out of 9 columns otherwise it will shift to the next page automatically.
Let’s do an example for your better understanding
Step 1
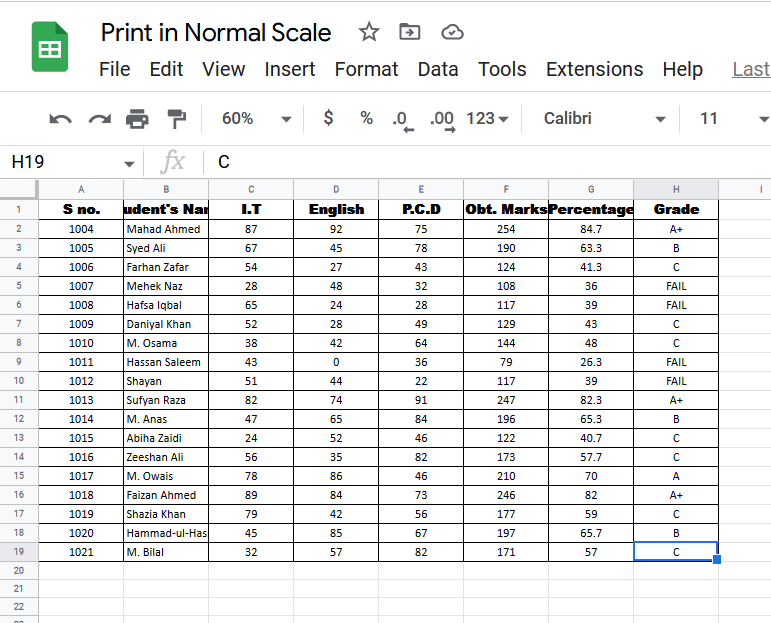
First, we will take a sample of data
Step 2
Now simply press the general shortcut key for print Ctrl+P print dialogue box will open with a print preview in front of you
Step 3
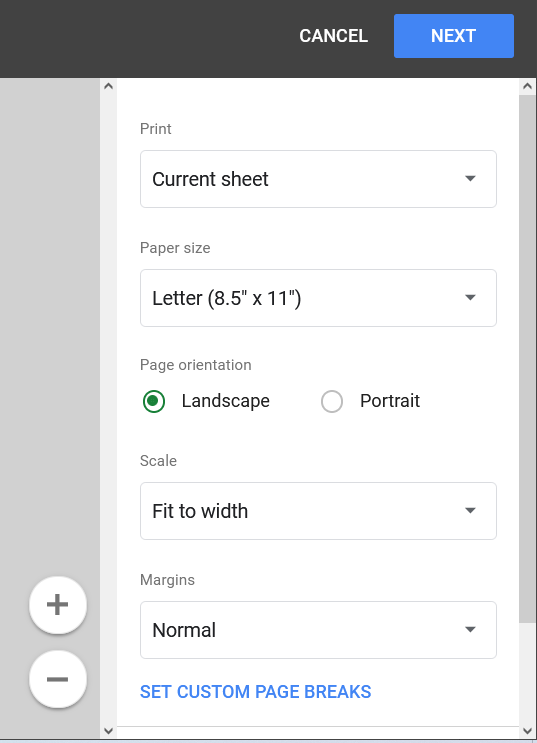
See the option “Scale” and select Normal 100%, so that your data will be printed in normal scale or font as you created
Step 4
Now simply press the NEXT button your print will be in your hand in normal mode.

Set Print Area in Google Sheets- Print data Fit height
As we discuss that in Google sheets usually we have the data exceeding through horizontally increase numbers of columns due to which Google sheets automatically fit and adjust the data and print it on one page. But there is sometimes criteria could be for height as well as sometimes we have such type of data which have large numbers list which exceed large numbers of rows then what to do to print it because some of the data shift on 2nd page so How to print this data on one page,
So similarly in Scale, we have an option of Fit to a height which fits the data automatically and compressed all rows, and prints it on one page as we may see in the example below:
Step 1
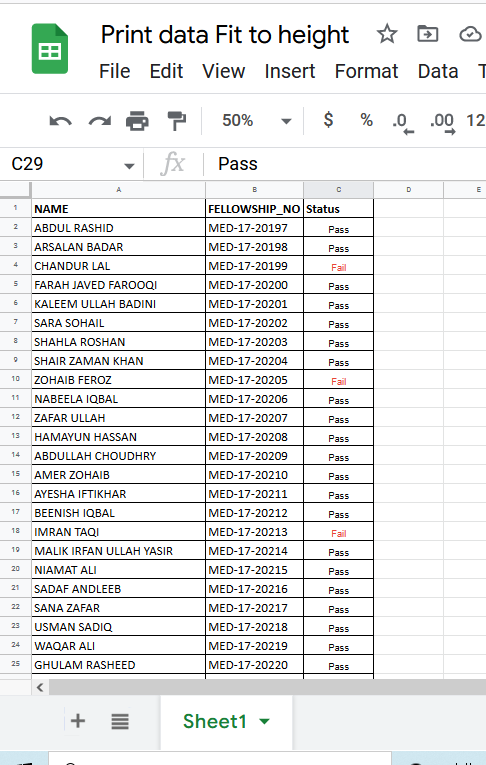
As we have such type of data
Step 2
Now press Ctrl+P print preview with dialogue box will appear
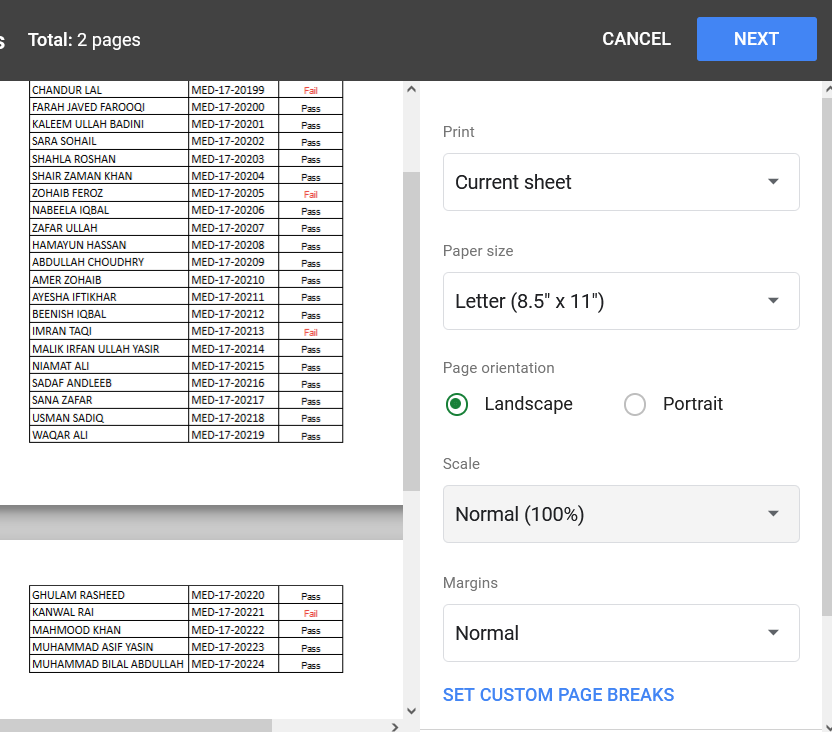
As you can see in the above picture our sample data is split into two pages due to the large no. of rows of data as we discussed but we want data to print on one page so we can easily adjust it by scaling in Fit to height with few clicks as you can see below,
Step 3
Go into the “Scale” option from the dialogue box looking right to you then select Fit to Height, Your data will automatically fit on one page as
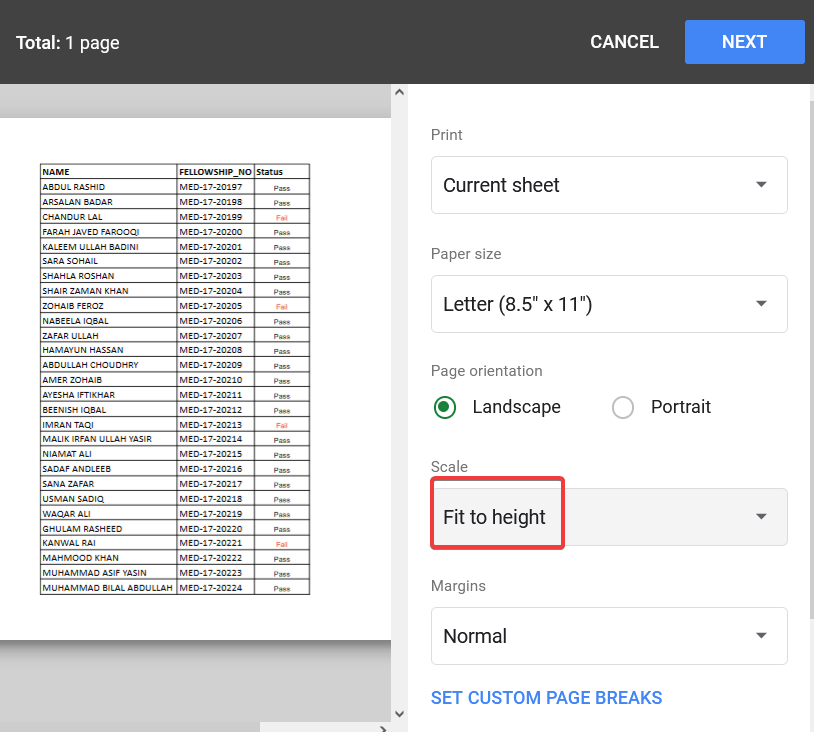
As you can see our data has been adjusted on one page as shown in the print preview by selecting the scale Fit to Height.
Step 4
Now simply press the next button you are to go to your Hard copy.
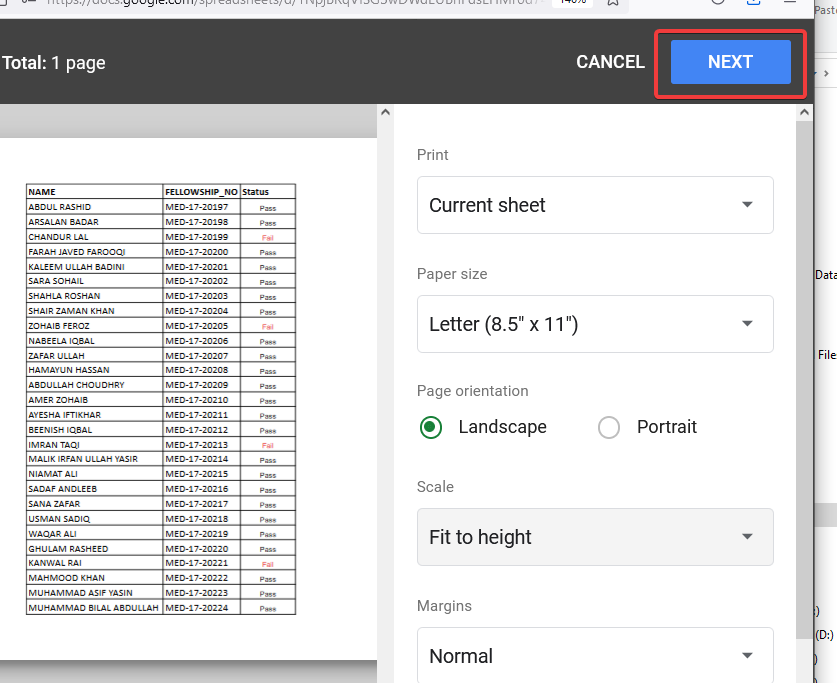
Set Print Area in Google Sheets – Print Data by Selection
As we are learning all scenarios of printing data in Google Sheets so we cannot negotiate the selection method of printing data. This is the most useful method to print data. As it’s up to us what is our criteria and which type of data we are having and which condition we have to apply. Now I will tell you when we use the selection method for example
Let’s suppose we have a very small table to print like this
As you know we have discussed before those Google sheets have some specific area by default to print the document so when we print the data default specific area is shown in the print preview as we can see in the above picture. But this is suitable placed data as our data is contained of very small numbers of rows and columns so then what to do and what is suitable for a better presentation of the document.
Here we use the selection method so that our data can be placed on the page perfectly while printing,
Let’s see how it works and how it is helpful
Step 1
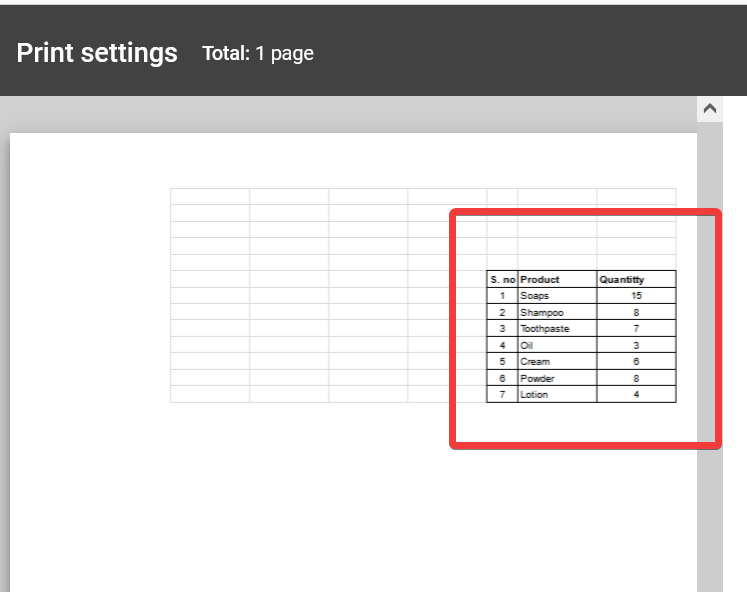
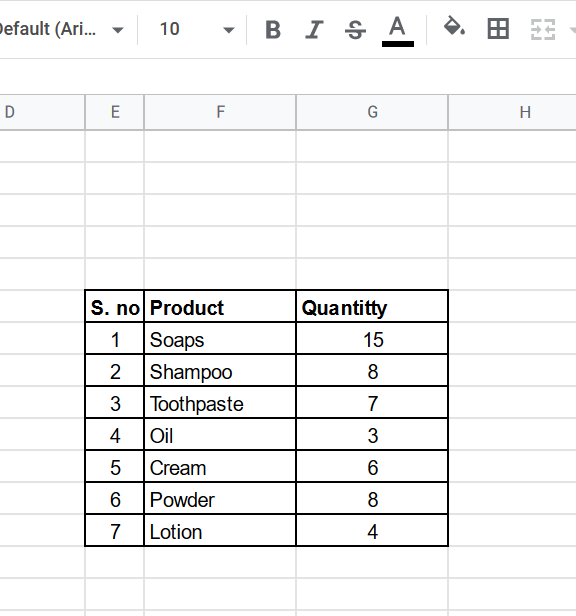
Let’s suppose we have a table of some products like
Step 2
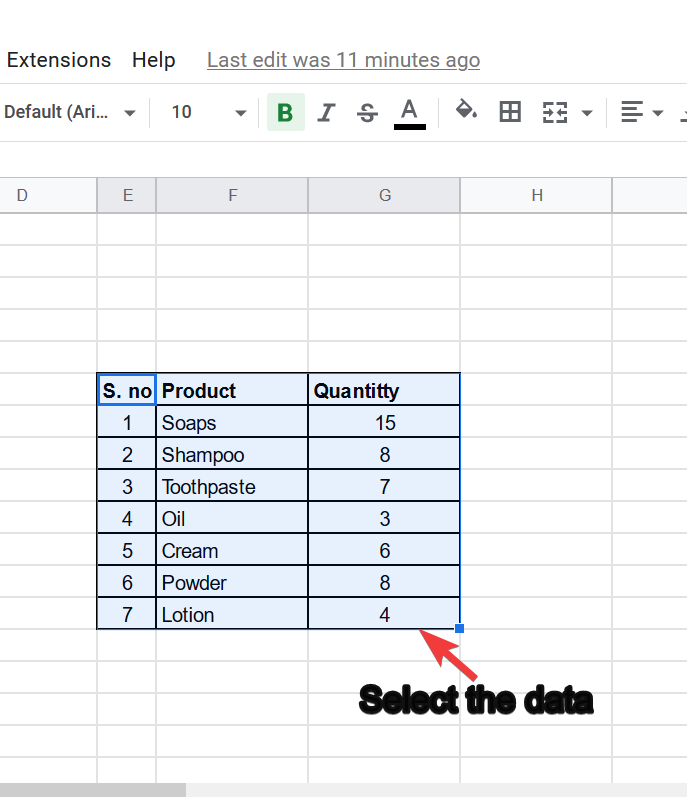
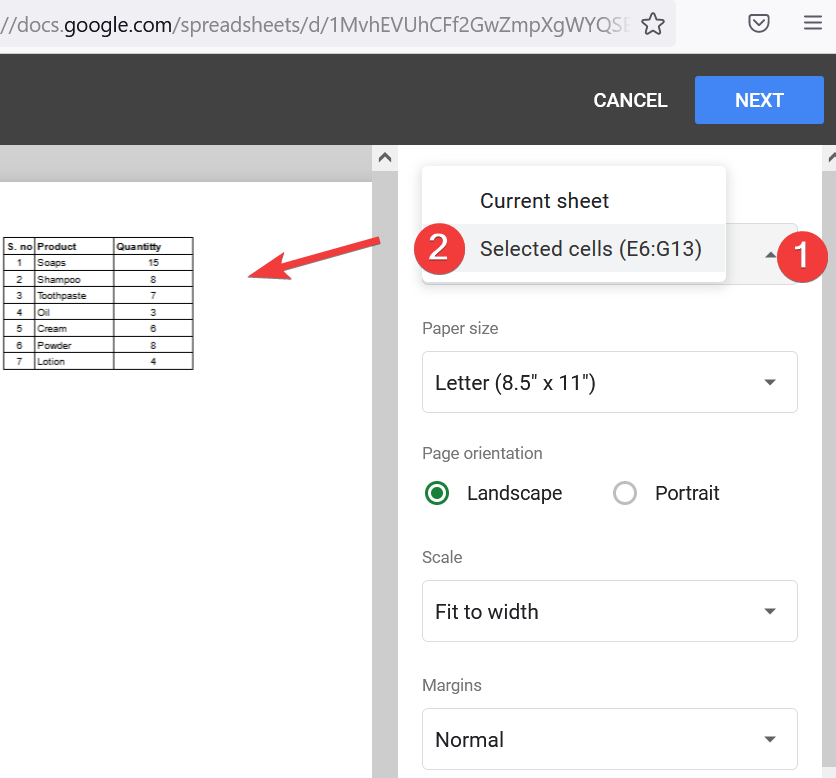
Now select the data which you want to print on the page
Step 3
Now press the shortcut key to print Crtl+P, and a print preview appears
Step 4
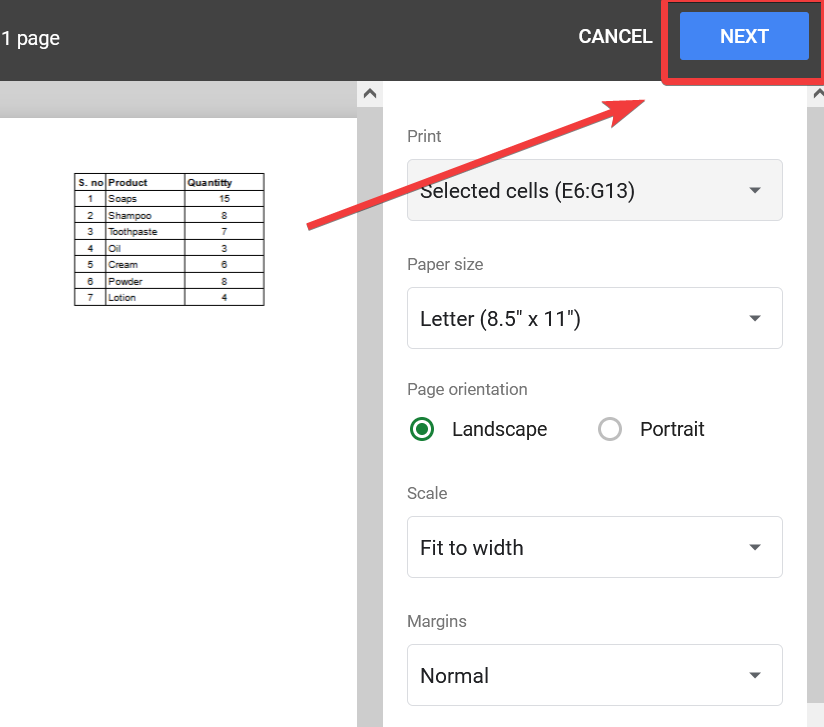
Now see at the right top of the dialogue box there is an option “Print” change it to “Print Selection”
Step 5
As you can see the difference in the print preview that how perfectly our data is placed on the page now press the Next button to finish it.
Set Print Area in Google Sheets – Paper Size
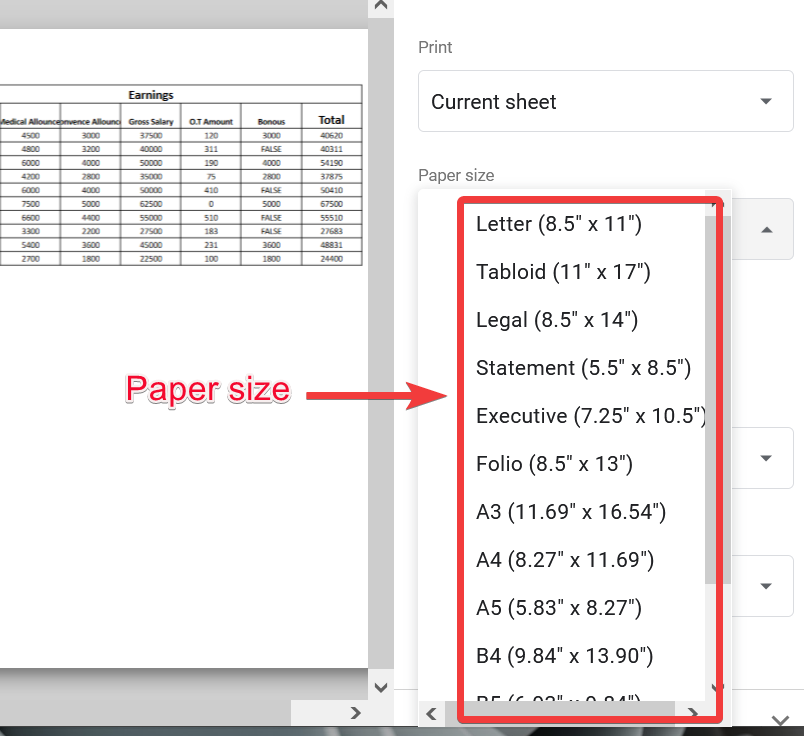
While printing the data when we press Ctrl+P a dialogue box opens where you see an option of Paper Size where there are the size of papers available which you may select while printing it’s up to you which size of paper you are using while printing, If you have common A4 size paper then select A4 and if you another size of paper in some special cases like legal paper, B4, A3, etc. Then you may select it by this option
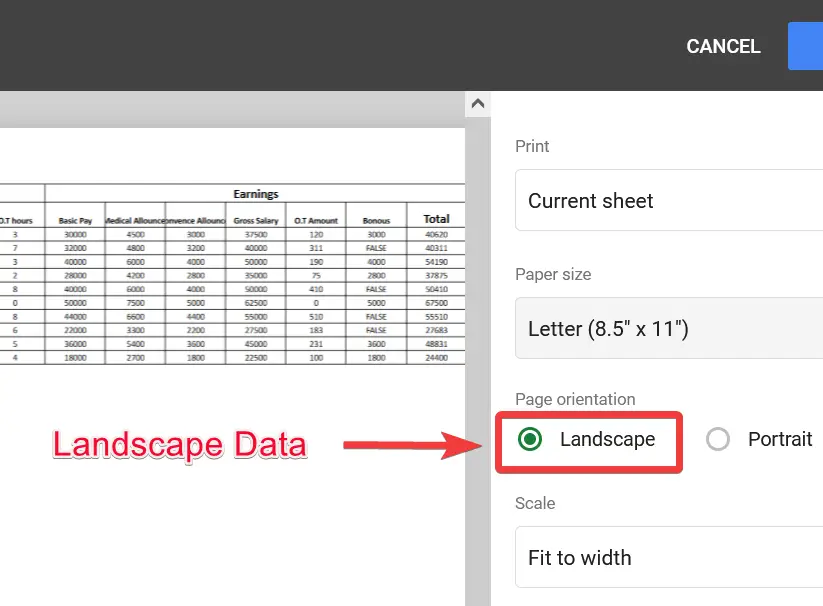
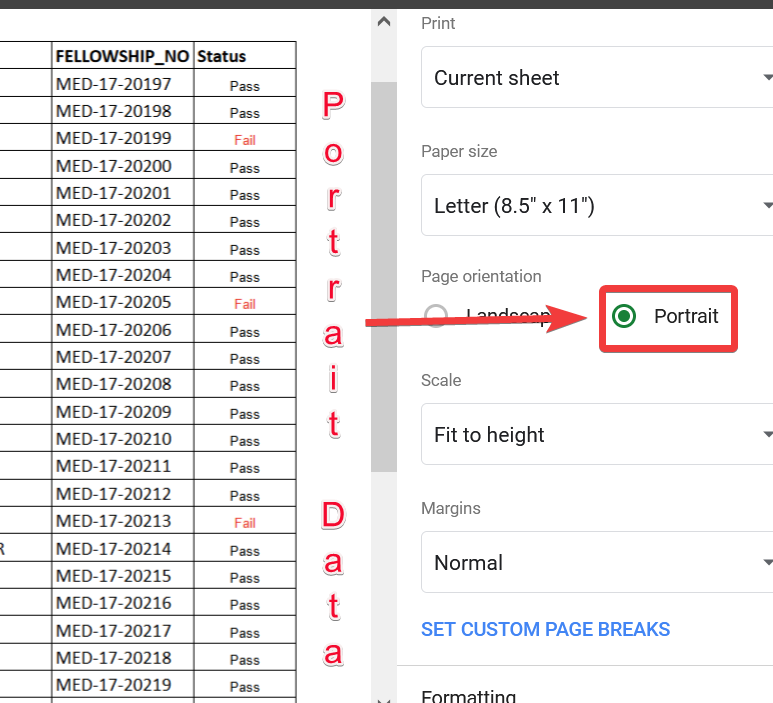
Set Print Area in Google Sheets – Page Orientation
As we discussed Paper size similarly we found an option below the paper size in the Print dialogue box of Page Orientation in which there are two arguments Landscape and another one is Portrait. Now it’s up to you that which is suitable for you and your data which is printing, by default it is printed in Landscape because as I told you that in Google Sheets usually, we have data in the horizontal form in large numbers of columns so in this case, we print data in Landscape but in some cases, we have data in large numbers of rows in a vertical form then Portrait option is suitable for you.
You can see both examples below
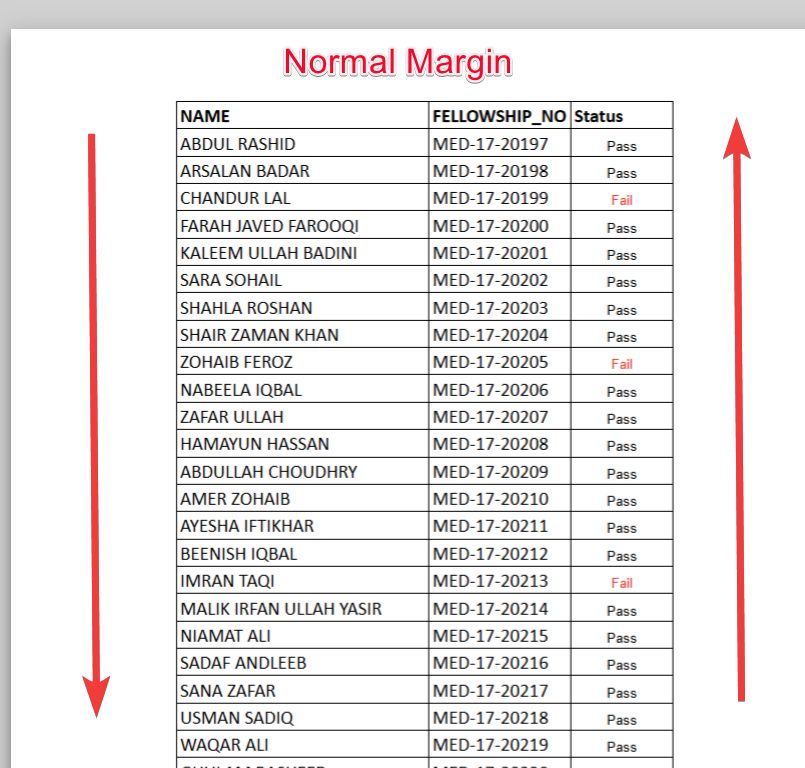
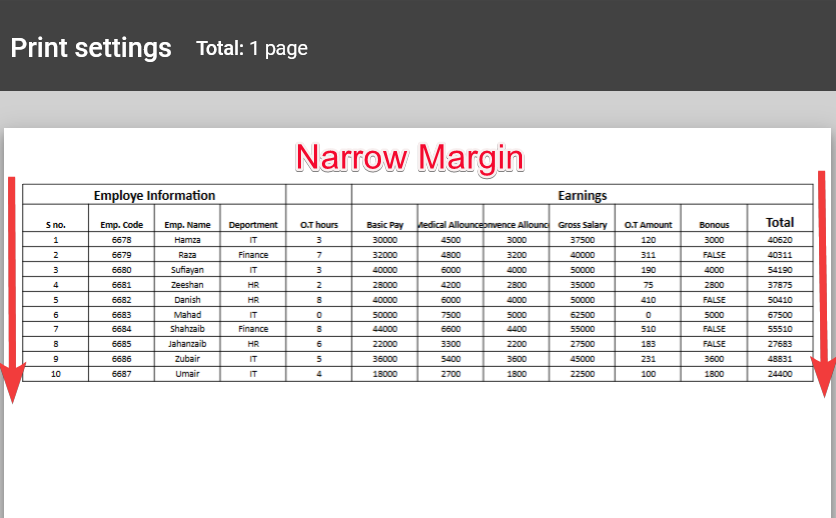
Set Print Area in Google Sheets – Margins
We have covered almost all options of printing data in Google Sheets Lastly there is one option remaining which is the margin. The term margin means “border” similarly while printing we have paper margins or paper borders, by default, there is a space of about an inch on all sides of the paper which makes the document’s presentation beautiful which is a Normal margin. But sometimes we need to remove this space and need a borderless document then we use a Narrow margin.
See below the example of both conditions
Important Notes
- There are some more features as well in the print dialogue box:
- Formatting by which you can do some essential changes that alignment, Center, Text Position &, etc.
- Header Footer may also be put in the form of numbers, title, date, time, etc.
Conclusion
If we assume, it seems very easy How to set print area in Google Sheets we are not aware of some problems that we faced while printing as we discussed above not to fit on the page, don’t adjust height inappropriate data placement which makes data presentation poor. This is why I wrote this article for your complete guidance about How to print data in Google Sheets with all scenarios that usually we face officially, by this method you may print any kind of data perfectly without any problem. So, keep in touch with Office Demy to learn more.


