
To Stop Sharing Calendar in Outlook
- Go to “Settings“.
- Click “Calendar” > “Shared Calendar“.
- Select a calendar, and change its sharing settings.
OR
- Open “Calendar View“.
- Click “Sharing and Permissions“.
- Remove the shared outlook.
Hi everyone. In this guide, we will learn how to stop sharing calendar in Outlook. Do you want to stop sharing your calendar in Outlook? Or you want to make your Outlook calendar private.
How wonderful is that because you are right in the place! In this tutorial we will discuss how to stop sharing a calendar in Outlook and will also discuss access given to the user while sharing a calendar in Outlook. You can unshare your Outlook calendar if you want to remove someone from a previously shared calendar.
When to stop sharing Calendar in Outlook?
For example, you have shared your calendar with other Exchange users in Outlook before. But now, you want to stop sharing the calendar, in other words, you need to cancel the permissions of other users to view your calendar, and you need to learn how to unshare the calendar in Outlook.
Therefore, I have brought a blog post in just the next section on how to unshare calendars in Outlook.
How to Stop Sharing Calendar in Outlook?
In this tutorial, we will teach two methods of Unsharing calendars in Outlook.
- Stop sharing calendar in Outlook Web version
- Stop sharing calendar in Outlook Desktop App version
Stop Sharing Calendar in Outlook – from Web Version
Step 1
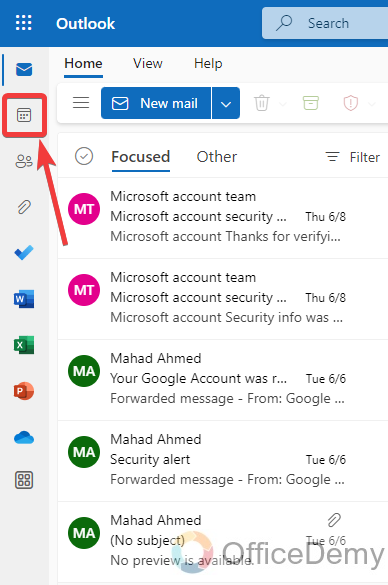
To unshare the calendar, we need to go into the Outlook Calendar. To go into the Outlook Calendar, look at the left thin panel of the window, you will see a “Calendar icon” just below the mail icon as highlighted below. Click on this icon to open the Outlook calendar.
Step 2
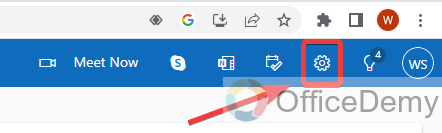
Once your calendar is open then open Outlook settings, you can access Outlook settings from the following settings icon located at the right top corner of the Outlook window.
Step 3
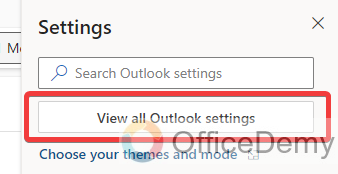
When you click on that settings icon, a drop-down menu will appear, but it has very few options. To see more detailed options, click on the “View all Outlook settings” button.
Step 4
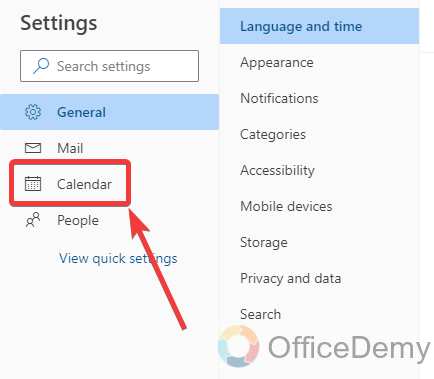
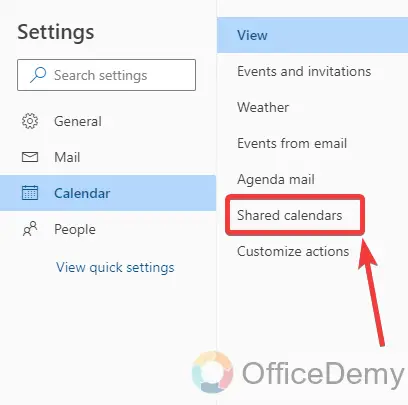
When you click on “View all Outlook settings“, a new window will open containing all settings options. Click on the “Calendar” tab from the first main menu section as below.
Step 5
After opening the “Calendar” tab, find and click the “Shared calendars” option from the sub-menus from the second section.
Step 6
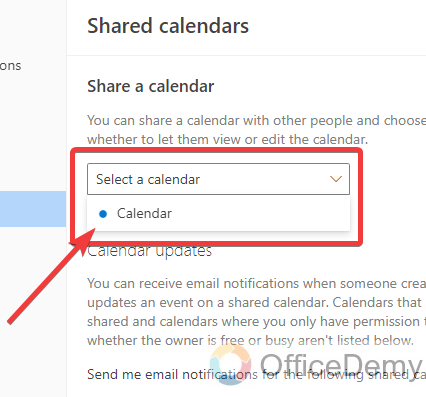
On this settings window, once you select the “Shared calendars” option, then you will see all shared calendars regarding options.
As Microsoft Outlook provides the features of using multiple calendars this is why here, the first option is to select the calendar which you want to unshare.
Click on “Select a Calendar” and then select your calendar from the drop-listed menu.
Step 7
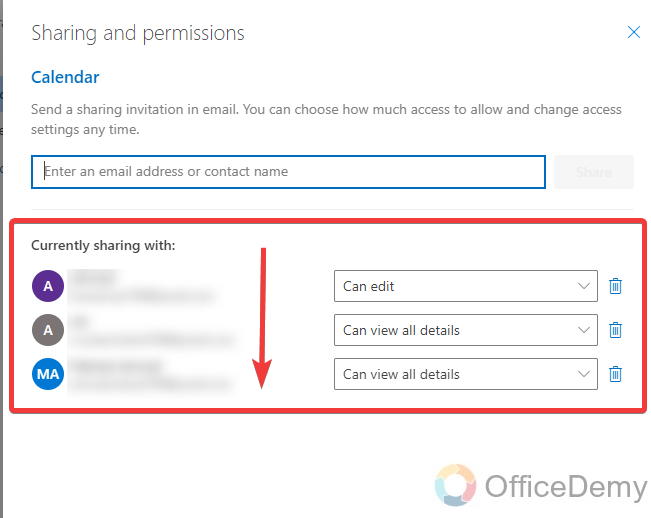
As you select the calendar, all shared descriptions with all user’s details and user access will be displayed in front of you as can be seen below in the following screenshot.
Step 8
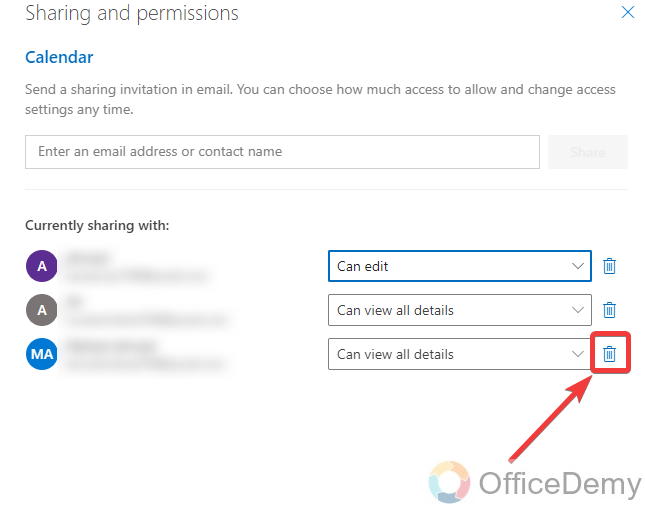
As we want to unshare our Outlook calendar, the first thing you will have to do is select the participant that you want to unshare. To unshare the calendar if you see it, there is a bin button at the right end of the row. You can easily remove the shared person by clicking on this bin button. Let’s try by clicking on it.
Step 9
As you can see from the result in the comparison of the above and the following screenshot, one participant has been removed.
In the same way, you can remove all the shared people to make your calendar unshared.
Stop Sharing Calendar in Outlook – from Desktop App
Step 1
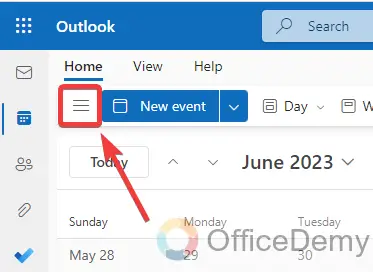
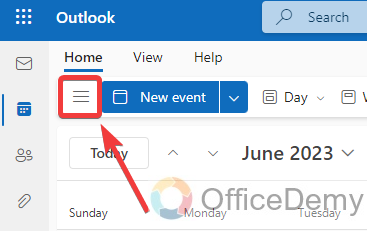
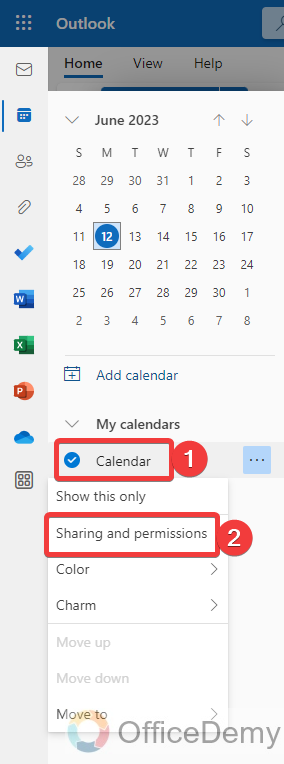
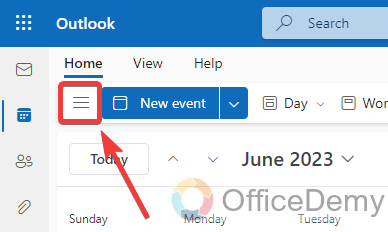
When you open Outlook on your web browser, the first thing you will see is your emails on your screen, so first access the Outlook Calendar then find these three line options just below the Home tab of the menu bar. Click on it to open.
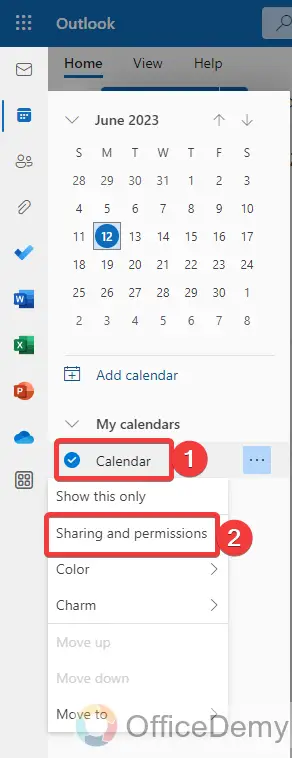
Step 2
When you click on these three line options, a pane menu panel will slide right to the window where you will see some options regarding your calendar. Press the right click of the mouse on your calendar option then select “Sharing and Permissions” from the drop-down menu.

Step 3
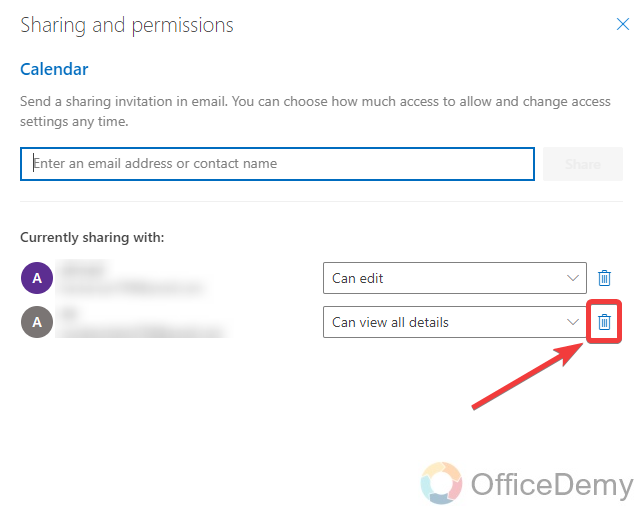
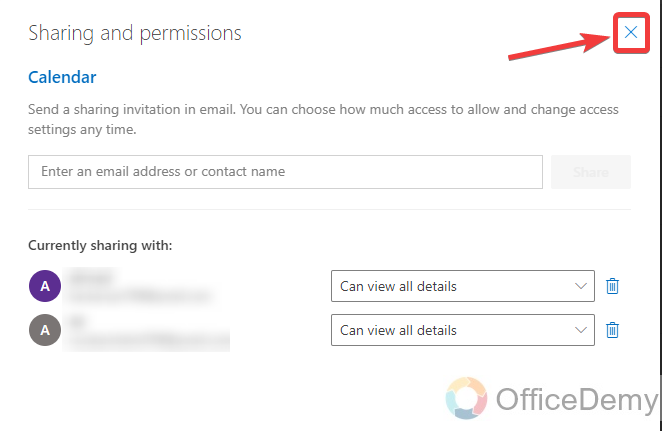
A new window will open for “Sharing and Permissions“, where you will see all your shared participants with their details. In the Outlook web, the procedure of Unsharring calendar is the same as the desktop version. Here is also a bin button located at the end as highlighted in the following picture. You can easily unshare your calendar by clicking on this bin button on Outlook web as well.
Frequently Asked Questions
Q: How to share Calendar in Outlook?
A: Although we were talking about how to unshare calendars in Outlook, most people don’t even know how to share calendars in Outlook. If you are one of them then the following steps are for you in which you will learn how to share Calendar in Outlook.
Step 1
To share Calendar in Outlook, you will again have to open “Share and Permissions” which you can access from the following three lines option menu below the Home tab button.
Step 2
These three lines of options will give a pane menu containing several options and folders in Outlook. On this panel press the right click of the mouse on your current calendar to open a drop-down menu in which you will find a “Sharing and Permissions” option. Click on it to open.
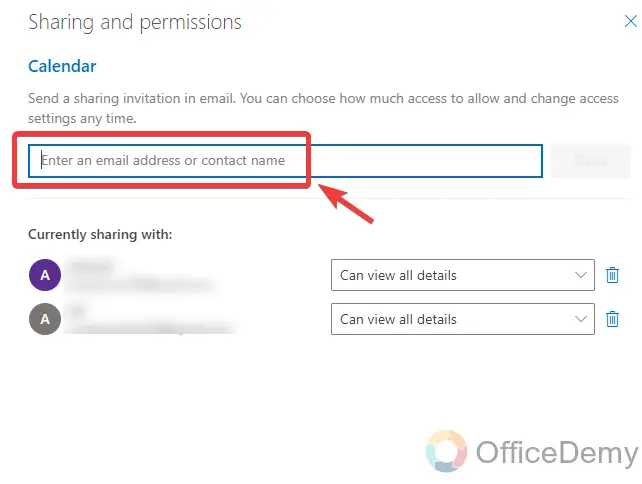
Step 3
When you click on “Sharing and Permissions“, a small new window will open, here you will find all the enclosed information of the person with whom you share your calendar. As you can see in the following picture a text dialogue box in the window. Write the username or email or contact name to share your calendar with him/her.
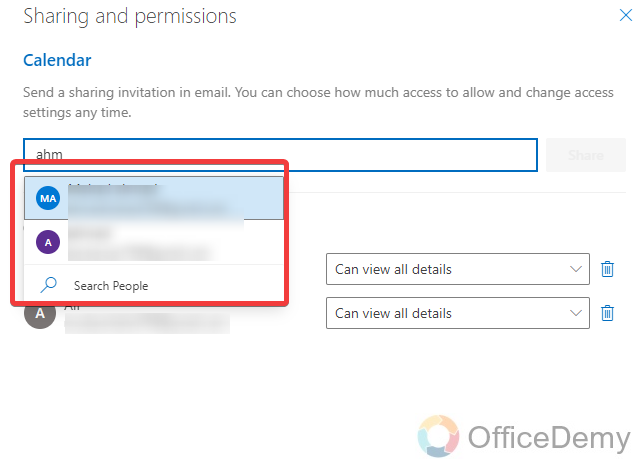
Step 4
When you write the email, it will suggest you pick the users in its records or from the Outlook contacts list. Pick up the person from the following suggestions with whom you want to share your calendar.
Step 5
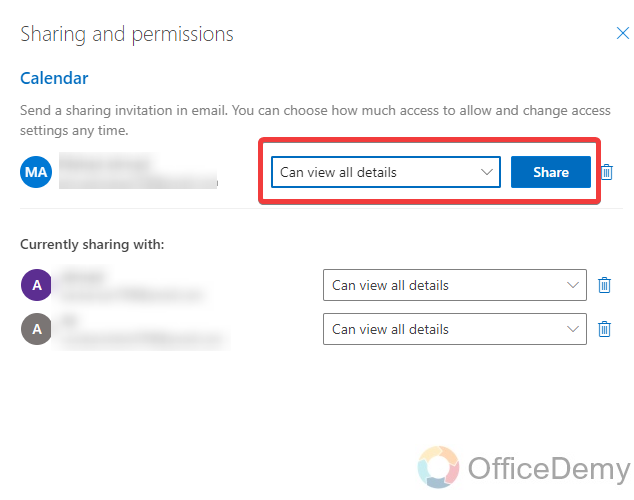
Once you have selected the user with whom you want to share your Outlook calendar, then click on the drop-listed menu just ahead of the username and select the rights of edits and view that you won’t want to grant the user. Once you have completed all the things then click on the “Share” button just to finally share your calendar
Step 6
As you can see in the results in the following example, the person you have selected has been added to the list of shared persons. That means your calendar has been shared with him/her.
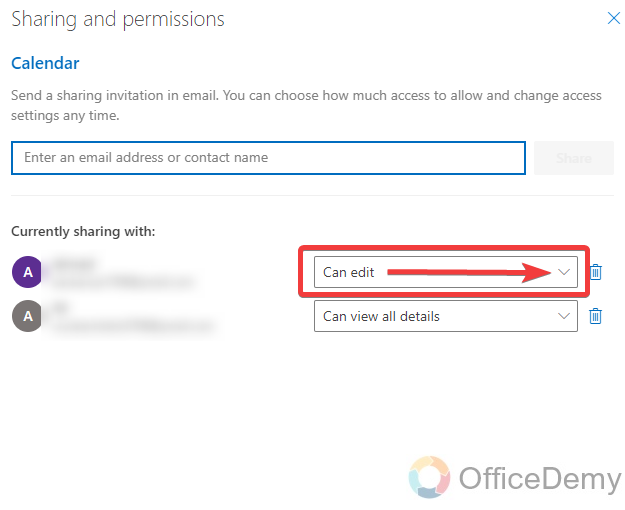
Q: How to change the access to the shared calendar in Outlook?
A: While sharing a calendar in Outlook, you need to set access approaches to the users. If you have selected Edit rights, it will enable the shared person to make changes to your calendar as well. If you don’t want to allow it to be so, then you can change the rights of sharing the calendar from the following steps.
Step 1
Same as above, first you will have to open the “Share and Permissions” window that you can open from the right menu panel of Outlook. To open this menu panel, click on these three line options located just below the Home tab of the menu bar.
Step 2
When a menu panel opens, here you will have to right-click on the calendar option to open a drop-down menu where you will see the “Sharing and Permissions” button to access.
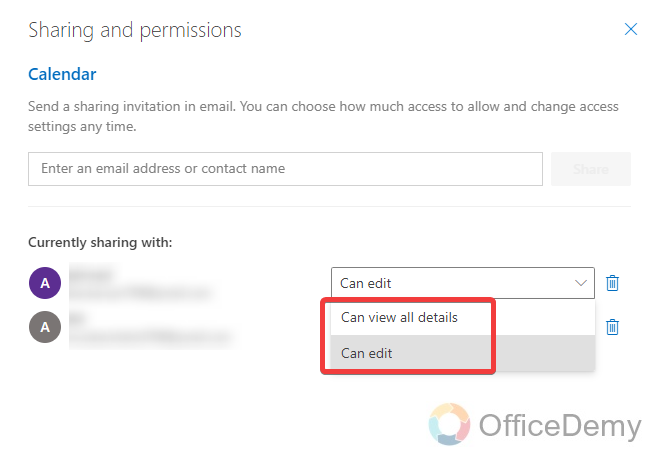
Step 3
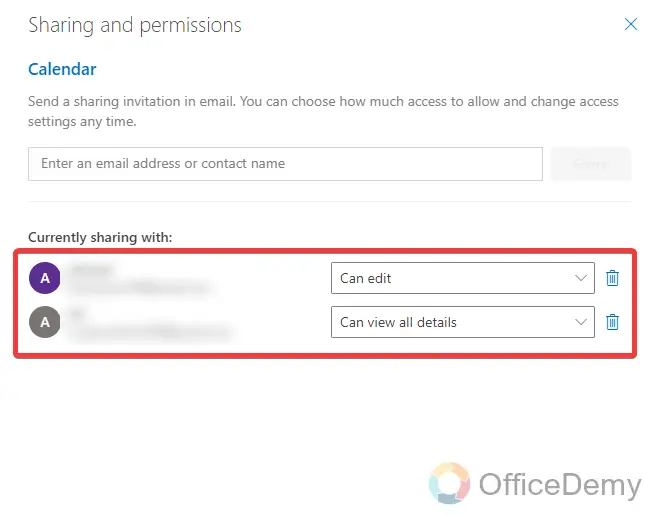
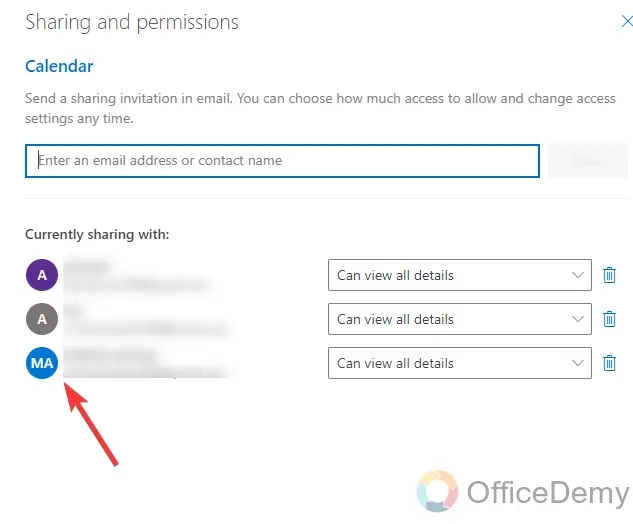
A new window will open, where you will find the list of participants currently sharing the calendar.
Click on the drop-listed menu as marked in the following screenshot.
Step 4
Here are two conditions to sharing Calendar with edit rights and View rights. Select any of them which you want to set for the person.
Step 5
You are all done now you can close the window.
Conclusion
That’s all from today’s guide. Thank you for reading this article on how to unshare calendar in Outlook, hope this post will be helpful to you. Your support encourages us to make such type of informative post so keep visiting Office Demy.


