
To Make Cornell Notes Template in Google Docs
- Insert a 2×5 table.
- Merge the first row’s two cells for the header.
- Fill in the header.
- In the second row, use one cell for Notes and the other for Keywords/Questions.
- Add the Summary section in the third row.
- Adjust heights and widths.
- Adjust margins, background color, etc.
In this article we will learn about how to make Cornell Notes Template in Google Docs. You will also get a FREE template of Cornell Notes in download section below.
Collaborative learning must have become a permanent contributor to active learning for students. It enhances problem-solving and decision-making skills. Google docs are one of the promising tools without any restrictions to work as a team. Unlike other collaborative tools where the involvement of partners cannot be revealed, Google docs provide revision history to disclose the task participation of students.
Furthermore, studies have shown that participative and collaborative learning facilitates teamwork, social skills, and computing skills. Google docs allow students to share notes and facilitate the workload. You can decide the permit rights for the shared documents thus preventing data loss and blocking sensitive information to corrupt the document. Real-time editing must be one of the greatest perks of using Google docs. Akin to other processors, the students can explore the web without leaving the document generating more productivity.
If you are interested to learn about how you can add subscript easily in google docs, please follow the link below.
Why Cornell Notes template is Important in Google Docs
A note-taking method, both simple and efficient compared to other methods such as Outlining, mapping, charting, sentence, and structure methods. It helps in segregating and organizing notes without any effort. The Cornell note-taking system has four sections – Header, Keyword or questions, Notes, and Summary. The header section is for noting the name, date, class, and topic. The notes section is for scripting down the important concepts and diagrams while the keyword or question section is for keywords and potential questions. Lastly, the summary section is for summarizing the noted concepts in your words.
- Simple and efficient
- Save time and effort
- Organized and systematic page layout
- Helps in exam preparation
Google docs have many built-in templates and you can customize the templates if you have google admin controls which are used for Google workspace accounts only. This article helps to create a Cornell note-taking template but cannot advise the steps to submit a template in Google docs.
Download/Copy Cornell Notes Template Google Docs
How to Make a Cornell Notes Template in Google Docs
Two Columns Cornell Notes Template
You can create a cornell notes template google docs by following the 10 steps below.
Step 1:
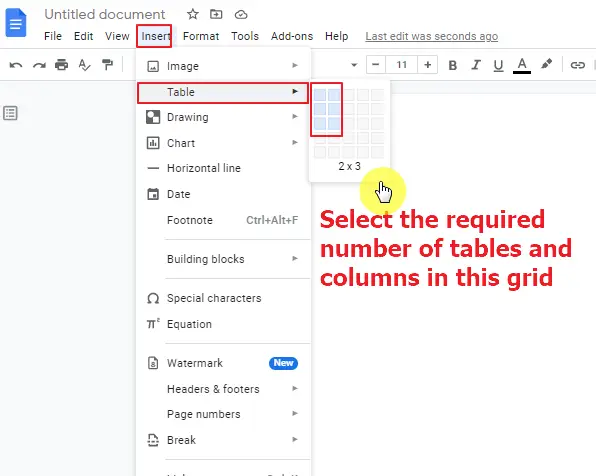
Open Google Docs. Go to Insert -> Table. Select the required number of rows and columns in the grid as shown below.
Step 2:
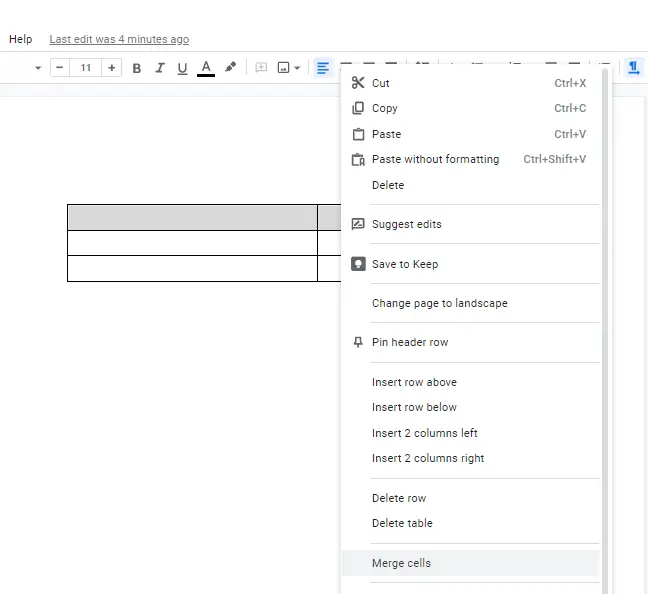
Select the two cells in the first row of the table. Right-click and select Merge cells.
Step 3:
The first row is the header section used for noting the name, topic, date and class. Enter the details and select Line and paragraph spacing to align the text with proper spacing. You can customize the line and paragraph spacing or choose the one listed in the drop-down.

Step 4:
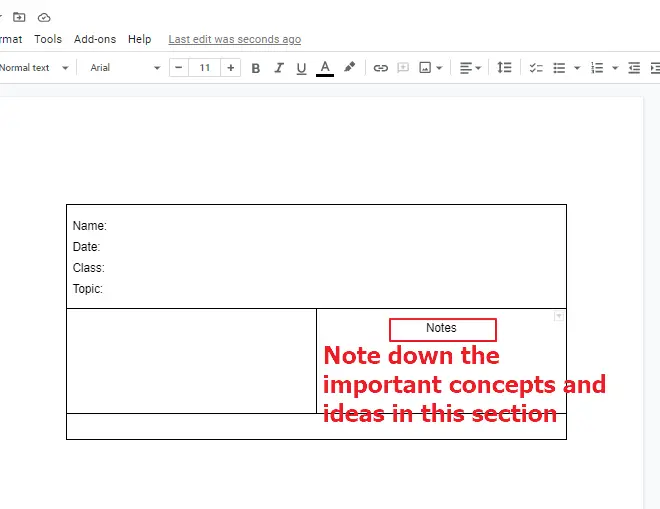
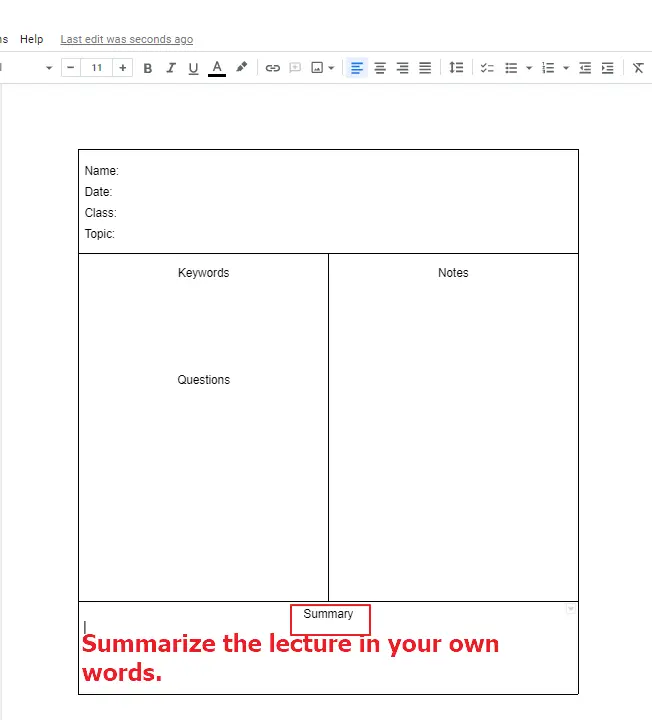
The second cell of the second row is for Notes. Jot down the important concepts and ideas of the lecture with abbreviations. Make the heading center-aligned.
Step 5:
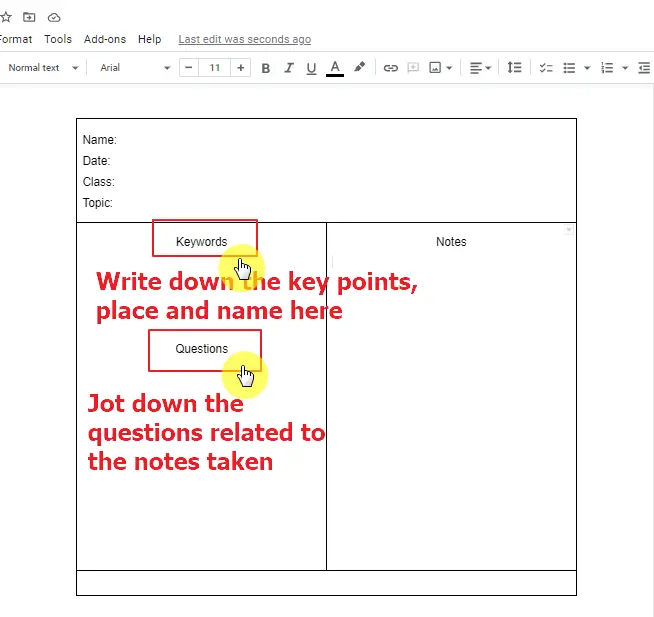
The first cell of the second row is for Keyword and Questions. Jot down the key points, dates, people and main ideas in this section. Write the potential questions related to notes taken in the Notes column.
Step 6:
The third row is the Summary section. It is used to summarize the lecture in your own words. It helps to get the clarification about the subject matter.
Step 7:
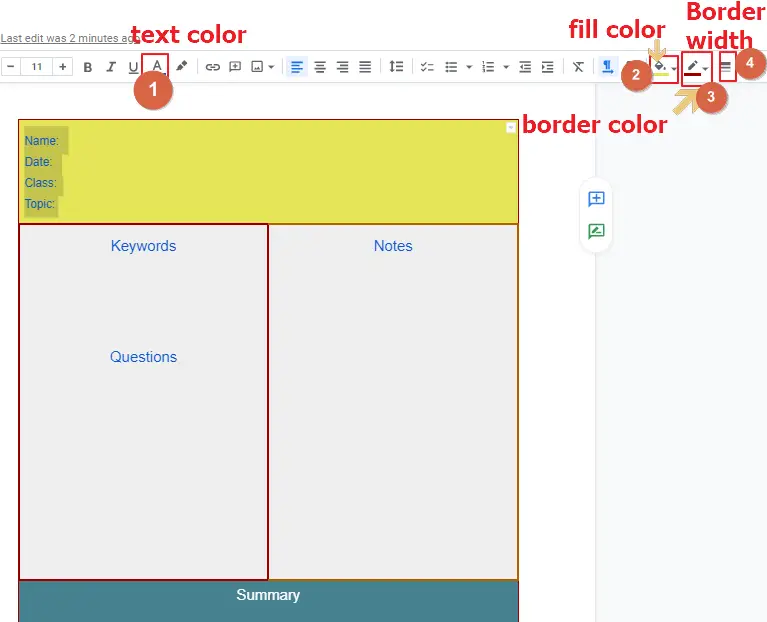
Once the table is created, format the font style, size, color of the text and fill color to the border or the table. Select the text and change the text color by clicking the text color icon in the format options below the menu options. Fill the row to any required color using the Fill Color icon and add border color to the border of the selected row or column using Border Color icon. You can alter the border width to any size using the Border Width icon.
Step 8:
To change the row height, column width, cell alignment and color adjustment, right-click in the table and select table Properties.

Step 9:
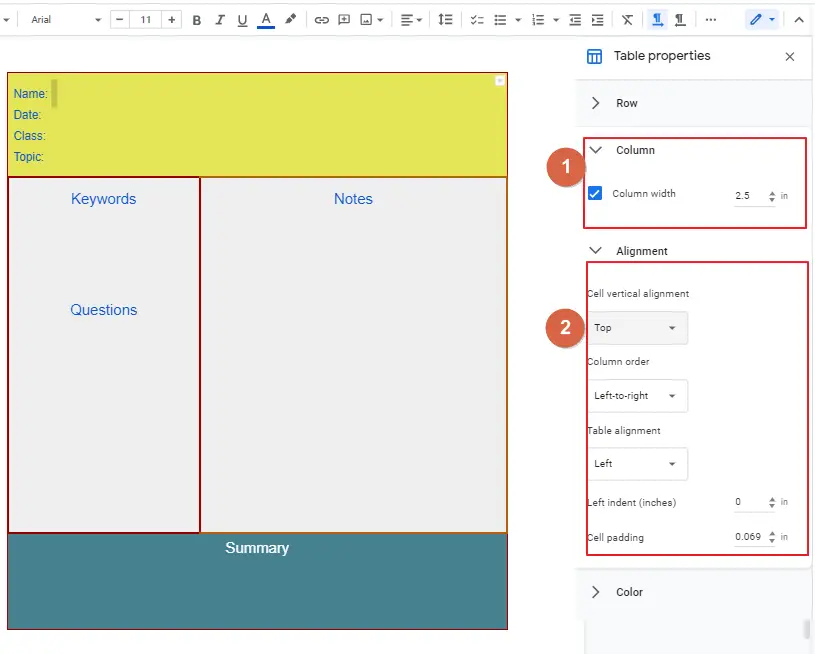
The Table Properties toolbar appears in the right-side corner of the screen. In the Row tab, adjust row minimum height. If you want to repeat the header row in each page, select Pin header row(s). If you want the text to flow to the next pages, select Allow row to overflow across page checkbox.

Step 10:
Adjust the column width of the selected column in the Column tab. Change the alignment of the cell in the Alignment tab.
To adjust the cell vertical alignment, select Top, Bottom or Middle from the Cell vertical alignment drop-down. You can also adjust the column order form left-to-right and right-to-left. To align the table to left, right or middle, select the Table alignment drop-down.
This template is saved to the Google doc template gallery if you have google workplace log-in credentials. Once saved to the gallery, this template can be shared with other users and can limit edit access to others.
- Google docs allow customizing the existing templates and creating as many new templates.
- You can import these templates to all the other Google apps such as Slides, Sheets, and Classroom.
Three Columns Cornell Notes Template
Sometimes two columns cornell notes template is not sufficient to put all information. For example, if we need get more information like Steps, diagram number or graphics number to be added to the reference document, we need another separate column. In this case, two column cornell notes can be extended to tree columns cornell notes.
In this section we will show you step by step how to create/make a three columns cornell notes template in Google Docs.
Step 1: open/create a new google document.
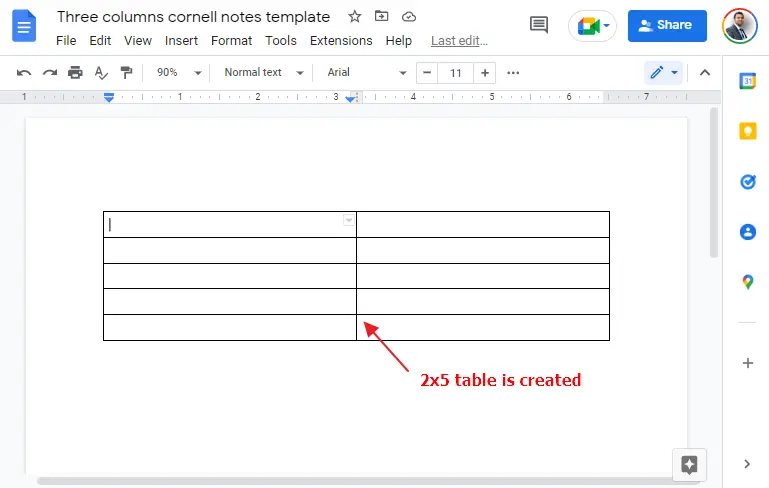
Step 2: First of all, we need to create the information table. Go to Insert > Table > and select 2×5 (2 columns and 5 rows) table.
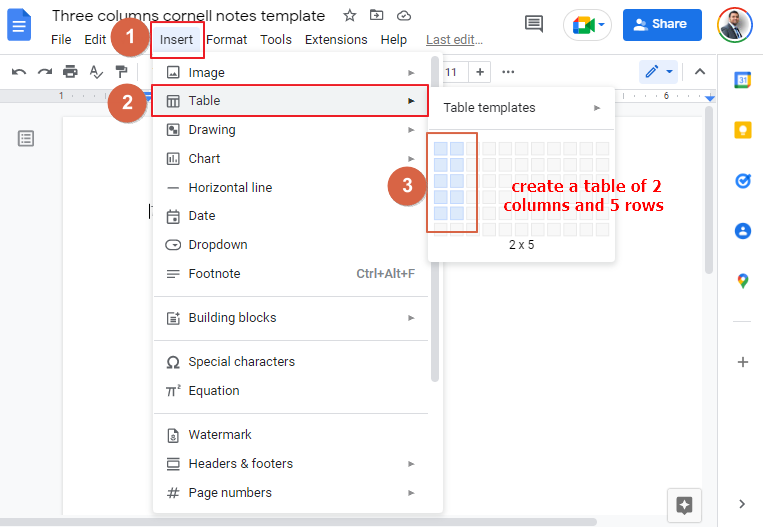
Step 3: A table of 2×5 is inserted in the document.
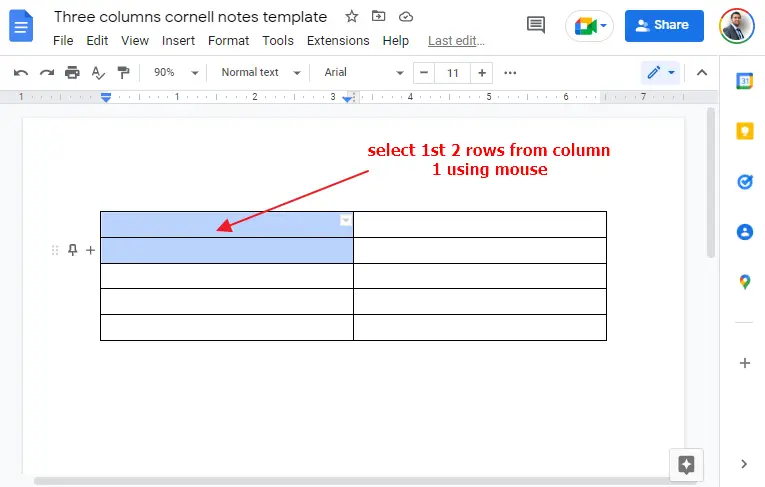
Step 4: Select first 2 rows from column using mouse pointer.
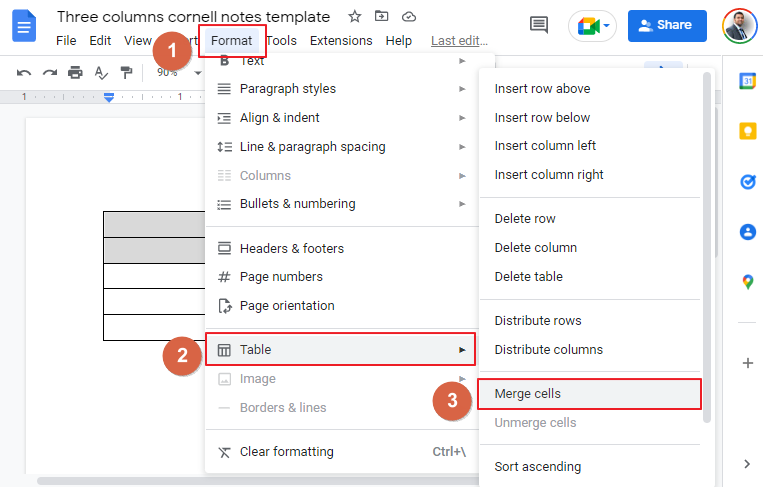
Step 5: Go to Format > Table > Merge Cells in order to merge those two cells.
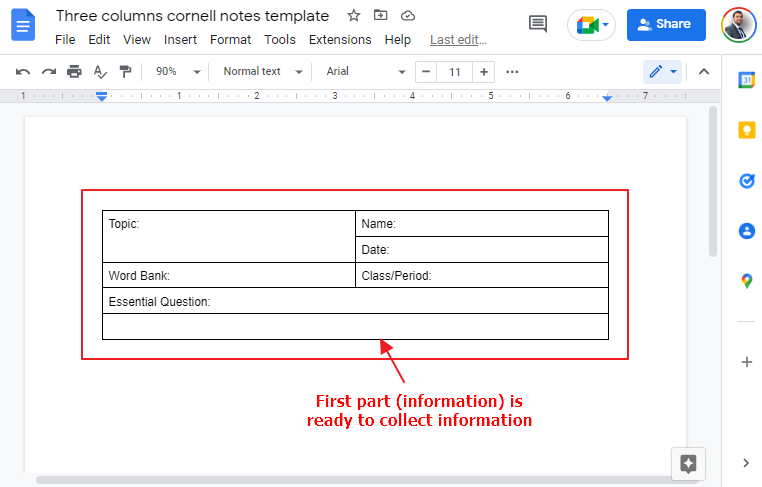
Step 6: Insert some text in the table (for example, Topic, Name, Date, Word Bank, Class/Period). In order to put the Question, we need to create a long merged cells. In this template, we have merge row 4 for both columns as well as row 5 by selecting both columns and using Format > Table > Merge Cells.
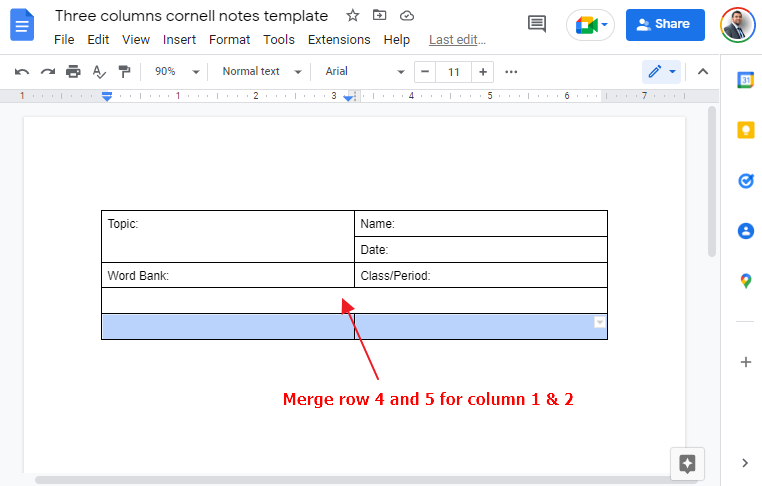
Now the main information table is created to give initial inputs including Essential Question section.
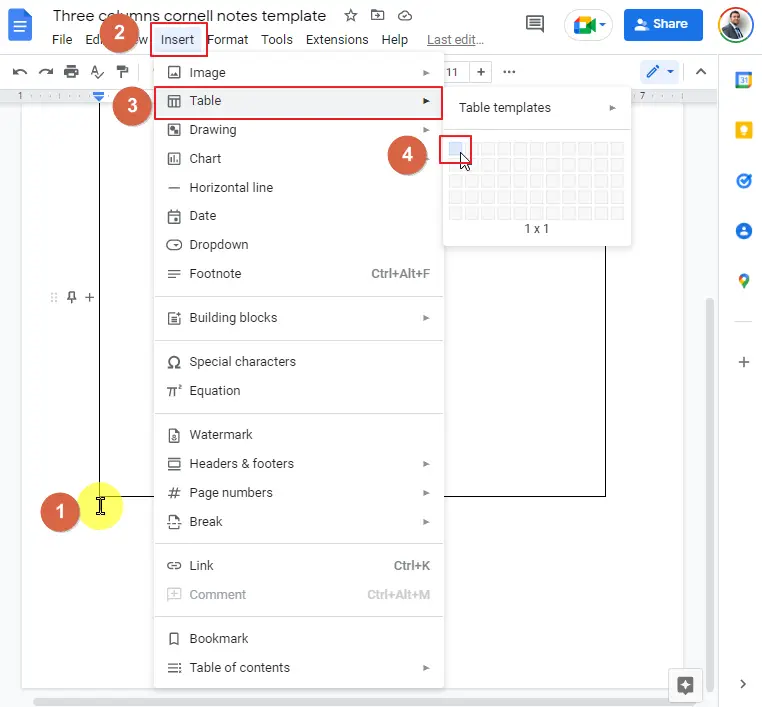
Step 7: Now we need to create another table for notes input. Put the mouse cursor below the first table and insert another table from Insert > Table > insert 3×2 (3 columns and 2 rows) table.
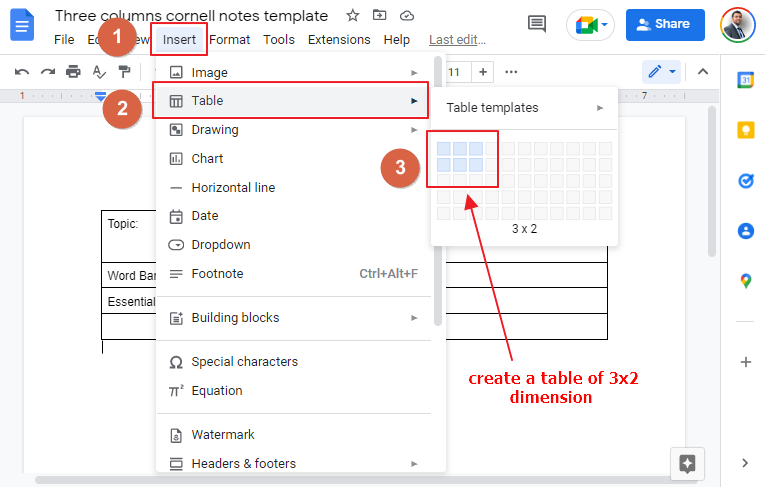
A 3×2 table is created where we can input our notes. But before that we need to do some customization.

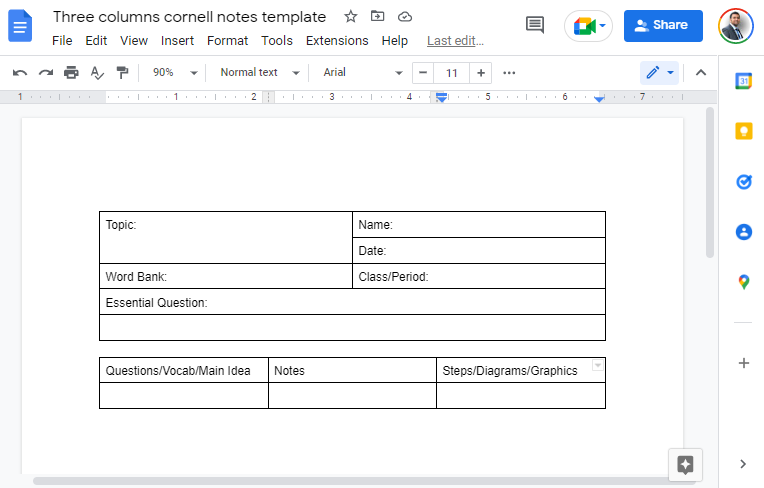
Step 8: We can put table header for this section of the template. For example, Questions, Vocab or main idea for column 1; Notes for column 2 and Step/Diagrams/Graphics for column 3.
Step 9: Now we need to increase the size of the row 2 where we will write all notes in details. Hold the bottom line of the table and drag it down to increase the size of the row 2.
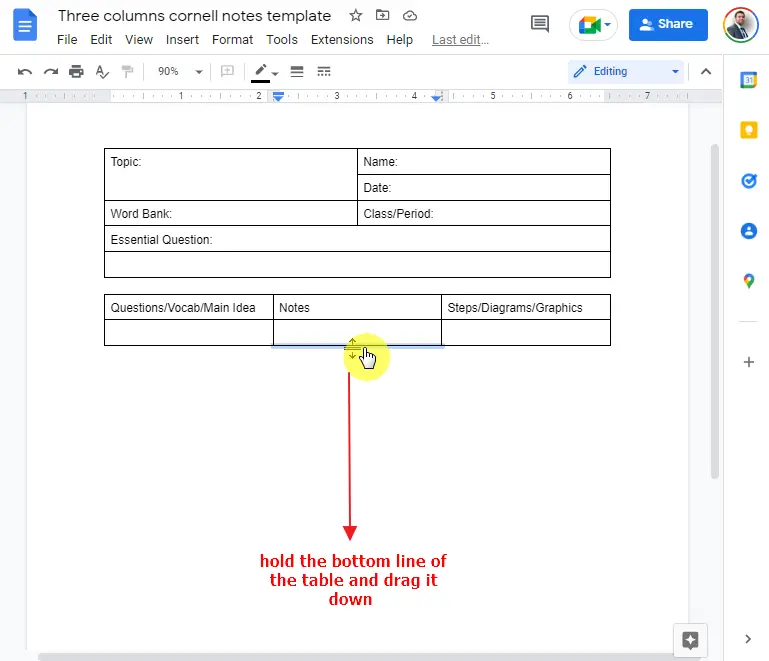
Here you can see that the notes input row becomes large in height where we can easily put lot of notes.
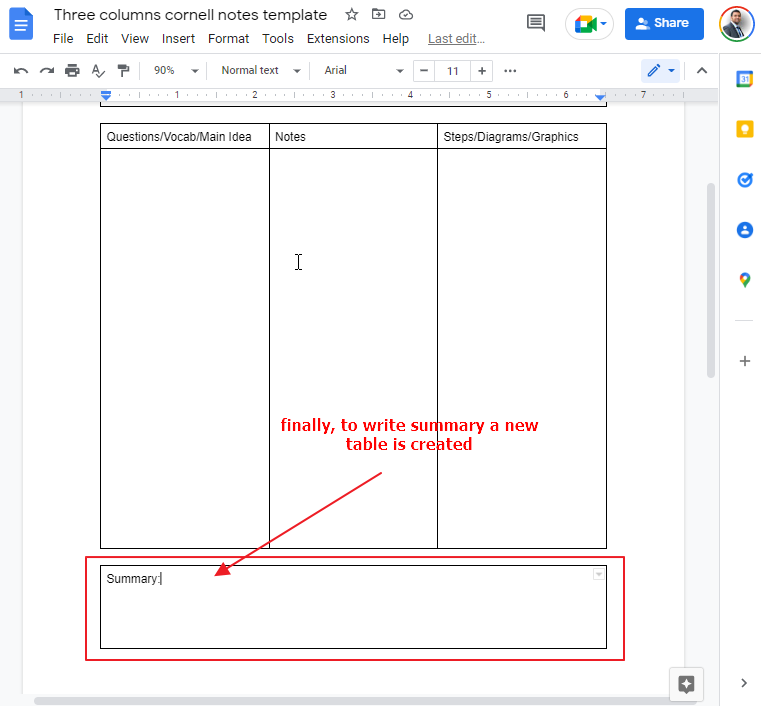
Step 10: Now the final table needs to be inserted to write down the summary of cornell notes. Place your cursor at the end of the second table and go to Insert > Table > insert 1×1 table (1 row, 1 column).
Step 11: Increase the size by dragging the bottom part of the table to give more space to write summary.
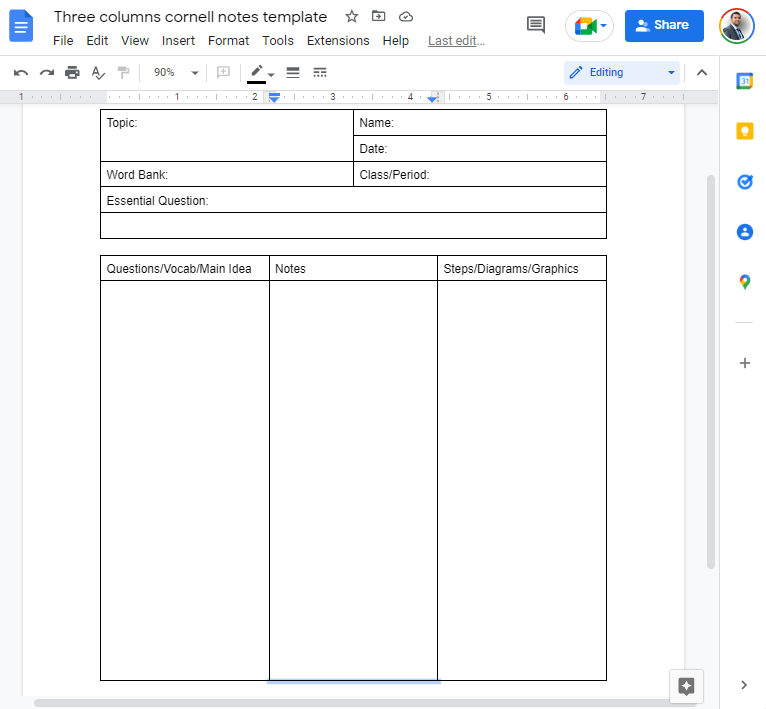
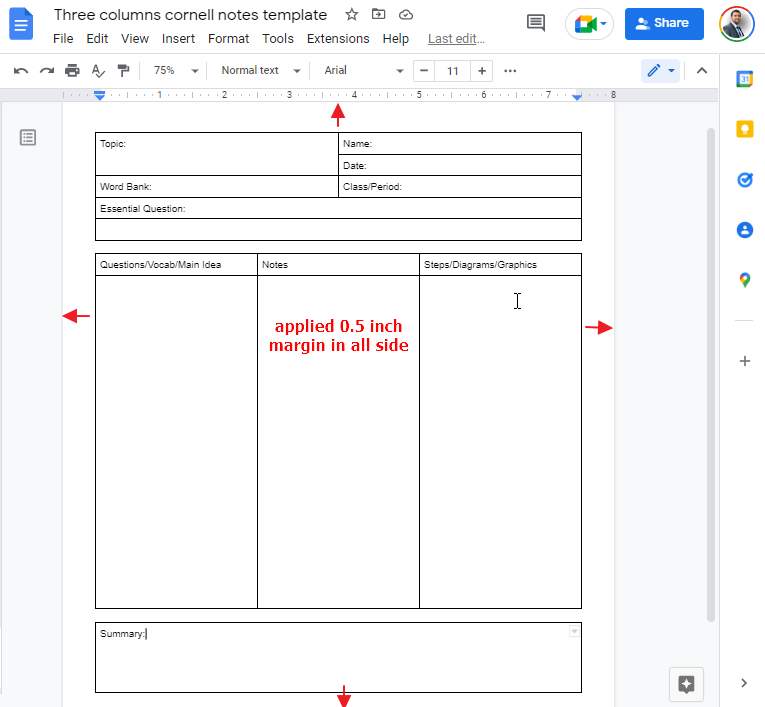
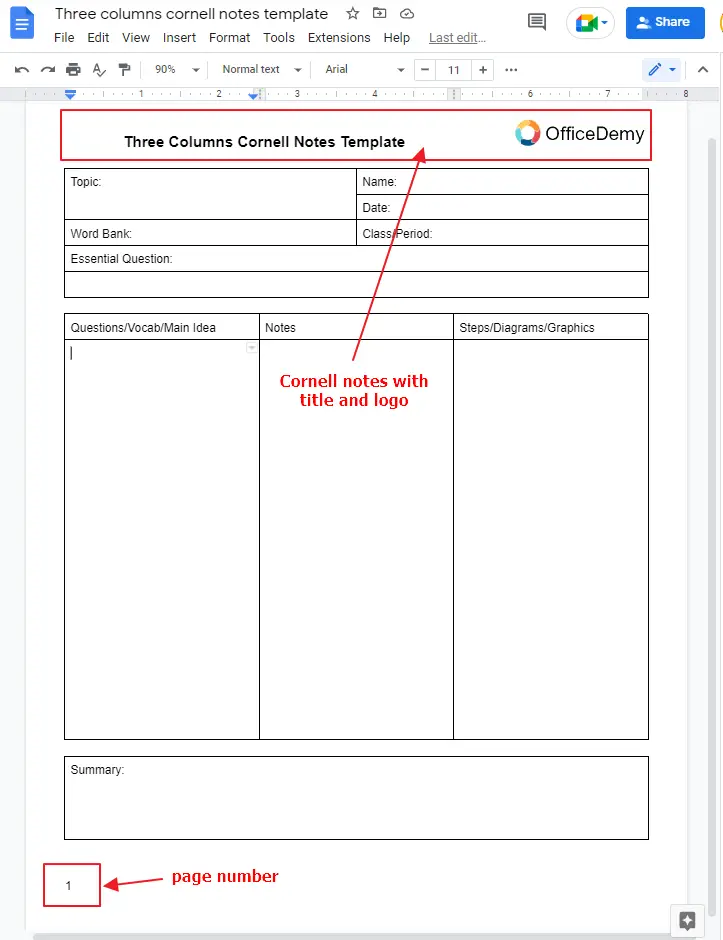
Final: Now your three column cornell notes template will look like the picture below.

How to Change the Margins of Cornell Notes Template in Google Docs
By default, the margins of google docs are 1 inch in all side which may reduce the size of the tables. As we are making 2 and 3 columns cornell notes template, we can reduce the document margins to give more space for the tables. It will allows us to put more information in the notes. Here is the procedure to change the margins in google docs.
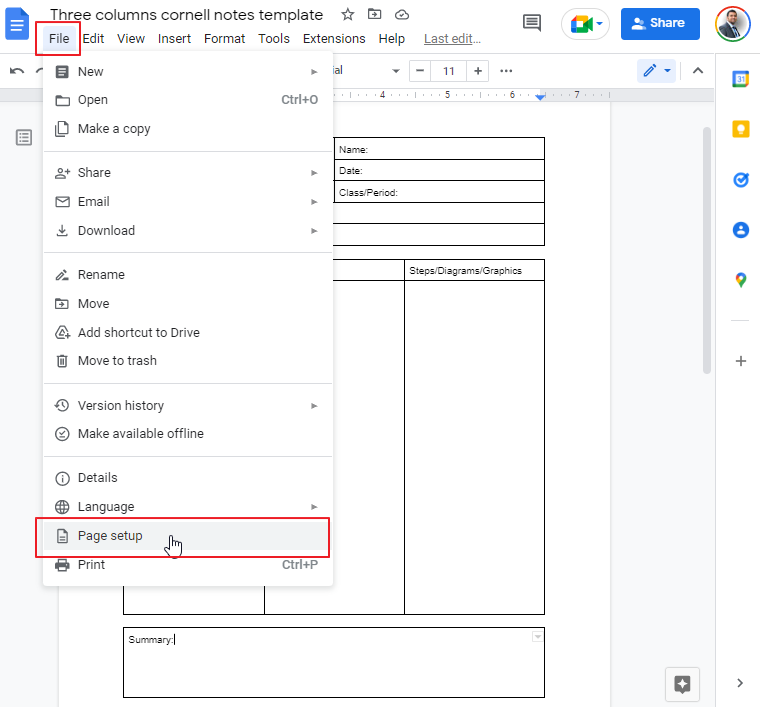
Step 1: Go to File > Page Setup
By default, the margins are defined in inches. Here the margins are 1 inch in all sides. Lets reduce the margins a bit.
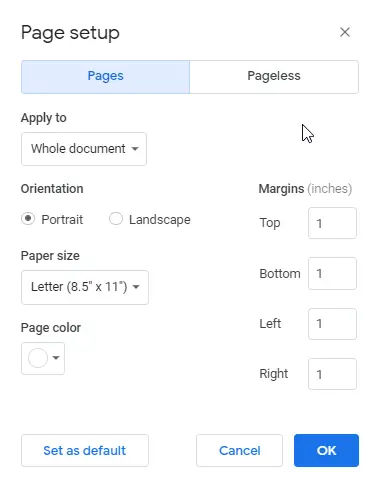
Step 2: Modify all margins to 0.5 inches (for top, bottom, left and right margins). and press Ok.

Your document margins are changed and reduced to 0.5 inches in all sides. This will give you more space to write more notes.
How to Change the Background Color of Cornell Notes Template in Google Docs
Sometimes we need change the background color of whole document. In this section you will see how we can change the background color of cornell notes template in Google Docs.
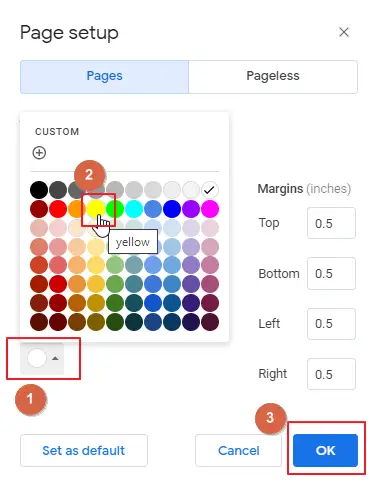
Step 1: Go to File > Page Setup.
Step 2: Click on the color button shown in the picture in position 1 and select any background color. Here, I have chosen Yellow color as background color. Finally, press Ok button.
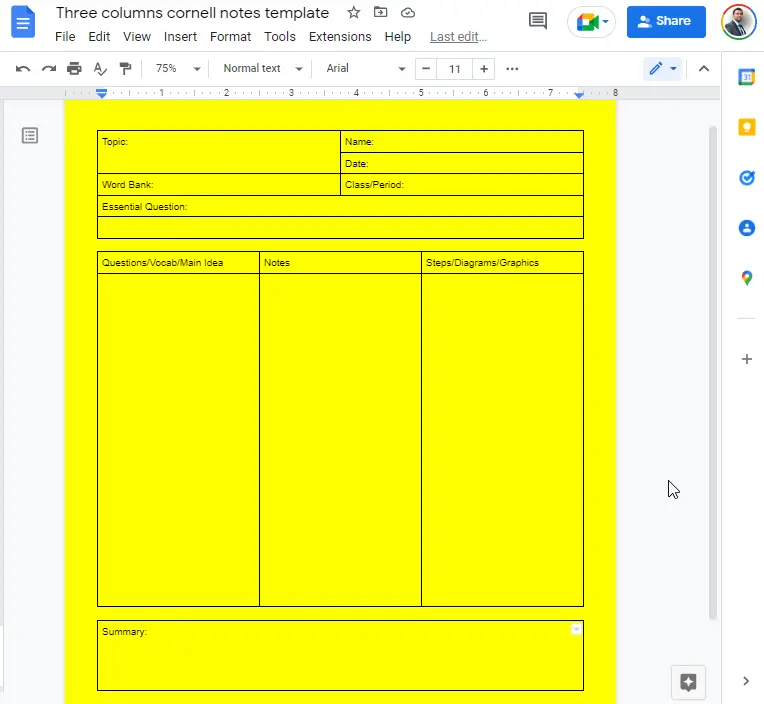
Now, you can see that the background color of the entire document is changed to yellow.
How to Add Header Information of Cornell Notes Template in Google Docs
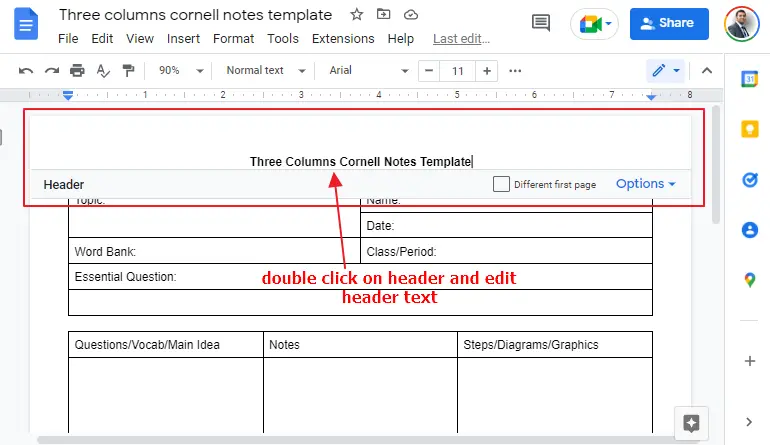
Step 1: Double click on the header part of the document. Type in your document title. Make the text Bold and increase the size of the text a little bit so that the title becomes more visible.
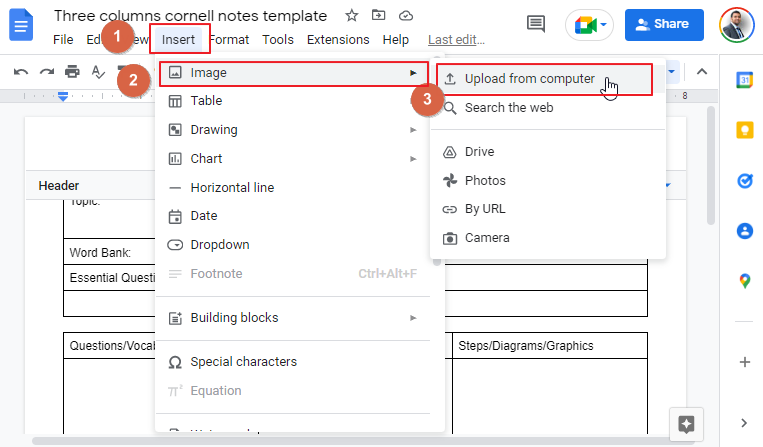
Step 2: We can also insert company logo which can be placed in the header part of the document. Go to Insert > Image > Upload from computer and select your company logo image.
Step 3: Now we can organize to logo location and also size by holding and dragging using mouse.
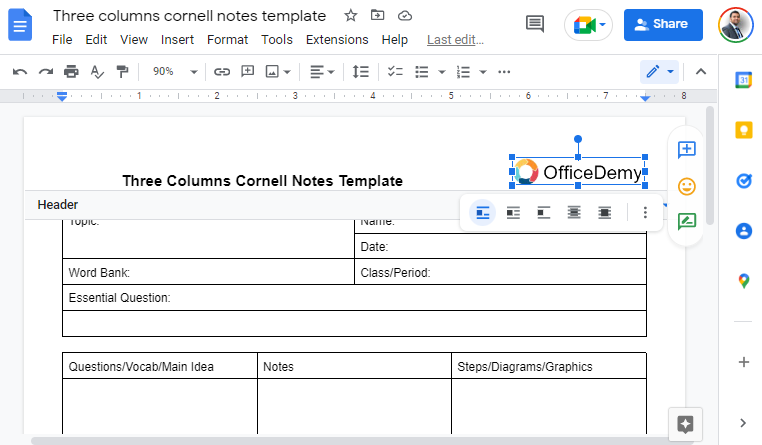
This is how we can add header title and company logo in cornell notes template.
How to Add Page Number in Cornell Notes Template in Google Docs
Inserting page number in a document is very important. In cornell notes template we can use google doc’s built-in footer page option to add page numbers.
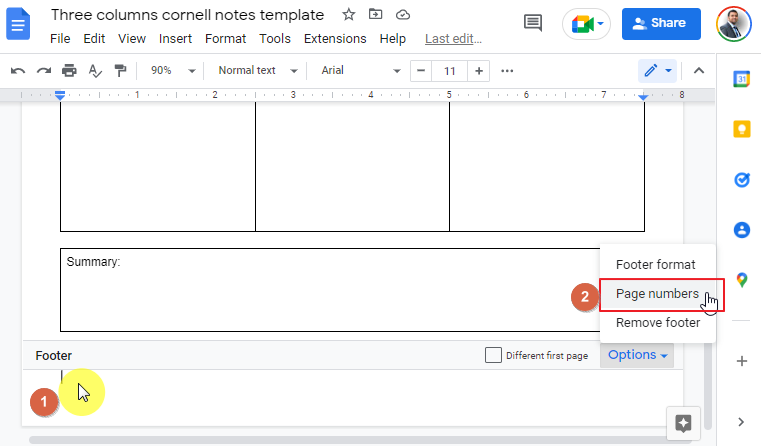
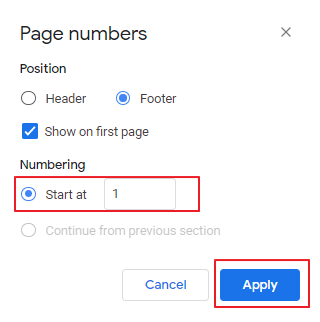
Step 1: Double click on the footer part of the document. You will see the option to edit footer part. Put you cursor in the left bottom part and click on Options > Page Numbers.
Step 2: Make sure, the Show on first page is checked and Numbering (Start at: 1) is selected. Press Apply button.
Step 3: Now you can see that the page number is added in the document’s footer position.
Notes to Remember about Cornell Notes in Google Docs
- Make sure to save the template in the google doc template gallery
- Google docs allow you to insert drawings, charts, and other graphics in the Notes section of the table
Some FAQs to Organize Your Work
Is it possible to convert the Google Docs cornell notes template to PDF?
Yes, is it possible to convert the google docs cornell notes template to PDF. Go to File > Download > select PDF document (.pdf) and save the PDF file in your computer.
Can we convert google docs cornell notes template to microsoft word format?
Yes, is it also possible to convert google docs cornell notes template compatible to microsoft word format. Please go to File > Download > select Microsoft Word (.docx) and save the microsoft word file in your computer.
Can we change the margin of cornell notes template in Google docs?
Yes, we can change the margins of cornell notes template from the page setup option. Go to File > Page Setup and change the margins according to your need.
Is it possible to add company logo in cornell notes template?
Yes, you can edit the header or footer section in google docs and import company logo picture in your cornell notes template. You can also add page numbers if needed.
Conclusion
This article focuses on creating a new Cornell notes template in google docs. This is a basic version of template creation. It is possible to add more formatting styles and designs to the template. You can edit the accessibility settings for other users. Google Docs sustains to be a user-friendly tool that has to be explored and acknowledged as a potential tool.


