
To Remove Page Breaks in Google Docs
- Locate the page break that you want to remove.
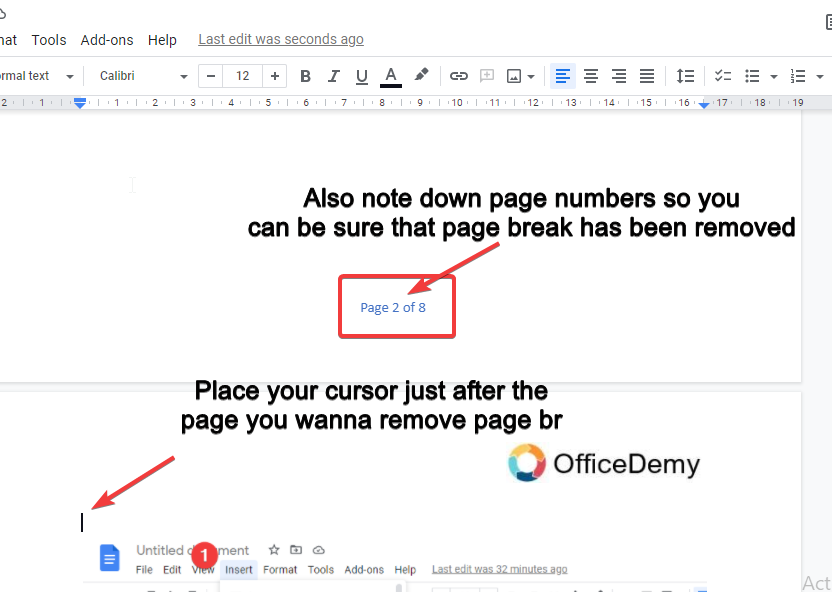
- Click at the beginning of the content.
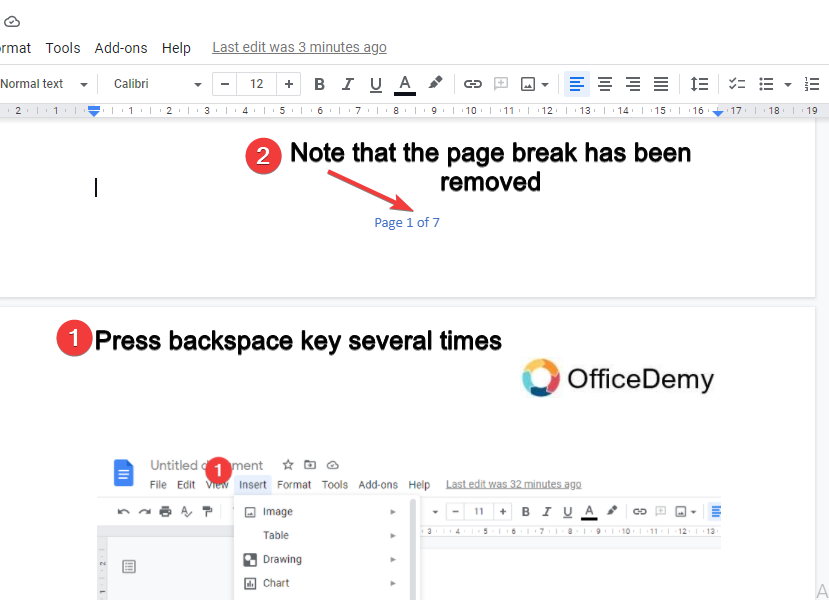
- Press the “Backspace” key on your keyboard several times until the content from the next page moves up, and the page break is removed.
OR
- Identify the page break.
- Place your cursor just before it.
- Click and drag your mouse to select all the white spaces.
- Press the “Backspace” or “Delete” key on your keyboard.
In this article, we will learn about Google docs page breaks and how to remove page breaks or unnecessary gaps between the pages. So let’s see in detail what page breaks are?
What is Page Break in Google Docs?
You must have noted that when starting working on a document in Google Docs. It is all good until you need to use images with proper sizes, orientation, and angles. Images have different sizes, orientations, and margins; therefore, images may tease you sometimes with their position and unwanted sizes. Images also create ugly whitespaces in between because of their unsuited size and aspects.
Documents created in a modern text editor like Microsoft Word or Google Docs may need extra formatting for custom spacing. It can be easily done by hitting enter key as many times as many of the lines you want to remove. But if you have added a page break into your document that you don’t need anymore, then you must be thinking about how to remove or delete a page break in Google Docs.
Some easy solutions are available to remove whitespaces that are unwanted or accidentally created.
The first solution is very straightforward and commonly used is pressing the enter key several times until your cursor removes all the (unwanted) spaces. Similarly, you can select all the whitespaces to delete them at once.
When you work on documents in Google Docs, all the pages new pages use default formatting and margins such as font size, footers, font family, footnotes, sticky logo, page numbers, margins, etc. But, when writing a book, or a story with many sections and chapters, then what will you do? You don’t want to add the same formatting on all the pages, you will use a page break to add custom headers, footer, page numbers, margins, font, etc., for specified pages and sections.
Why do we need Google docs remove page breaks?
Google docs allow you to add and remove page breaks in your document depending on your need and formatting preferences. Adding a page break is quite simple, we have discussed it previously; now removing a page break is even simple. We need to remove page breaks oftentimes when we have accidentally added a page break, or we have shortened our content and now we don’t need any page break. Many times, merging the sections also results in removing page breaks.
- To merge sections or pages
- To remove unnecessary whitespaces
- To provide a clean and professional document look
- To optimize document spaces
How to Remove Page Break in Google Docs
We can remove page break in google docs using two simple methods which are provided below.
Method 1: Multiple Press in Backspace Key
Place Your Cursor at Right Place
Open your Google docs file and place the cursor before the content where you want to remove the page break.
Press Backspace Key Several Times
Press the backspace key from your keyboard several times until the page content is shifted to the previous page. It is quite messy and irritating, isn’t it?
Instead, use a handy trick to remove the page break in Google docs, which is explained in method 2.
Method 2: Single Press in Backspace Key
Select All Whitespaces
Just go to the position above which you want to remove the page break, click on the empty page and select all the whitespaces by dragging your mouse.
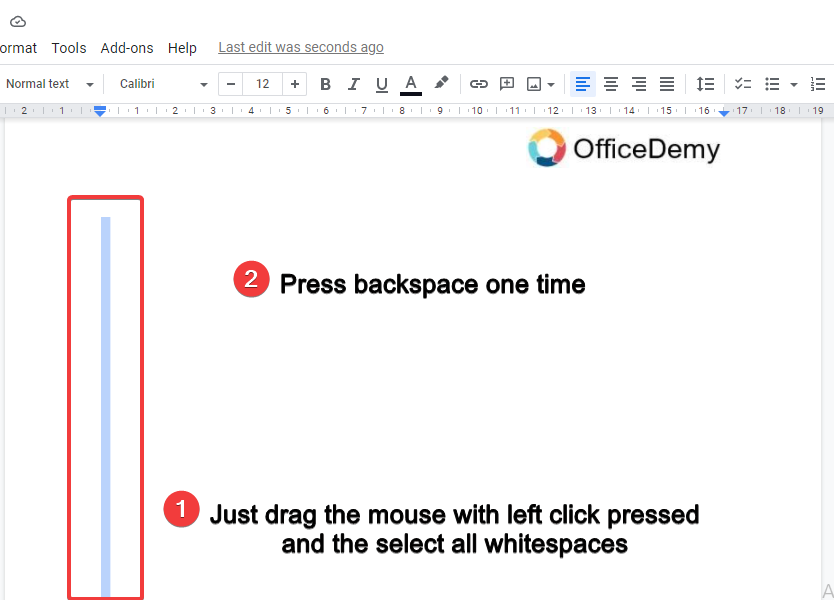
Press Backspace or Delete Key
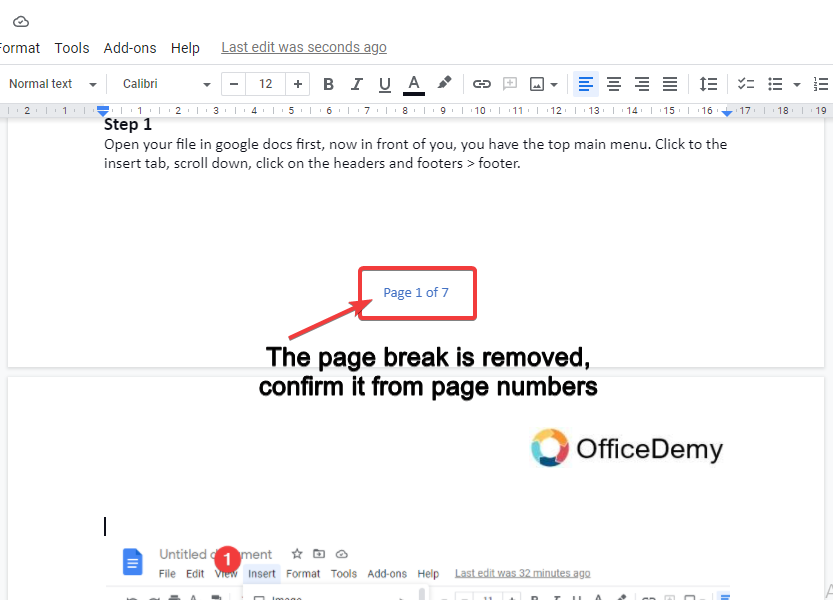
Now press backspace or delete key once and the page will be removed, you can confirm it by noticing your page numbers before and after.
Notes
- You can easily select whitespaces for removing a page break at once, you will see a blue selection box when selecting whitespaces.
- Always use step 3, if you are having problems in step 3 then you can surely go with step 2. Both are for the same function
- Remember that, removing a page break is quite similar to removing normal gaps in the document.
Conclusion
In this particular guide, we learned about Google docs remove page breaks. Page breaks are very easy to remove if you understand its process carefully. You don’t need to go into a specific function to remove page breaks. Remember that, there is no dedicated function or feature in Google docs to remove page breaks. You always need to do it manually but it’s quite simple and easy as you followed in above steps. So, after this quick guide you can answer; what are Google docs page breaks? Why do we need Google docs remove page breaks? And how we can remove page breaks with 2 simple methods. Don’t forget to share your experience in the comments section below, and also do share this valuable information with your friends. Subscribe to Office Demy for more quick guides about Google docs and much more.


