
To Delete Calendar in Outlook
- Go to “Calendar view“.
- Locate the calendar you want to delete.
- Tap and hold.
- Select “Delete Calendar” from the context menu.
- Confirm the deletion.
OR
- Open a web browser and go to the Outlook Web app.
- Access the “Calendar view“.
- Locate the calendar you want to delete under “My Calendars“.
- Right-click and select “Remove” from the context menu.
- Confirm By Clicking “Yes“.
In this article, we will learn how to delete Calendar in Outlook. We all know that; managing your schedules and appointments efficiently is crucial for staying organized and productive.
Outlook, the popular email and productivity application, offers a comprehensive calendar feature that allows users to create and manage multiple calendars. However, there are instances when you may need to delete a calendar, whether due to changes in your plans or a need to declutter your Outlook interface.
In this guide, I will provide you with a step-by-step guide on how to delete calendar in Outlook, ensuring you can streamline your digital workspace and keep your calendars up to date. By following these instructions, you will be able to remove unwanted calendars and focus on the events and tasks that matter most to you. Let’s dive in and discover how you can easily delete calendars in Outlook, saving you time and effort in organizing your schedule.
Why we Delete Calendar in Outlook?
Understanding how to delete a calendar in Outlook can be valuable for various reasons.
Firstly, it allows you to reorganize and streamline your schedule by removing unused calendars, reducing clutter, and focusing on what’s important. Secondly, it helps you adapt to changing plans by deleting calendars associated with canceled or rescheduled events, ensuring that your calendar accurately reflects your commitments.
Additionally, deleting unnecessary calendars prevents confusion, simplifies navigation, and provides a clear overview of your schedule. It also facilitates efficient collaboration by removing shared calendars after projects are completed, keeping your interface organized, and ensuring everyone sees only relevant information.
Overall, learning how to delete calendars in Outlook empowers you to take control of your schedule, maintain an organized workspace, and optimize your productivity.
How to Delete Calendar in Outlook?
So we have very straightforward ways to delete the calendar in the Outlook App version, and also the web version. As our normal practice, we will start with the App method, and then we will see the web version. Let’s get started.
Delete Calendar in Outlook – Desktop App
In this section, we will learn how to delete calendar in Outlook App. Deleting a calendar using this way will permanently delete the calendar from your Outlook account, and it will also delete it from the people’s account you shared your calendar with. So make sure you know these details before you attempt to delete your calendar.
Step 1
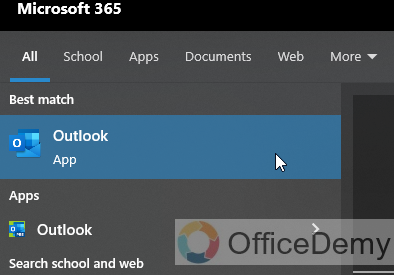
Open the Outlook app on your device.
Step 2
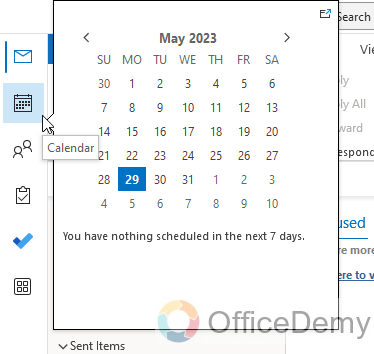
Tap on the Calendar icon at the left side of the screen to access the calendar view.
Step 3
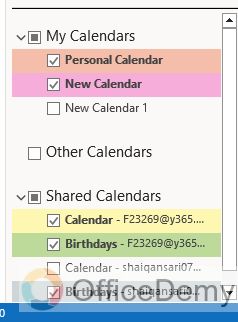
In the calendar view, locate the calendar you want to delete. You may need to swipe left or right to find it if you have multiple calendars, or you can find it in the list view inside the left-hand sidebar.
Step 4
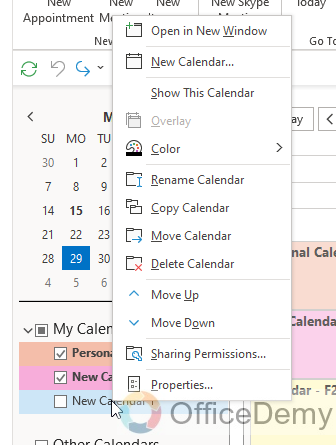
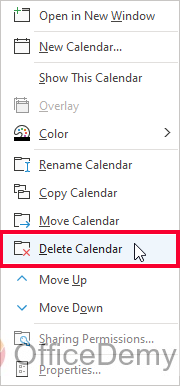
Tap and hold on to the calendar you wish to delete. A context menu should appear.
Step 5
From the context menu, select “Delete Calendar”
Step 6
You will be prompted with a confirmation message asking if you want to delete the calendar. Review the message to ensure you’re deleting the correct calendar, as this action is irreversible.
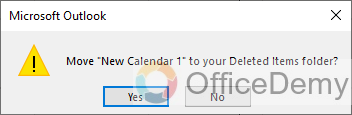
Step 7
Tap “Yes” to confirm the deletion.
Step 8
The calendar will be permanently deleted from your Outlook app, and all associated events and appointments will be removed as well.

This is how to delete calendar in Outlook App very easily.
Now let’s see the web method for the same problem.
Delete Calendar in Outlook – Web Interface
In this section, we will learn how to delete calendar in Outlook Web. So this is another method, but the location of the buttons, and access ways can be different from the App version. also, note that the deletion effect is the same as the App version, which is the deletion of a calendar that will also delete it from people’s accounts who have a share in it. Let’s see the steps
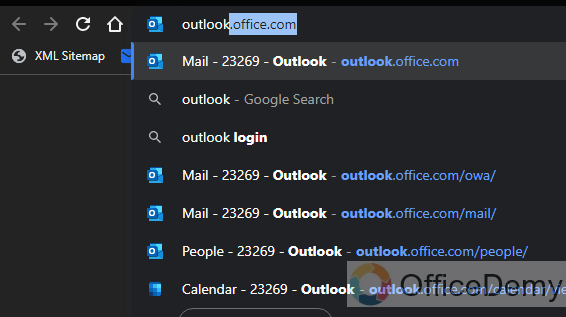
Step 1
Open a web browser and go to the Outlook Web app by navigating to the Outlook website or the Outlook 365 portal
outlook.office.com
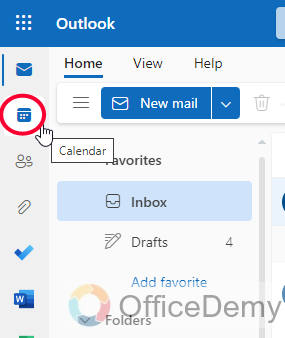
Step 2
Click on the “Calendar” icon at the left side corner of the screen to access the calendar view.
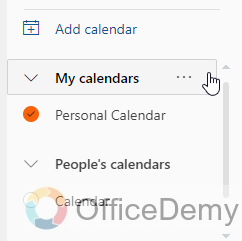
Step 3
On the left side of the screen, you will see a list of calendars under the “My Calendars” section.
Step 4
Locate the calendar you want to delete.
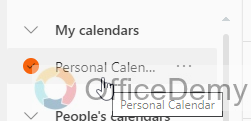
Step 5
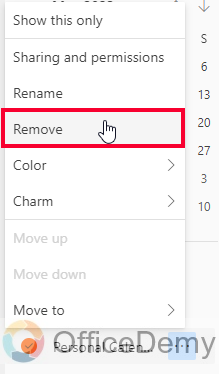
Right-click on the calendar you wish to remove, and a context menu will appear.
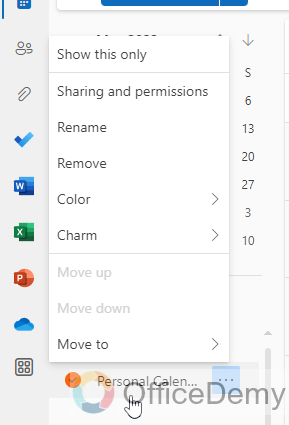
Step 6
From the context menu, select “Remove”
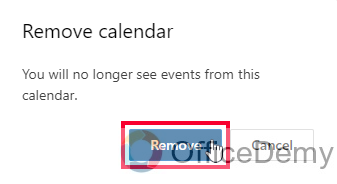
Step 7
A confirmation window will appear asking if you want to permanently delete the calendar. Click “Remove” to confirm the deletion
Step 8
The calendar will be deleted from your Outlook Web account, along with all associated events and appointments.
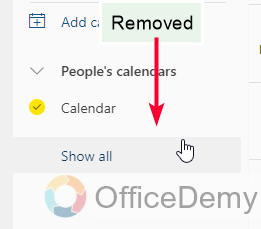
This is how to delete calendar in Outlook Web. I hope this was an easy guide for you.
Things To Remember
- Deleting a calendar in Outlook helps declutter and streamline your schedule.
- Ensure you are deleting the correct calendar as the action is irreversible.
- Deleting a calendar removes all associated events and appointments.
- Removing unnecessary calendars simplifies navigation and reduces confusion.
- Deleting shared calendars after collaboration ends keeps your interface organized.
- The steps may vary slightly depending on the version of Outlook (app or web) you are using.
Frequently Asked Questions
Can I View Someone Else’s Calendar in Outlook if I Need to Delete It?
To delete someone else’s calendar in Outlook, you must first gain access to it. Follow these steps to learn how to access someone else’s calendar: navigate to the calendar section, click on Open Calendar from the toolbar, select From Address Book, search and double-click the desired name, then click OK. Finally, you’ll be able to delete the calendar if necessary.
How to delete a calendar in Outlook if I no longer need it?
Open Outlook, go to the Calendar view, right-click on the calendar you want to delete, select “Delete Calendar,” and confirm the deletion. The calendar will be permanently removed.
Can I Block My Calendar in Outlook Instead of Deleting It?
Yes, you can block your calendar in Outlook instead of deleting it. Simply go to your Outlook calendar, select the desired time slot, and schedule an appointment or mark it as busy. This will effectively block your calendar, preventing others from scheduling meetings or events during that time. Make the most of outlook calendar blocking for better organization and time management.
How to delete a shared calendar in Outlook after a project is completed?
In Outlook, navigate to the Calendar view, find the shared calendar, right-click on it, choose “Delete Calendar,” and confirm the deletion. This removes the shared calendar from your interface.
How to ensure I’m deleting the correct calendar in Outlook?
Take a moment to review the calendar name and its associated events before confirming the deletion. This helps prevent the accidental deletion of the wrong calendar.
How to delete a calendar in Outlook Web?
Sign in to Outlook Web, access the Calendar view, right-click on the calendar you want to delete, select “Remove,” and confirm the deletion. The calendar will be permanently deleted.
Can I recover a deleted calendar in Outlook?
No, the deletion of a calendar in Outlook is irreversible. Ensure you have a backup or export of important events before deleting a calendar.
What happens to the events and appointments in a deleted calendar?
All events and appointments associated with the deleted calendar will be permanently removed. Make sure to move any important events to another calendar before deletion.
Conclusion
Wrapping up how to delete calendar in Outlook. We learned two quick ways to delete calendar in Outlook App and Web. The method is extremely easy and you just need to follow the simple steps. I hope you find this guide helpful and you have learned something new from it. Like if you find our guides helpful. Thanks for reading. Keep learning with Office Demy.


