
To Encrypt Emails in Outlook
- Open Outlook > Click “New Email“.
- Fill in email details (To, Subject, etc.).
- Compose your message.
- Click “Options” above your message.
- Find the encryption button.
- Select an encryption option from the dropdown.
OR
- Open Outlook and click “File“.
- Choose “Options” from the left sidebar.
- Go to “Trust Center” > “Trust Center Settings“.
- Click “Email security“.
- Check “Encrypt contents and attachments for outgoing messages“.
- Click “Save” and restart Outlook.
Hello, and welcome back to another Outlook guide. Today, we will learn how to encrypt Emails in Outlook. we use a lot of the internet in our day-to-day life, and email communication is mostly in business while working at the office or home, in these times, privacy and data security are paramount, and encrypting emails has become crucial to safeguard sensitive information. Whether you are using the Outlook app on your mobile device or accessing it through the web, encrypting your emails adds an extra layer of protection against unauthorized access.
In this article, we will guide you through the process of encrypting emails in Outlook, providing you with step-by-step instructions to ensure that your confidential communications remain secure and confidential.
Importance of Encrypting Emails in Outlook
Understanding the importance of encrypting emails in Outlook is essential in today’s digital landscape. With the increasing prevalence of cyber threats and the potential for sensitive information to fall into the wrong hands, learning how to encrypt emails becomes paramount.
Encryption ensures that your emails are transformed into unreadable code, making it nearly impossible for unauthorized individuals to decipher their contents. By encrypting your emails, you can protect valuable data such as financial information, personal details, trade secrets, or any other confidential communication from being intercepted or accessed by malicious actors.
Additionally, encrypting emails helps maintain compliance with privacy regulations and instills trust among your recipients, demonstrating your commitment to data security and privacy protection.
How to Encrypt Emails in Outlook?
So, we have technically three ways to encrypt emails in Outlook. We have two methods that can be used within the Outlook desktop app, and the last one is for the Outlook web interface. The two App methods have big differences, one is to add an encryption check to the current message you are sending, and the other is setting the emails to be encrypted every time. So, we will learn all these methods in today’s guide.
Encrypt Emails in Outlook – A Single Email
In this section, we will learn how to encrypt emails in Outlook, and we will see how to encrypt a single email message at the time of composing it. This method is very simple and most used to quickly encrypt a single message, and it does not affect other messages or emails.
Step 1
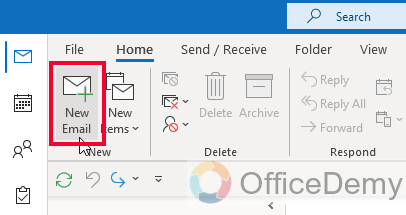
Open the Outlook desktop app on your computer.
Step 2
Click on the “New Email” button on the top left corner of the screen.
Step 3
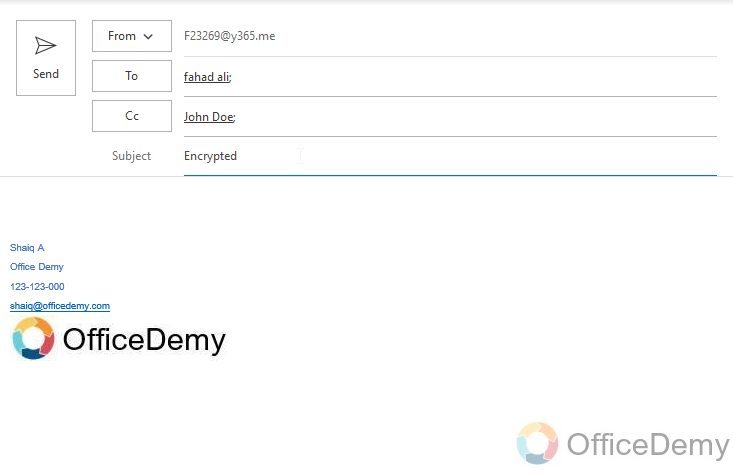
Fill out all the details of the message such as “To” “Subject”, “CC” etc.
Step 4
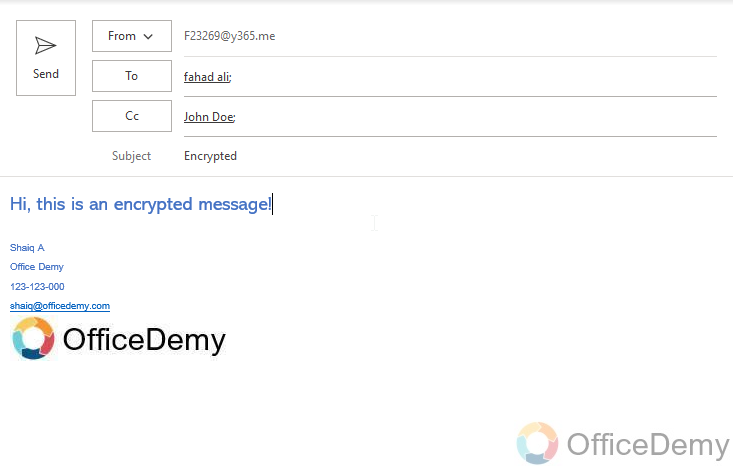
Type your message in the body section and complete your message to make it ready to send.
Step 5
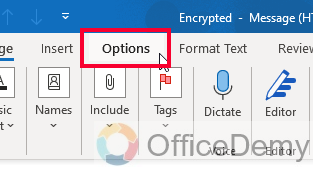
Now when you are done with your email message, click on the Options tab above your message
Step 6
Here, you can see an encryption button
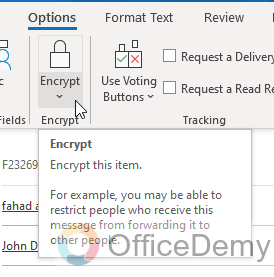
Step 7
Click on the drop-down button associated with the Encryption button, and choose an item from the list, both options are kind of encrypted messages, choose what best fits your requirement.
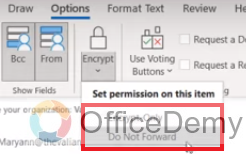
Now as you select any of the options, it has been applied to your message, now you can send this email, and it will be sent as an encrypted email.
This is how to encrypt emails in Outlook for specific emails at the time of composing them.
Encrypt Emails in Outlook – Turn on Encryption for All Emails
Now, in this section, we will learn how to encrypt emails in Outlook using the encryption settings in the Outlook app. Let’s see how this method works.
Step 1
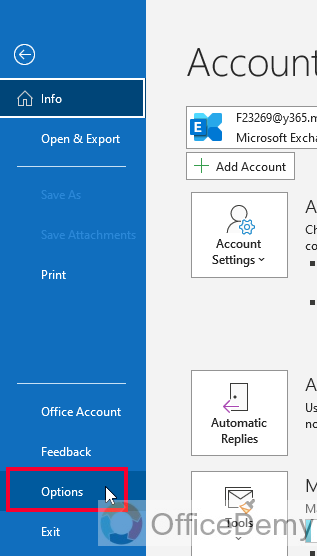
Open Outlook App and click on the “File” tab

Step 2
Click on the “Options” button on the left sidebar.
Step 3
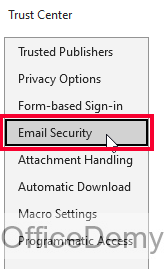
Now select the “Trust Center” tab from the left sidebar

Step 4
Now click on the “Trust Center Settings” in the “Trust Center” section

Step 5
In the new pop-up window, click on the “Email security” tab on the left sidebar.
Step 6
In the top “Encrypted Email” section, check on the first checkbox “Encrypt contents and attachments for outgoing messages”
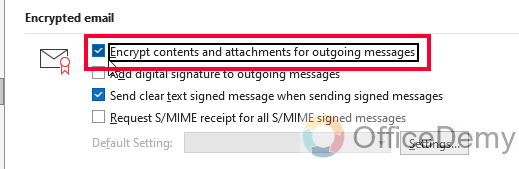
Step 7
Click on the “Save” button below this screen and close all the pop-up windows.

To reflect the changes made, restart your Outlook app and now all your outgoing messages will be encrypted from its contents and attachments.
So, this was another quick method to encrypt emails in Outlook using the Outlook Desktop App.
Now let’s move to the last section of this article, which is how to encrypt emails in Outlook web interface.
Encrypt Emails in Outlook Web Interface
In this section, we will learn how to encrypt emails in Outlook web interface. This is also a very quick and straightforward method that can be quickly used at the time of composing a new email to any recipient.
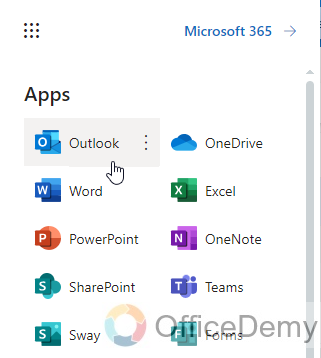
Step 1
Go to Microsoft 365 and choose Outlook from Apps.
Step 2
Now, at the Outlook home screen, click on the “New Email” button

Step 3
Start writing content for your new message such as “To“, “CC“, “Subject“, etc.
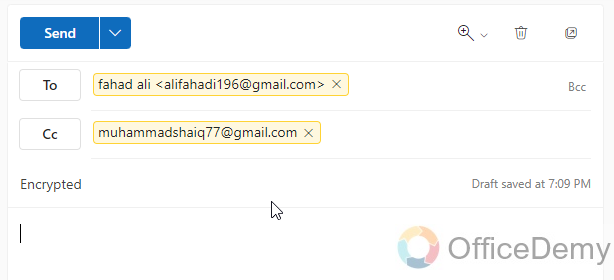
Step 4
When you are done, now look for three dots in the right corner for getting further messaging options.
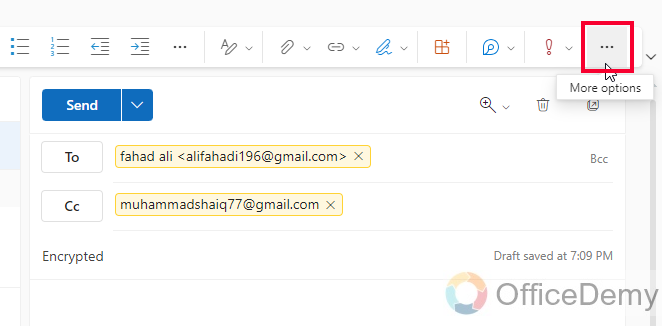
Step 5
Here you will find a button “More Options”, click on it.
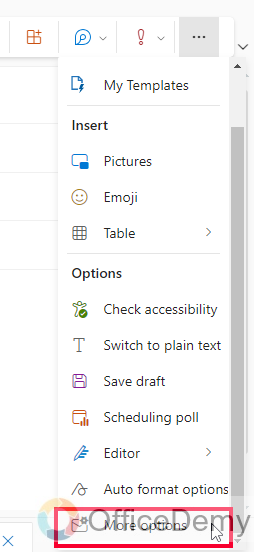
Step 6
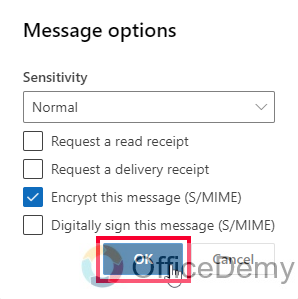
You have several checkboxes, here, check on “Encrypt this message S/MIME”

Step 7
Click on the “Ok” button, and now your message has been encrypted, and you can send it directly with S/MIME encryption.
Things To Remember
- IRM configuration and setup are required to use Encryption in Outlook.
- Encrypting emails in Outlook adds an extra layer of protection to prevent unauthorized access to sensitive information.
- Encryption transforms emails into unreadable code, making it difficult for hackers to decipher the contents.
- Encrypting emails helps comply with privacy regulations and demonstrates a commitment to data security.
- Encryption is essential for safeguarding financial information, personal details, and trade secrets.
- Encrypted emails maintain confidentiality and instill trust among recipients.
- Learning how to encrypt emails in Outlook is crucial in today’s digital landscape to mitigate the risks of cyber threats.
- Encryption protects against interception and unauthorized access to confidential communications.
- Following step-by-step instructions is key to ensuring successful email encryption in Outlook.
- Regularly updating Outlook and implementing strong passwords further enhances email security.
- Educating yourself and your team on email encryption best practices is essential for maintaining a secure digital environment.
Frequently Asked Questions
How to enable email encryption in Outlook?
To enable email encryption in Outlook, go to the “File” tab, select “Options,” then choose “Trust Center” and click on “Trust Center Settings” In the Trust Center window, select “Email Security” and check the box for “Encrypt contents and attachments for outgoing messages.” Click “OK” to save the changes.
How to set up encryption for outgoing emails in Outlook?
To set up encryption for outgoing emails in Outlook, you need a digital certificate. Go to the “File” tab, select “Options,” then choose “Trust Center” and click on “Trust Center Settings” In the Trust Center window, select “Email Security” and click on “Settings” under “Encrypted email” Choose a digital certificate provider and follow their instructions to obtain a certificate. Once you have the certificate, select it in the “Security Settings Name” dropdown menu and click “OK.”
Is It Difficult to Open Encrypted Mail in Outlook?
When it comes to using Outlook, opening encrypted emails can pose a challenge. Users often wonder whether it is difficult to open encrypted email, as the security measures in place can complicate the process. However, with the right knowledge and tools, users can easily navigate through the encryption and access their important messages in Outlook.
How to decrypt encrypted emails in Outlook?
When you receive an encrypted email in Outlook, it will have an attachment with a .p7m or .p7s extension. Double-click the attachment, and Outlook will prompt you to enter your private key password or passphrase. Once you provide the correct password, Outlook will decrypt the email and display its contents.
Conclusion
This was all about how to encrypt emails in Outlook. I hope you find this guide helpful. Thanks for reading. Keep learning with Office Demy.


